# Kick Docs for Business Owners

Kick is self-driving bookkeeping software. Here's everything you need to manage your business finances in one place.

Kick keeps your books up to date automatically, so you always know where your business stands, without spending time on bookkeeping.

### Frequently accessed

<table data-view="cards"><thead><tr><th></th><th></th><th></th><th data-hidden data-card-target data-type="content-ref"></th></tr></thead><tbody><tr><td><i class="fa-rocket-launch">:rocket-launch:</i></td><td><strong>Setup Guide</strong></td><td>Get your workspace connected and running in a few steps</td><td><a href="/pages/vq2H2uU4Q4JSOEmzifcT">/pages/vq2H2uU4Q4JSOEmzifcT</a></td></tr><tr><td><i class="fa-calendar-check">:calendar-check:</i></td><td><strong>Monthly Review Guide</strong></td><td>A quick routine to keep your books clean every month</td><td><a href="/pages/fqeWoOru1p5hqCI3NMTU">/pages/fqeWoOru1p5hqCI3NMTU</a></td></tr><tr><td><i class="fa-file-invoice-dollar">:file-invoice-dollar:</i></td><td><strong>Tax Prep Guide</strong></td><td>Get your books ready for your accountant before tax season</td><td><a href="/pages/WgWUntrS6jzPgrweHyra">/pages/WgWUntrS6jzPgrweHyra</a></td></tr><tr><td><i class="fa-plug">:plug:</i></td><td><strong>Integrations</strong></td><td>Connect your banks, payroll, payments, and other tools</td><td><a href="/pages/Wh0bw1NX6nathNBiPbqe">/pages/Wh0bw1NX6nathNBiPbqe</a></td></tr><tr><td><i class="fa-chart-line">:chart-line:</i></td><td><strong>Insights</strong></td><td>See your cash flow and financial health at a glance</td><td><a href="/pages/vAWNzEgAqRWgn1My1BCi">/pages/vAWNzEgAqRWgn1My1BCi</a></td></tr><tr><td><i class="fa-circle-question">:circle-question:</i></td><td><strong>FAQs</strong></td><td>Answers to the most common questions from business owners</td><td><a href="/pages/OXQZuNlum637KhVAQKJO">/pages/OXQZuNlum637KhVAQKJO</a></td></tr><tr><td><i class="fa-gift">:gift:</i></td><td><strong>Refer &#x26; Earn</strong></td><td>Share Kick with other business owners and earn rewards</td><td><a href="/pages/xW8AqHjFvm8BKmTLTKth">/pages/xW8AqHjFvm8BKmTLTKth</a></td></tr></tbody></table>

Interested in Kick but have questions before signing up? [Schedule a personalized demo](https://calendly.com/d/cv28-cyy-56c/kick-introduction-call) with our team.


# Setup Guide

Get your Kick workspace fully set up and your books running in a few steps.

Use this guide to get from zero to fully running - accounts connected, transactions flowing, and your team in place.

***

## Step 1: Set up your workspace

Create your account at [use.kick.co/register](https://use.kick.co/register). During registration, you'll create your workspace and add your first business entity.

If you own more than one business, add each as a separate entity - this keeps your books, reports, and tax packages separate.

→ [Set Up Your Workspace](/setting-up/set-up-your-workspace)

***

## Step 2: Connect your accounts

Connect every bank account, credit card, and financial tool your business uses. The more complete your connections, the more accurate your books will be automatically.

* Connect your [**business bank accounts and credit cards**](/setting-up/connect-your-accounts-and-integrations) via Plaid - covers 12,000+ institutions
* Connect [**Stripe or PayPal**](/integrations/payment-processors) if you accept payments through them
* Connect [**Ramp**](/integrations/ramp) or [**Mercury**](/integrations/mercury) if you use them
* Connect [**Gusto**](/integrations/gusto) if you run payroll
* Connect [**BILL**](/integrations/bill.com) if you manage bills, invoices, and accounts payable
* Connect [**personal accounts**](/common-workflows/personal-to-business) if you ever pay for business expenses personally

If your financial institution isn't supported by Plaid, or you don't have online access to an account, you can upload bank statements or CSVs manually using [Import Transactions](/setting-up/universal-importer).

**Use AI to work with your books in natural language**\
Kick supports MCP (Model Context Protocol), which lets you connect AI assistants like Claude or ChatGPT directly to your workspace. Once connected, you can ask questions, run reports, and manage transactions using plain language - without opening Kick. If you or your accountant work with AI tools, this is worth setting up early.

→ [MCP & CLI](https://docs.kick.co/ai-and-automation)

***

## Step 3: Enter opening balances

If you're starting Kick mid-year or migrating from another platform, import your opening balances so your Balance Sheet starts from the right place.

→ [Opening Balances](/setting-up/opening-balances)

***

## Step 4: Invite your accountant or team

Add your accountant, bookkeeper, or business partners to your workspace. Assign them the right role based on what they need to access.

→ [Invite Your Team](/setting-up/invite-your-team)\
→ [Roles & Permissions](/reference/roles-and-permissions)

***

## Step 5: Review your transactions

Once your accounts are connected, Kick starts categorizing automatically. Spend 10-15 minutes reviewing the first batch and correcting anything that's wrong.

When you update a category, Kick notices. It will prompt you to apply the same change to similar transactions - past and future. Confirming this teaches the model how to handle that transaction going forward, so you won't have to correct it again. The more you engage with your transactions early on, the more accurate Kick becomes for your specific business.

Also confirm that transfers between accounts are matched correctly - money moving between your bank and credit card, or from a payment processor to your bank, should show as transfers, not income or expenses.

→ [Categorization](/common-workflows/categorization)\
→ [Transfers](/common-workflows/transfers)

***

## Step 6: Set up receipt capture

Get in the habit of attaching receipts to transactions as they come in - not at year-end. Kick lets you attach receipts directly from the transaction detail, forward email receipts to a dedicated inbox, or photograph them from your phone.

For meals, travel, and purchases over $75, a receipt attached to the transaction is what makes the deduction defensible if it's ever questioned.

→ [Receipts](/setting-up/receipts)

***

## Step 7: Set up Rules for edge cases

Kick's model learns from your behavior over time, but there are situations it can't infer on its own - custom categories you've created, specific vendors that should always map to a particular account, or transactions that need to be split across entities. Rules handle these cases.

After your first review, create Rules for anything that:

* Belongs in a custom category Kick wouldn't know about
* Should always be assigned to a specific entity
* Needs to be split the same way every time it appears
* Involves a vendor or description that's ambiguous without context you have

Rules run automatically every time a matching transaction syncs - so you set them once and they work in the background indefinitely.

→ [Rules](/common-workflows/rules)

***

## Setup checklist

* [ ] Create workspace and add entities
* [ ] Connect all business bank accounts and credit cards
* [ ] Connect direct integrations (Stripe, PayPal, Ramp, Mercury, Gusto, BILL)
* [ ] Connect personal accounts
* [ ] Import opening balances (if applicable)
* [ ] Invite your accountant or team
* [ ] Review first batch of transactions and correct categories - Kick learns from your changes
* [ ] Set up receipt capture - email forwarding, text a photo from your phone, or manual upload
* [ ] Set up Rules for edge cases, custom categories, and anything the model can't infer on its own
* [ ] Connect MCP if you use Claude, ChatGPT, or other AI tools


# Monthly Review Guide

A 15-minute monthly habit that keeps your books accurate and your financial picture clear all year.

Kick runs in the background automatically - but a quick monthly check-in keeps everything accurate, prevents small issues from compounding, and means there are no surprises at tax time. Done consistently, this takes about 15 minutes.

The goal isn't to do your accountant's job. It's to stay informed about your own business and make sure Kick has everything it needs to keep your books clean.

***

## Build the habit: do this once a month

### 1. Clear uncategorized transactions

Kick [categorizes](/common-workflows/categorization) \~97% of transactions automatically. The ones it leaves uncategorized are where your attention is needed most.

1. Go to **Transactions** → **Add filter** → **Status: Uncategorized**
2. Work through the list - assign a category to each one
3. When Kick prompts you to apply the same change to similar transactions, say yes - this trains Kick and prevents the same transaction from coming back uncategorized next month

**Speed tip:** If you see the same merchant appearing uncategorized repeatedly, create a [Rule](/common-workflows/rules). You'll never have to categorize it manually again.

→ [Rules](/common-workflows/rules)

***

### 2. Check for unmatched transfers

Unmatched [transfers](/common-workflows/transfers) are one of the most common sources of inflated income or phantom expenses. A Stripe payout that isn't matched to the bank deposit looks like double revenue. A credit card payment that isn't matched looks like two expenses.

1. Go to **Transactions** → filter by **Category: Transfer**
2. Look for any transactions without a matched counterpart (the Match column will be empty)
3. Match them manually, or create a Transfer Rule so it happens automatically going forward

→ [Transfers](/common-workflows/transfers)

***

### 3. Move personal business expenses across

If you connected personal accounts, this is the moment to review them.

1. Go to **Transactions** → filter by **Entity: Personal**
2. Move any business expenses to the right entity and assign the correct category

Don't leave this until the end of the year - catching expenses monthly means nothing gets missed, and your P\&L reflects reality in real time.

→ [Personal to Business](/common-workflows/personal-to-business)

***

### 4. Check your Profit & Loss

Open the [P\&L](/reports/profit-and-loss) for the month and do a quick sanity check:

* Does income look right for what you billed or sold this month?
* Are there any expense categories running higher than expected?
* Are there any line items you don't recognize?

You don't need to analyze everything. Look for anything that seems off and dig into it. Click any line to see the individual transactions behind the number.

→ [Profit & Loss](/reports/profit-and-loss)

***

### 5. Respond to open tasks

Check [Tasks](/working-with-your-team/tasks) for anything your accountant has sent you. Unanswered questions slow down their close process - a quick response now saves back-and-forth later.

→ [Tasks](/working-with-your-team/tasks)

***

### 6. Ask what the numbers mean

Once your books are clean, step back from the checklist. This is where the monthly review pays off: accurate books and a clearer picture of how your business is actually doing.

**Are you profitable this month?**\
Check net income on the P\&L. If it's lower than expected, expand the expense categories to find what's running high.

**Where is your cash actually going?**\
Open [Insights](/reports/insights) and look at Cash Out by category. [Expenses by Vendor](/reports/expenses-by-vendor) shows which vendors you're paying the most - useful for spotting subscriptions or recurring costs worth renegotiating.

**Is cash in the bank tracking with your P\&L?**\
A healthy P\&L with a shrinking bank balance usually means money is tied up in receivables, loan payments, or owner distributions. The [Balance Sheet](/reports/balance-sheet) and Insights help explain the gap.

**Are you growing compared to last month?**\
On the P\&L, use the Compare dropdown to add a previous period column - a quick side-by-side shows whether income is up and whether expenses grew proportionally.

→ [Insights](/reports/insights)\
→ [Profit & Loss](/reports/profit-and-loss)\
→ [Expenses by Vendor](/reports/expenses-by-vendor)

***

## Make it faster over time

The first month takes the longest. As you build [Rules](/common-workflows/rules) for recurring transactions and Kick learns your patterns, uncategorized transactions drop. Most business owners find the monthly review gets meaningfully shorter after the first 2-3 months.

**The fastest path to a 15-minute review:**

* Create Rules for every recurring vendor that keeps coming up uncategorized
* Set up a Transfer Rule for any payment processor payout that repeats on a schedule
* Connect [personal accounts](/common-workflows/personal-to-business) and review them weekly rather than letting them pile up

***

## Monthly review checklist

* [ ] Clear all uncategorized transactions
* [ ] Confirm transfers are matched
* [ ] Review personal transactions and move business expenses
* [ ] Review Profit & Loss for the month
* [ ] Respond to open tasks from your accountant
* [ ] Review key numbers - profitability, cash position, month-over-month growth


# Tax Prep Guide

How to get your books to a state your accountant can actually work with - and what a clean handoff looks like.

Tax prep is more than generating a report and sending it over. The quality of what your accountant receives determines how much time they spend on questions versus actually filing - and whether anything gets missed.

This guide is about accuracy and handoff. If you've been doing monthly reviews, most of this will be fast. If you haven't, this is the catch-up process.

***

## What your accountant actually needs

Before you generate anything, understand what a complete set of books looks like from your accountant's perspective:

* Every transaction for the year is [categorized](/common-workflows/categorization) - nothing left uncategorized
* All [transfers](/common-workflows/transfers) are matched - no phantom income or duplicate expenses
* Personal business expenses have been moved into the right entities
* Bank accounts [reconcile](/common-workflows/reconciliation) to statements - the numbers in Kick match the numbers the bank reported
* Any [journal entries](/common-workflows/journal-entries) from your accountant are finalized and locked

When these are true, your [P\&L](/reports/profit-and-loss), [Balance Sheet](/reports/balance-sheet), and General Ledger are reliable. That's what makes tax prep fast.

***

## Step 1: Confirm all accounts synced through year-end

Before reviewing anything, check that every account has been syncing.

Go to the **Accounts** tab and look for any disconnection warnings or gaps. If an account shows an error, fix the connection and let Kick backfill the missed transactions. If a bank isn't supported by Plaid, import the missing months via Import Transactions.

A gap in your bank data means a gap in your books - undetected until your accountant compares the numbers to your actual bank statements.

→ [Manage Integrations](/integrations/manage-integrations)\
→ [Import Transactions](/setting-up/universal-importer)

***

## Step 2: Clear every uncategorized transaction for the year

Filter the Transactions tab: **date range → full tax year**, **Status → Uncategorized**. Work through everything that's left.

If a transaction is genuinely unclear - you don't know what it was for - add a memo with your best recollection and flag it for your accountant via a [Task](/working-with-your-team/tasks). Don't leave it uncategorized and hope they figure it out. Uncategorized transactions don't appear on your P\&L, which means your reports are incomplete until they're resolved.

***

## Step 3: Catch up on personal transactions

Go through the Personal entity for the **entire tax year**, not only recent months. Business expenses paid with personal cards that weren't moved across are missing deductions - sometimes significant ones.

Filter by **Entity: Personal**, sort by date oldest to newest, and work through the full year systematically.

→ [Personal to Business](/common-workflows/personal-to-business)

***

## Step 4: Audit your Profit & Loss

Run the P\&L for the full tax year and read it critically: not only as a number to report, but as a document that needs to make sense.

**Things to look for:**

* **Income looks right** - does the total match what you know you earned? If you accept payments through Stripe or PayPal, cross-check against your processor's annual summary.
* **No major categories are missing** - if you paid for health insurance, software, or a vehicle all year and those categories don't show up, something didn't get categorized correctly.
* **Large one-off items are explainable** - if there's a big unusual expense or income line, make a note of it. Your accountant will ask, and having the answer ready saves time.
* **Nothing looks obviously wrong** - an expense category that's 10x higher than last year is worth investigating before your accountant flags it.

→ [Profit & Loss](/reports/profit-and-loss)

***

## Step 5: Resolve open tasks from your accountant

If your accountant has sent you questions through Tasks, these need to be answered before they can close your books. Outstanding tasks typically mean there are transactions still in question - and those questions will affect your reports.

Check Tasks, answer everything, and confirm with your accountant that they have what they need.

***

## Step 6: Know when to bring in a partner

If any of these apply to your situation, consider working with a bookkeeping partner before generating your Tax Package:

* **You have payroll history** - each tax year requires a payroll reconciliation via journal entry. This is specialized work most business owners prefer to hand off.
* **You have loans** - each loan payment needs to be [split](/common-workflows/splits) between principal and interest. Multiple years of loan history is time-consuming to do correctly.
* **You need data older than 2 years** - Plaid retrieves up to 2 years of transaction history. Older data from closed accounts needs to be manually imported and reviewed.

Kick can connect you with a vetted bookkeeping partner who can take over the catch-up work.

→ [Partner Program](/referrals-and-partnerships/partner-program)

***

## Step 7: Check your receipts and documents

Before generating the Tax Package, do a quick pass on documentation. Your accountant will need supporting records for any deduction that might be questioned.

Make sure:

* Meals, travel, and large purchases have [receipts](/setting-up/receipts) attached to the transaction
* Loan agreements and payroll records are uploaded to [Documents](/common-workflows/documents)
* Year-end statements from Stripe, PayPal, or other processors are on file
* Any 1099s you've received are stored and accessible in your workspace

If your accountant has flagged transactions that need documentation, address those first.

→ [Receipts](/setting-up/receipts)\
→ [Documents](/common-workflows/documents)

***

## Step 8: Download the Tax Package

Once your books are clean and your accountant has confirmed they're ready, generate the Tax Package.

Go to **Accounting → Year-End Tax Package**, select the tax year, and download.

Use the **Cover Page** to add notes for your tax preparer - anything unusual, questions you have, or context about specific line items. This is better than a separate email and ensures nothing gets lost.

→ [Tax Package](/reports/tax-package)

***

## Tax prep checklist

* [ ] All accounts confirmed connected and synced through year-end
* [ ] All uncategorized transactions cleared for the full year
* [ ] Personal entity reviewed for the full year, business expenses moved
* [ ] P\&L reviewed and makes sense - no missing categories, no unexplained anomalies
* [ ] All open tasks from accountant answered
* [ ] Payroll, loan, and historical data handled (if applicable)
* [ ] Receipts attached for meals, travel, and large purchases
* [ ] Loan agreements, processor statements, and 1099s uploaded to Documents
* [ ] Tax Package downloaded with cover page notes completed


# Set Up Your Workspace

Create your Kick account and get your business workspace ready.

### Create your account

Go to [use.kick.co/register](https://use.kick.co/register) to sign up. During registration you'll create your workspace and add your first business entity.

***

### Add your business entity

An entity represents a single business. When you register, Kick creates your first entity automatically. You'll be asked for:

* **Business name**
* **Entity type:** LLC, S-Corp, Sole Proprietor, etc.
* **Bookkeeping start date:** the date Kick will start pulling in transactions from

If you own more than one business, you can add additional entities at any time.

→ [Multi-Entity](/setting-up/multi-entity)

***

### What's next

Once your workspace is created:

1. [Connect your accounts and integrations](/setting-up/connect-your-accounts-and-integrations): link your bank accounts, credit cards, and financial tools
2. [Invite your team](/setting-up/invite-your-team): add your accountant, bookkeeper, or business partners
3. Review your [transactions](/common-workflows/transactions): Kick will start [categorizing](/common-workflows/categorization) automatically once accounts are connected

Review our [Setup guide](/best-practice-guides/setup-guide) for best practice from Kick.


# Multi-Entity

Manage multiple businesses from one Kick workspace.

If you own more than one business, or have a holding company structure, Kick lets you manage all your entities from a single workspace. Each entity has its own books, reports, and transaction history.

Multi-entity requires a **Plus** plan or above. On Plus, an additional entity costs nothing until it reaches 250 transactions. Once it passes that mark it stays billed at $50/month for unlimited transactions, and the count doesn't reset at the start of a new year. If you're on an older Plus plan, your workspace is capped at 5 entities until you move to current pricing.

***

### How entities work

Each entity in your workspace operates independently with its own:

* Financial statements ([P\&L](/reports/profit-and-loss), [Balance Sheet](/reports/balance-sheet), etc.)
* Connected accounts and integrations
* Documents and [tasks](/working-with-your-team/tasks)
* Transaction history

You can view transactions across all entities in a single feed, or filter to a specific entity at any time.

***

### Add an entity

1. Go to the **Accounts** tab
2. Click **Add entity**
3. Enter the business name, entity type, country, industry, and annual revenue
4. Complete the flow to create the entity

Step 2 opens a guided setup flow. You can also open **⌘K** (or **Ctrl+K** on Windows) and choose **Add entity**.

Once created, connect the entity's accounts the same way you connected your first business.

→ [Connect Your Accounts & Integrations](/setting-up/connect-your-accounts-and-integrations)

***

### Moving expenses between entities

If a transaction lands in the wrong entity, you can fix it from the [Transactions](/common-workflows/transactions) tab: select the transaction and use **Move to entity**. Kick automatically generates the intercompany [journal entries](/common-workflows/journal-entries) on both sides, so your books stay balanced without any manual work.

***

### Splitting shared expenses

For expenses shared across businesses - like rent, software, or insurance - you can split a single transaction across multiple entities by amount or percentage. Kick handles the intercompany entries automatically.

→ [Splits](/common-workflows/splits)

***

### Personal entity

Every workspace includes a **Personal** entity for connecting personal bank accounts and credit cards. Transactions in the Personal entity don't post to your business books - you review them and move any business expenses across manually.

→ [Personal to Business](/common-workflows/personal-to-business)


# Connect Your Accounts

Link your bank accounts, credit cards, and financial tools so Kick can pull in your transactions automatically.

### How connections work

Kick supports three ways to bring financial data in:

* **Plaid:** connects to over 10,000 banks and credit cards. This is the primary method for most accounts.
* **Direct connections**: native [integrations](/integrations/integrations) for tools like Ramp, Mercury, Gusto, Stripe, PayPal, and BILL with richer data syncing, including auto-splits and receipt matching.
* **Universal Importer**: upload PDF bank statements or CSVs for institutions not supported by Plaid, or to backfill historical data.

***

### Connect a bank or credit card

1. Go to the **Accounts** tab
2. Click **Add account**
3. Select your institution from the list, or search for it
4. Complete the login flow to authorize the connection
5. Confirm whether each account is **Personal** or **Business**
6. Click **Continue**

Once connected, Kick begins syncing transactions automatically from your bookkeeping start date.

{% hint style="info" %}
When you connect a bank, all accounts at that institution are imported. Each account can be assigned to a different entity if you have multiple businesses.
{% endhint %}

#### Transaction history

Kick pulls in as much history as your bank provides through Plaid - typically 6 to 24 months depending on the institution. If you need older data, upload historical statements via the [Universal Importer](/setting-up/universal-importer).

***

### Personal accounts

If you sometimes use a personal bank account or credit card for business expenses, connect it as a **Personal** account. Transactions from personal accounts don't post to your books automatically - you review them and move any business expenses across manually.

→ [Personal to Business](/common-workflows/personal-to-business)

***

### Manage connections

To view, reconnect, or remove an account, go to **Accounts** and click on any connected account to see its settings. If a connection breaks (this can happen when a bank requires re-authentication), Kick will flag it and prompt you to reconnect.


# Universal Importer

Upload bank statements or CSVs to bring in transactions when a live bank connection isn't available.

Kick connects to most banks automatically via Plaid - but when a live connection isn't available, you can import transactions manually by uploading bank statements or CSV files. This is also useful for backfilling historical data beyond what Plaid provides.

{% hint style="info" %}
Import Transactions is available on paid plans (Basic and above).
{% endhint %}

***

### How to open Import Transactions

* Press **⌘K** → select **Import Transactions**
* Or from the **Accounts** tab → click ⋯ on any account → **Import transactions**

The importer opens as a full-screen overlay.

***

### Supported file types

* **PDF** bank statements
* **CSV** transaction exports
* **JPG / PNG** (image scans of statements)
* Maximum file size: **20 MB per file**

Excel (.xlsx) and Word files are not supported.

***

### How it works

#### 1. Upload your files

Drag and drop your statement files, or click **Upload statement**. You can upload multiple files at once. Kick processes each file automatically - extraction typically takes a few minutes.

#### 2. Review the account details

Once processed, Kick extracts the bank name, account number, statement period, and opening and closing balances. Review each field and correct anything that looks off. Link the statement to an existing account in Kick, or let Kick create a new one.

#### 3. Review transactions

Click **Review** to open the transaction spreadsheet. Kick extracts each transaction's date, description, and amount. You can edit any row directly. Kick validates that the transactions reconcile to the statement's opening and closing balances - if they don't, it flags the discrepancy for you to resolve.

#### 4. Import

When the statement shows **Ready to import**, click **Import documents**. Transactions flow into the Transactions tab and go through Kick's automatic categorization - the same as any transaction from a live connection.

***

### What happens after import

Imported transactions appear on your [Transactions](/common-workflows/transactions) tab and are [categorized](/common-workflows/categorization) automatically. They're treated the same as transactions from a connected bank - you can edit categories, add memos, attach receipts, and create [rules](/common-workflows/rules).

***

### Import vs. Reconcile

These are different workflows:

<table><thead><tr><th width="133.5277099609375"></th><th>Import Transactions</th><th>Reconcile</th></tr></thead><tbody><tr><td><strong>Purpose</strong></td><td>Bring in missing transactions</td><td>Confirm your books match bank statements - needed only for connected accounts</td></tr><tr><td><strong>File types</strong></td><td>PDF, CSV, image</td><td>PDF only</td></tr><tr><td><strong>When to use</strong></td><td>No live bank connection, or backfilling history</td><td>Closing a period for any connected account</td></tr></tbody></table>

→ [Reconciliation](/common-workflows/reconciliation)

***

### Troubleshooting

<details>

<summary><strong>Password-protected PDF</strong></summary>

Remove the password before uploading.

</details>

<details>

<summary><strong>Transactions don't match statement balance</strong></summary>

Edit the transaction amounts or the opening and closing balances in the review spreadsheet.

</details>

<details>

<summary><strong>Statement period is locked</strong></summary>

Go to **Settings →** [**Locks**](/working-with-your-team/locks) and unlock the period first.

</details>

<details>

<summary><strong>File won't upload</strong></summary>

Check that the file is a PDF, CSV, or image and under 20 MB.

</details>

<details>

<summary><strong>Transactions landing in the wrong period</strong></summary>

Check the statement dates and your bookkeeping start date.

</details>


# Receipts

How to attach receipts to transactions in Kick, and why it matters for taxes and audits.

Kick lets you attach receipts directly to transactions so your records are complete and your accountant has everything they need in one place. No separate folder, no chasing down PDFs at year-end.

***

### Why receipts matter

For most day-to-day business expenses, a categorized transaction is enough. But for certain purchases - meals, travel, large equipment buys, or anything that might be questioned in an audit - having the actual receipt attached to the transaction is what makes the deduction defensible.

The IRS generally requires documentation for business expenses over $75. Keeping receipts attached in Kick means you're building that paper trail automatically, not scrambling for it later.

***

### How to attach a receipt

You can attach a receipt to any transaction in a few ways:

**From the transaction detail:**

1. Open any transaction by clicking on it
2. Click **Attach receipt** (or the paperclip icon)
3. Upload a photo, PDF, or image file from your device

You can also email or text a receipt to your Kick workspace. To add your email address and/or phone number:

1. Navigate to your workspace.
2. Open **Settings** by clicking the profile icon in the top-right corner, or press **Cmd + K**, type **Receipt**, and press **Enter**.
3. Scroll down to **Receipts**.
4. Click **Add your phone number** and follow the on-screen instructions.
5. Click **Add email** and follow the on-screen instructions.

<figure><img src="/files/dcS56vaV2FJ1cMtNq8NR" alt=""><figcaption></figcaption></figure>

**From your email (forwarding):** Forward any email receipt to your Kick receipts inbox. Kick will automatically match it to the right transaction. Find your unique forwarding address in **Settings → Receipts**.

**From your phone:** Use your mobile to photograph a receipt immediately after a purchase and text to your unique Kick Workspace number.

***

### Receipts and reconciliation

When your accountant [reconciles](/common-workflows/reconciliation) your books, they may flag transactions that are missing documentation. Attaching receipts as you go - rather than in one batch at year-end - keeps that process smooth and fast.

During [tax prep](/best-practice-guides/tax-prep-guide), receipts already attached to transactions mean your accountant can move faster and your records are audit-ready without extra work.

***

### Tips

* **Attach right away** - it takes 10 seconds after a purchase and saves hours at year-end
* **Meals and entertainment** - add a memo with who you met and the business purpose; receipt alone isn't always enough
* **Recurring expenses** - for subscriptions and recurring charges, one receipt on file is typically sufficient unless the amount changes


# Opening Balances

Set starting balances for your accounts so your Balance Sheet and reports are accurate from day one.

If you're starting Kick mid-year, or migrating from another platform like QuickBooks, you need to set opening balances - the starting point for each account in your books as of the day before your bookkeeping begins in Kick.

Without opening balances, your [Balance Sheet](/reports/balance-sheet) and Trial Balance (a listing of all account balances used to verify your books are in balance) won't reflect the true state of your business. Your [Profit & Loss](/reports/profit-and-loss) is available immediately and doesn't require them.

***

### What opening balances do

Opening balances establish where each account stands before Kick starts tracking. They answer the question: *what did my business own and owe before I started using Kick?*

Every opening balance generates a [journal entry](/common-workflows/journal-entries) in the background - crediting or debiting the target account and offsetting to your equity account (typically Retained Earnings or Owner's Capital). You don't need to create these manually.

***

### When you need them

* You're starting Kick mid-year and your Balance Sheet needs to reflect existing cash, loan balances, and equity
* You're migrating from QuickBooks or another accounting platform
* Your Balance Sheet or Trial Balance shows balances that don't match your prior books

***

### How to set opening balances

#### Import from a prior Balance Sheet

If the Balance Sheet importer is available in your account:

1. Export your Balance Sheet from your previous accounting system as of the day **before** your Kick bookkeeping start date
2. Go to **Accounting → Balance Sheet** and click **Import balances**
3. Kick extracts your account balances and maps them to your chart of accounts
4. Review the mapping, confirm the balance sheet is balanced (assets = liabilities + equity), and submit

#### Send us your balances instead

If you don't have a Balance Sheet to import, the same **Import balances** window has an **Or manually submit opening balances** section below the upload area. Click **Submit manually** to open a form where you can send your balances to our team.

#### Set per account during reconciliation

When you reconcile a bank or credit card account for the first time, Kick prompts you to set the opening balance for that account. Click **Set opening balance** on any account, or **Edit** if one is already set, then enter the closing balance from your last statement before your Kick start date and save.

Setting balances this way needs a **Basic** plan or above.

→ [Reconciliation](/common-workflows/reconciliation)

***

### Opening balance date

Opening balances are always set as of the **day before your bookkeeping start date**. For example, if your bookkeeping starts January 1, 2025, your opening balances are dated December 31, 2024.

***

### FAQs

<details>

<summary><strong>Do I need opening balances to use Kick?</strong></summary>

Not immediately - your Profit & Loss is available right away. But your Balance Sheet and Trial Balance won't be accurate until opening balances are set. If you only need P\&L tracking, you can skip them for now.

</details>

<details>

<summary><strong>What if I'm starting a brand new business with no prior history?</strong></summary>

If your business is new and started fresh with Kick from day one, you may not need opening balances - or you may only need to enter your starting bank balance. Contact support if you're unsure.

</details>

<details>

<summary><strong>Can I edit opening balances later?</strong></summary>

Yes. Go to **Accounting → Chart of Accounts**, find the account, and click **Remove opening balance** or edit it. Changes require Admin permissions.

</details>


# Chart of Accounts

The list of accounts that organizes everything in your books - you or your accountant can manage it.

The Chart of Accounts (CoA) is the backbone of your books. It's a structured list of every account used to record transactions - income, expenses, assets, liabilities, and equity. Every transaction you categorize in Kick flows into one of these accounts.

***

### Do you need to manage this?

For most business owners, the answer is no. Kick sets up a standard Chart of Accounts when you create your workspace, and you or your accountant can adjust it from there: adding, renaming, or restructuring accounts as needed for your specific business.

You'll interact with the CoA indirectly every time you categorize a transaction (you're assigning it to an account), but you don't need to understand the full structure to use Kick effectively.

***

### Where to find it

Go to **Accounting** -> **Chart of Accounts** to see the full list of accounts in your workspace, organized by type:

* **Assets** - what your business owns (bank accounts, equipment, receivables)
* **Liabilities** - what your business owes (loans, credit cards, payroll liabilities)
* **Equity** - the owner's stake in the business
* **Income** - revenue from your business activities
* **Expenses** - costs of running your business

***

### When you or your accountant adjusts the CoA

You or your accountant may add or rename accounts to better reflect your business - for example, creating separate accounts for different loan types, or splitting a broad expense category into more specific ones. These changes flow through automatically to your reports.

If you see a category in your transactions that you don't recognize, it may have been added during setup or by your accountant. You can always ask through [Tasks](/working-with-your-team/tasks).

{% hint style="info" %}
When you create a custom CoA in your workspace, this account will not map automatically to a Category. This requires additional step to set up an [Accounting Rule](/common-workflows/rules) use Categories in [categorization](/common-workflows/categorization).
{% endhint %}

***

### The CoA and your reports

Your [Profit & Loss](/reports/profit-and-loss) and [Balance Sheet](/reports/balance-sheet) are organized by the accounts in your CoA. A well-structured CoA means cleaner, more useful reports - which is why accountants often adjust it when they first access a new workspace.


# Invite Your Team

Add your accountant, bookkeeper, or business partners to your workspace.

You can invite anyone to your Kick workspace - your accountant, bookkeeper, business partner, or office manager. All plans include unlimited members at no extra cost.

***

### Invite someone

1. Go to **Settings** → **Members**
2. Click **Add team**
3. Enter their email address
4. Select their role
5. Choose which entities they should have access to
6. Click **Send invite**

They'll receive an email with a link to access your workspace. If they're already on Kick, they'll sign in with their existing account.

{% embed url="<https://player.mux.com/7x6g7BsOg02029GCXh01tMbXAJKpdylJMV86jAG61FqgHY>" %}

***

### Roles

<table><thead><tr><th width="159.8558349609375">Role</th><th>What they can do</th></tr></thead><tbody><tr><td><strong>Admin</strong></td><td>Full access to every entity. Manages team members, entities, and accounting settings. Billing is handled by the Primary Admin, the person who set up the workspace.</td></tr><tr><td><strong>Member</strong></td><td>Access to assigned entities only. Reviews reports and transactions, uploads documents, connects bank accounts, and creates tasks.</td></tr><tr><td><strong>Accountant</strong></td><td>Access to assigned entities only. Does everything a Member can, plus manages team members and edits the chart of accounts, locks, and accounting settings.</td></tr></tbody></table>

**Admin** gives full control of your workspace, including managing team members, entities, and accounting settings. Admins automatically have access to all current and future entities.

**Member** suits a business partner, office manager, or collaborator who works in the books for specific entities. Members can review reports and transactions, upload documents, connect bank accounts, and create [tasks](/working-with-your-team/tasks), but cannot change accounting settings or manage team members.

**Accountant** suits a bookkeeper or outside accountant. Accountants can do everything a Member can, plus manage team members and edit the chart of accounts, categories, locks, and settings. You can limit their access to specific entities.

***

### Update or remove access

1. Go to **Settings** → **Members**
2. Click the **⋯** menu next to their name
3. Select **Configure permissions** to change their role or entity access, or **Remove from workspace** to revoke access

{% embed url="<https://player.mux.com/u8vC9h3pzPFTydpK29wTyf02KsQSlsM2701QCSrxZxz00s>" %}

***

### FAQs

<details>

<summary><strong>Can I invite multiple people?</strong></summary>

Yes - you can add as many members as you need. All plans include unlimited members.

</details>

<details>

<summary><strong>How do I resend an invite?</strong></summary>

Go to **Settings** → **Members**, find the person with a pending invite, click **⋯** → **Resend invite**.

</details>

<details>

<summary><strong>Can team members see my personal accounts?</strong></summary>

Only if you give them access to the Personal entity when inviting them. You can scope entity access per member.

</details>


# Transactions

View and manage all the financial activity flowing through your connected accounts.

### The Transactions tab

The Transactions tab is where all your financial activity lives. Every transaction from your connected bank accounts, credit cards, and integrations flows in automatically. Kick categorizes them as they sync - once categorized, they post to your reports in real time.

***

### What you'll see

Each transaction shows the date, description, account it came from, amount, and category. You can customize which columns are visible using the **Views** icon (⚙) in the top right.

Use **Add filter** to narrow the list by date, category, account, amount, or other attributes.

***

### Reviewing a transaction

Click any transaction to open the details panel. From here you can:

* **Change the category** - if Kick got it wrong, update it and optionally apply the same change to similar transactions going forward
* **Add a memo** - add a note for your records or for your accountant
* **Attach a receipt** - upload or match a document to the transaction
* **Move to a different entity** - if you have [multiple businesses](/setting-up/multi-entity) and a transaction landed in the wrong one
* **Split the transaction** - if a single charge needs to be divided across multiple categories or entities

→ [Categorization](/common-workflows/categorization)\
→ [Splits](/common-workflows/splits)

***

### Bulk actions

Select multiple transactions by clicking with **Shift** held. When rows are selected, a footer shows **N selected** and **Select all**. Click **Actions** (⌘K) to open a command menu where you can update category, add a memo, move to an entity, or create a [task](/working-with-your-team/tasks) for your accountant to review. Many actions have single-key shortcuts in the menu.

***

### Add a manual transaction

If you need to record something that didn't come through a connected account - like a cash payment - you can add it manually.

1. Click the **(+)** icon in the top right, or press **⌘K**
2. Click **Add transaction**
3. Enter the date, description, amount, and entity
4. Click **Save**

***

### Uncategorized transactions

When Kick's confidence is low on a transaction, it leaves it uncategorized for you to review. Uncategorized transactions are flagged in the tab so they're easy to find. Reviewing them regularly keeps your reports accurate.


# Categorization

Kick automatically categorizes your transactions and learns from your changes

### How it works

When [transactions](/common-workflows/transactions) sync into Kick, the AI categorizes approximately 97% of them on the first pass - things like meals, software subscriptions, payroll, rent, and revenue. Your [Profit & Loss](/reports/profit-and-loss) updates in real time as transactions are categorized.

When Kick's confidence is low, the transaction is left uncategorized for you to review manually.

***

### Correcting a category

If Kick gets a category wrong, click the transaction and update it. Kick will prompt you to apply the same change to similar transactions - both historical and going forward. Confirming this teaches Kick how to handle that type of transaction in the future.

***

### Rules

For transactions that should always be categorized a specific way, create a Rule. Rules override AI categorization and run automatically whenever a matching transaction syncs.

For example:

* Always categorize Amazon transactions as *Supplies & Equipment*
* Always move Apple charges to a specific business entity and categorize as *Computers*

→ [Rules](/common-workflows/rules)

***

### Uncategorized transactions

Uncategorized transactions appear when Kick isn't confident enough to assign a category automatically. Review these regularly - they won't appear on your P\&L until categorized, which means your reports won't be complete until they're cleared.

Filter the Transactions tab by **Category → Uncategorized** to see them all in one place.

***

### Categories vs. General Ledger Accounts

Categories are the plain-language labels you see on your transactions - *Meals & Entertainment*, *Software*, *Payroll*, etc. Each category maps to an account in your chart of accounts, which is what actually drives your financial reports.

For most business owners, you won't need to think about chart of accounts - Kick handles the mapping automatically, but your accountant can adjust the mappings if needed.


# Personal to Business

Capture business expenses that were paid from a personal account.

### The Personal entity

Every Kick workspace includes a **Personal entity** - a dedicated place to connect your personal bank accounts and credit cards. This lets Kick surface personal transactions for review without them ever hitting your business books automatically.

Transactions in the Personal entity don't appear on your [P\&L](/reports/profit-and-loss) or [Balance Sheet](/reports/balance-sheet) until you explicitly move them across. This keeps your business financials clean while making sure no deductible expense gets missed.

***

### Connect a personal account

1. Go to the **Accounts** tab
2. Click **Add account**
3. Connect your personal bank or credit card the same way you'd connect a business account
4. When asked, mark it as **Personal**

***

### Review and move transactions

1. On the **Transactions** tab, filter by entity → **Personal**
2. Review each transaction
3. For anything with a business purpose, select it and move it to the appropriate business entity
4. Assign the correct category

Once moved, the transaction posts to your business books as an expense. The other side is recorded as a contribution from you to the business.

You can move transactions in bulk - select multiple and use the bulk actions toolbar at the bottom of the screen.

***

### What stays in Personal

Any transaction you don't move stays in the Personal entity and never affects your business financials. You can always come back and move it later.

***

### Why this matters

Most small business owners pay for business expenses with personal cards at some point - travel, meals, subscriptions, equipment. Without the Personal entity, those expenses are easy to miss at tax time. Connecting your personal accounts to Kick gives you a systematic way to catch them all.


# Reconciliation

Confirm that your Kick transactions match your official bank statements, period by period.

Reconciliation is the process of comparing your transactions in Kick against your actual bank or credit card statements to confirm everything is accounted for and accurate. It's typically done once a month at close, and can be handled by you or your accountant.

***

### What reconciliation does

Every transaction in Kick comes from a bank feed or an import. Reconciliation verifies that the transactions Kick has on record for an account actually match what the bank has on record - same amounts, same dates, no missing transactions, no duplicates.

When reconciliation is complete for a period, those transactions are marked as reconciled. If your accountant then [locks](/working-with-your-team/locks) the period, the numbers are frozen and protected from accidental changes.

***

### Which accounts can be reconciled

* Checking accounts
* Savings accounts
* Credit cards
* Lines of credit

***

### How reconciliation works in Kick

#### Step 1 - Upload your bank statement

Open **Reconciliation** from the sidebar and select the account to reconcile. Upload the bank statement for the period as a PDF. Kick extracts the statement's opening balance, closing balance, and transaction list automatically.

#### Step 2 - Review matches

Kick pairs each statement line against the transactions already in your Kick account. Most will match automatically. For any differences - a transaction that's in the statement but not in Kick, or in Kick but not the statement - you review and resolve each one.

Common resolutions:

* **Add a missing transaction** - the bank has it but Kick doesn't (often from a disconnected account)
* **Remove a duplicate** - Kick has an extra transaction that doesn't exist on the statement
* **Mark as from a previous period** - a transaction that belongs to an earlier reconciliation

#### Step 3 - Finish

Once Kick's reconciled closing balance matches the statement's closing balance exactly, you can finish the reconciliation. The period is marked as reconciled and a record is saved.

{% embed url="<https://www.loom.com/share/71dab8a900494c3a894ed8f1f544c7e8>" %}

***

### Undo a reconciliation

Only the most recent reconciliation per account can be undone from the Reconciliation page. Older reconciliations cannot be undone.

Period locks can block the undo. If any of the reconciled transactions fall in a locked period, Kick tells you the undo is blocked, lists the affected entities, and offers a **Go to locks** button. Unlock those entities, then try the undo again.

***

### Reconciliation and Import Transactions

If your bank statement has transactions that aren't in Kick - because the account was disconnected or the bank's Plaid history doesn't go back far enough - use Import Transactions first to bring them in, then reconcile.

→ [Import Transactions](/setting-up/universal-importer)

***

### FAQs

<details>

<summary><strong>Do I need to reconcile every month?</strong></summary>

It's best practice. Monthly reconciliation catches missing or duplicate transactions quickly, before they compound across periods. Your accountant will typically drive this as part of closing a period.

</details>

<details>

<summary><strong>What if the closing balance doesn't match?</strong></summary>

It means there's a difference between what the bank recorded and what Kick has. Common causes: a missing transaction, a duplicate, an incorrect amount, or a transaction dated in the wrong period. Work through the unmatched items to find and resolve the discrepancy.

</details>

<details>

<summary><strong>Can I reconcile if my account has a connection error?</strong></summary>

No - fix the connection first, then reconcile. Go to the Accounts tab and click **Fix connection** on the affected account.

</details>


# Journal Entries

Understand what journal entries are, when they're created, and how to view them in your books.

Journal entries are the underlying accounting records that power your financial reports. Every transaction in Kick - whether it came from your bank, a payroll run, or a bill - generates a journal entry that posts to your general ledger. Most business owners will never need to create one manually, but knowing what they are helps you understand what you're looking at in your reports.

***

### What a journal entry is

A journal entry is a double-entry record with two sides: a debit and a credit. Every financial event in your business is recorded this way - money always moves from one account to another. For example, when you pay a software subscription, the expense account for Software increases (debit) and your bank balance decreases (credit).

Kick generates these automatically every time a transaction is categorized.

***

### Where journal entries come from

| Source                                                         | Example                                                                     |
| -------------------------------------------------------------- | --------------------------------------------------------------------------- |
| **Transaction**                                                | A categorized bank or card transaction                                      |
| **Manual journal entry**                                       | An adjustment created by you or your accountant                             |
| **Loan**                                                       | Loan activity posted from Kick's loan workflow                              |
| **Recurring**                                                  | A scheduled journal entry your accountant set up                            |
| [**Opening balance**](/setting-up/opening-balances)            | Your starting account balances                                              |
| **Payroll integration (**[**Gusto**](/integrations/gusto)**)** | Each payroll run posted by expense type                                     |
| **Bill vendor**                                                | A bill from Ramp or BILL posted to accounts payable (money you owe vendors) |
| [**Invoice**](/common-workflows/invoicing)                     | An invoice you send to a customer                                           |

***

### View journal entries

Journal entries are visible in the **General Ledger** report. Go to **Accounting → General Ledger**, select an entity and date range, and expand any account to see the individual entries. Click the reference number on any entry to open the full detail.

You can also see journal entry activity in the [**Activity**](/working-with-your-team/activity) tab - filter by **Journal Entry** to see a log of all entries with timestamps and who or what created them.

***

### Manual journal entries

You or your accountant may create manual journal entries for adjustments that don't come from a regular transaction: things like depreciation (spreading a large purchase over time), accruals (recording expenses or income before cash changes hands), or corrections. These are created from the command palette (**⌘K → Add journal entry**) or from the **Accounting tab** and require Admin or Accountant access.

<figure><img src="/files/RQagUjPLsU9EGmnFTbBT" alt=""><figcaption></figcaption></figure>

If you see a journal entry in your General Ledger that you don't recognize, check the Activity tab to see who created it and why, or ask your accountant.

***

### Recurring and reversal entries

Manual journal entries can be set to recur on a schedule (monthly depreciation, for example) or to reverse automatically in the following period (useful for accruals). You or your accountant can manage these.

***

### Locked periods

Journal entries in locked periods cannot be edited or deleted. If a correction needs to be made to a locked period, your accountant will need to unlock it first.

→ [Locks](/working-with-your-team/locks)

***

### FAQs

<details>

<summary><strong>Do I need to create journal entries myself?</strong></summary>

For most business owners, no. Kick generates journal entries automatically as transactions are categorized. Manual journal entries are typically created by you or your accountant for adjustments, accruals, or corrections.

</details>

<details>

<summary><strong>Where can I see what's been posted to my books?</strong></summary>

Go to **Accounting → General Ledger**. Every journal entry is listed by account, with dates, amounts, and references. You can also use **Activity** to see a chronological log of all entries.

</details>

<details>

<summary><strong>Can I edit a journal entry?</strong></summary>

Transaction-sourced entries update automatically when you change a transaction's category. Manual journal entries can be edited by your accountant as long as the period isn't locked.

</details>


# Transfers

Make sure money moving between your accounts is recorded correctly and doesn't skew your reports.

### What is a transfer?

A transfer is any movement of money between two accounts you own - for example:

* Moving money from checking to savings
* A Stripe or PayPal payout landing in your bank account
* Paying your credit card bill from your checking account

When both accounts are connected to Kick, each side shows up as a separate transaction. Kick needs to link them together so the movement is recorded as a transfer, not as income on one side and an expense on the other.

***

### How Kick handles transfers automatically

Kick looks for matching transactions across your accounts and links them automatically. When a match is found, both sides are categorized as a transfer and the movement nets to zero - so it doesn't inflate your income or expenses.

For [payment processors](/integrations/payment-processors) like Stripe and PayPal, Kick's direct integrations handle this automatically.

***

### When transfers need your attention

If Kick can't find a confident match, it surfaces a suggested match in the match drawer's **Suggested** list. Open the transaction and click **Find a transaction match** to review suggestions. Select the right one and click **Match** to confirm it, or leave it alone if none of the suggestions fit.

If a transaction is categorized as a transfer but has no match, it usually means:

* The other account isn't connected to Kick yet
* The category on the other side needs to be updated

***

### Match a transfer manually

1. Click the transaction to open the details panel
2. Click **Find a transaction match**
3. Switch the drawer from **Suggested** to **All** and find the corresponding transaction on the other account
4. Select it and click **Match**

To reverse a match, click **Unmatch** on the matched row.

***

### Credit card payments

Paying your credit card from your bank account is a common transfer. The outflow from your bank and the payment recorded on your credit card should be matched together. Kick usually handles this automatically - if it doesn't, use the manual match above.

***

### Automate with Rules

For transfers that follow a predictable pattern - like a Stripe payout always landing in the same bank account - you can create a Transfer Rule to match them automatically.

→ [Rules](/common-workflows/rules)


# Splits

Break a single transaction into multiple line items when a charge covers more than one category or business.

### When to use splits

Use splits when a single transaction needs to be divided - for example:

* A charge that covers both office supplies and software
* A shared expense (like rent or insurance) that should be split across multiple businesses
* A loan payment that includes both principal and interest

***

### Split a transaction

1. Click the transaction to open the details panel
2. Click **Split transaction**
3. Add line items and allocate each portion by amount or percentage
4. Assign a category to each line
5. Click **Save**

The split amounts must add up to the original transaction total. To undo a split, open the transaction and click **Unsplit**.

***

### Split by amount vs. percentage

* **By amount** - use when you have exact figures, like a loan amortization schedule
* **By percentage** - use for recurring allocations, like splitting a shared expense proportionally across businesses

***

### Splitting across businesses

If you have multiple entities, you can split a transaction and assign each portion to a different business. Kick automatically creates the intercompany accounting entries on both sides - you don't need to do anything manually.

→ [Multi-Entity](/setting-up/multi-entity)

***

### Automate with Rules

For transactions that always need the same split - like a recurring insurance bill that's always divided the same way - create a Split Rule to handle it automatically every time it syncs.

→ [Rules](/common-workflows/rules)

***

### Integration splits

Some integrations split transactions automatically:

* [**Stripe**](/integrations/payment-processors) - splits payouts into gross revenue, fees, and net
* [**PayPal**](/integrations/payment-processors) - splits payments into revenue and fees
* [**Gusto**](/integrations/gusto) - splits each payroll run into wages, payroll taxes, and benefits

These happen automatically once the integration is connected.


# Rules

Automate how Kick handles recurring transactions so you spend less time on manual categorization.

Rules let you tell Kick exactly how to handle specific transactions - overriding AI categorization with your own logic. Once a rule is created, it runs automatically every time a matching transaction syncs.

***

### When to use rules

Rules are useful any time you find yourself making the same correction repeatedly. Instead of updating a transaction manually each month, create a rule once and let Kick handle it going forward.

Examples:

* Always categorize Amazon transactions as *Supplies & Equipment*
* Always move Apple charges to a specific business entity and categorize as *Computers*
* Always split a software subscription 50/50 across two businesses
* Always match Stripe payouts to the corresponding deposit in your bank account

***

### Rule Types <a href="#rule-types" id="rule-types"></a>

Kick has four standard Rule Types that run at different times and for different purposes:

1. **Transactions, Transfer, and Split Rules** run when transactions are first synced or a new Rule is created
2. **Accounting Rules** run every time a transaction is updated or recategorized

***

#### Transactions Rules <a href="#transactions-rules" id="transactions-rules"></a>

Transactions Rules run when new transactions sync into Kick or when a new Transactions Rule is created. They’re ideal for setting simple, proactive Rules to categorize transactions or move them to a different entity - including your Personal entity.

Transactions Rules currently support the following actions:

* **Change Category** – Automatically apply a specific category when certain conditions are met
* **Move to a different Entity** – Reassign transactions to a different Business entity or move between Business and Personal
* **Assign Classes** – After creating custom Classes (available on Plus), assign them to transactions
* **Assign Vendors or Customers** – Assign a Vendor or Customer to each transaction based on the conditions you set, automating Revenue and Expense insights
* **Add Memos** – Add additional context to transactions for your own records or for your CPA come tax time

Examples:

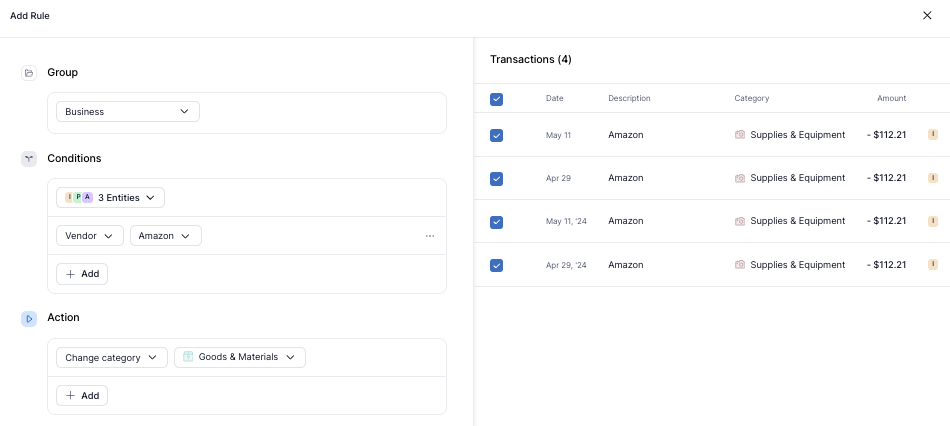
* Recategorize all **Amazon** transactions from *Supplies & Equipment* to *Goods & Materials*

<div data-with-frame="true"><figure><img src="https://prod-uk-services-workspac-workspacefilespublicbuck-vs4gjqpqjkh6.s3.amazonaws.com/w_01JKXKPYB5Q0PBMZBNY0T9CKGA/wFile_01JXYECB6V2VG4NP7P3CDZTEZF" alt=""><figcaption></figcaption></figure></div>

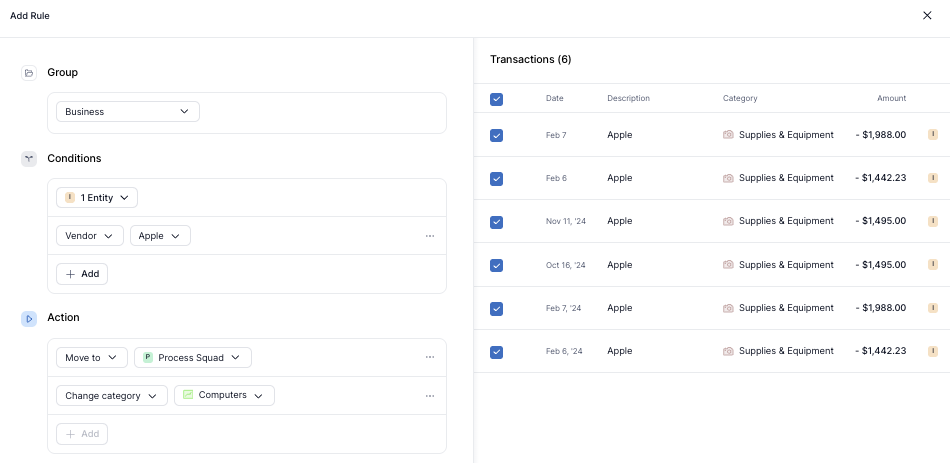
* Move all **Apple** transactions from one Business entity to another and categorize as *Computers*

<div data-with-frame="true"><figure><img src="https://prod-uk-services-workspac-workspacefilespublicbuck-vs4gjqpqjkh6.s3.amazonaws.com/w_01JKXKPYB5Q0PBMZBNY0T9CKGA/wFile_01JXYEDEZ3KVQXCT7F65RGRWMJ" alt=""><figcaption></figcaption></figure></div>

Rules are especially helpful if you’re using **Custom Categories**, since these categories are not automatically assigned by Kick’s categorization model.

Creating a Rule ensures that your Custom Categories are automatically applied to the right transactions going forward.

***

#### Accounting Rules <a href="#accounting-rules" id="accounting-rules"></a>

Accounting Rules run every time a transaction is updated or recategorized.

These Rules are ideal for ensuring your transactions are consistently mapped to the correct account in your **Chart of Accounts (CoA)**.

Examples:

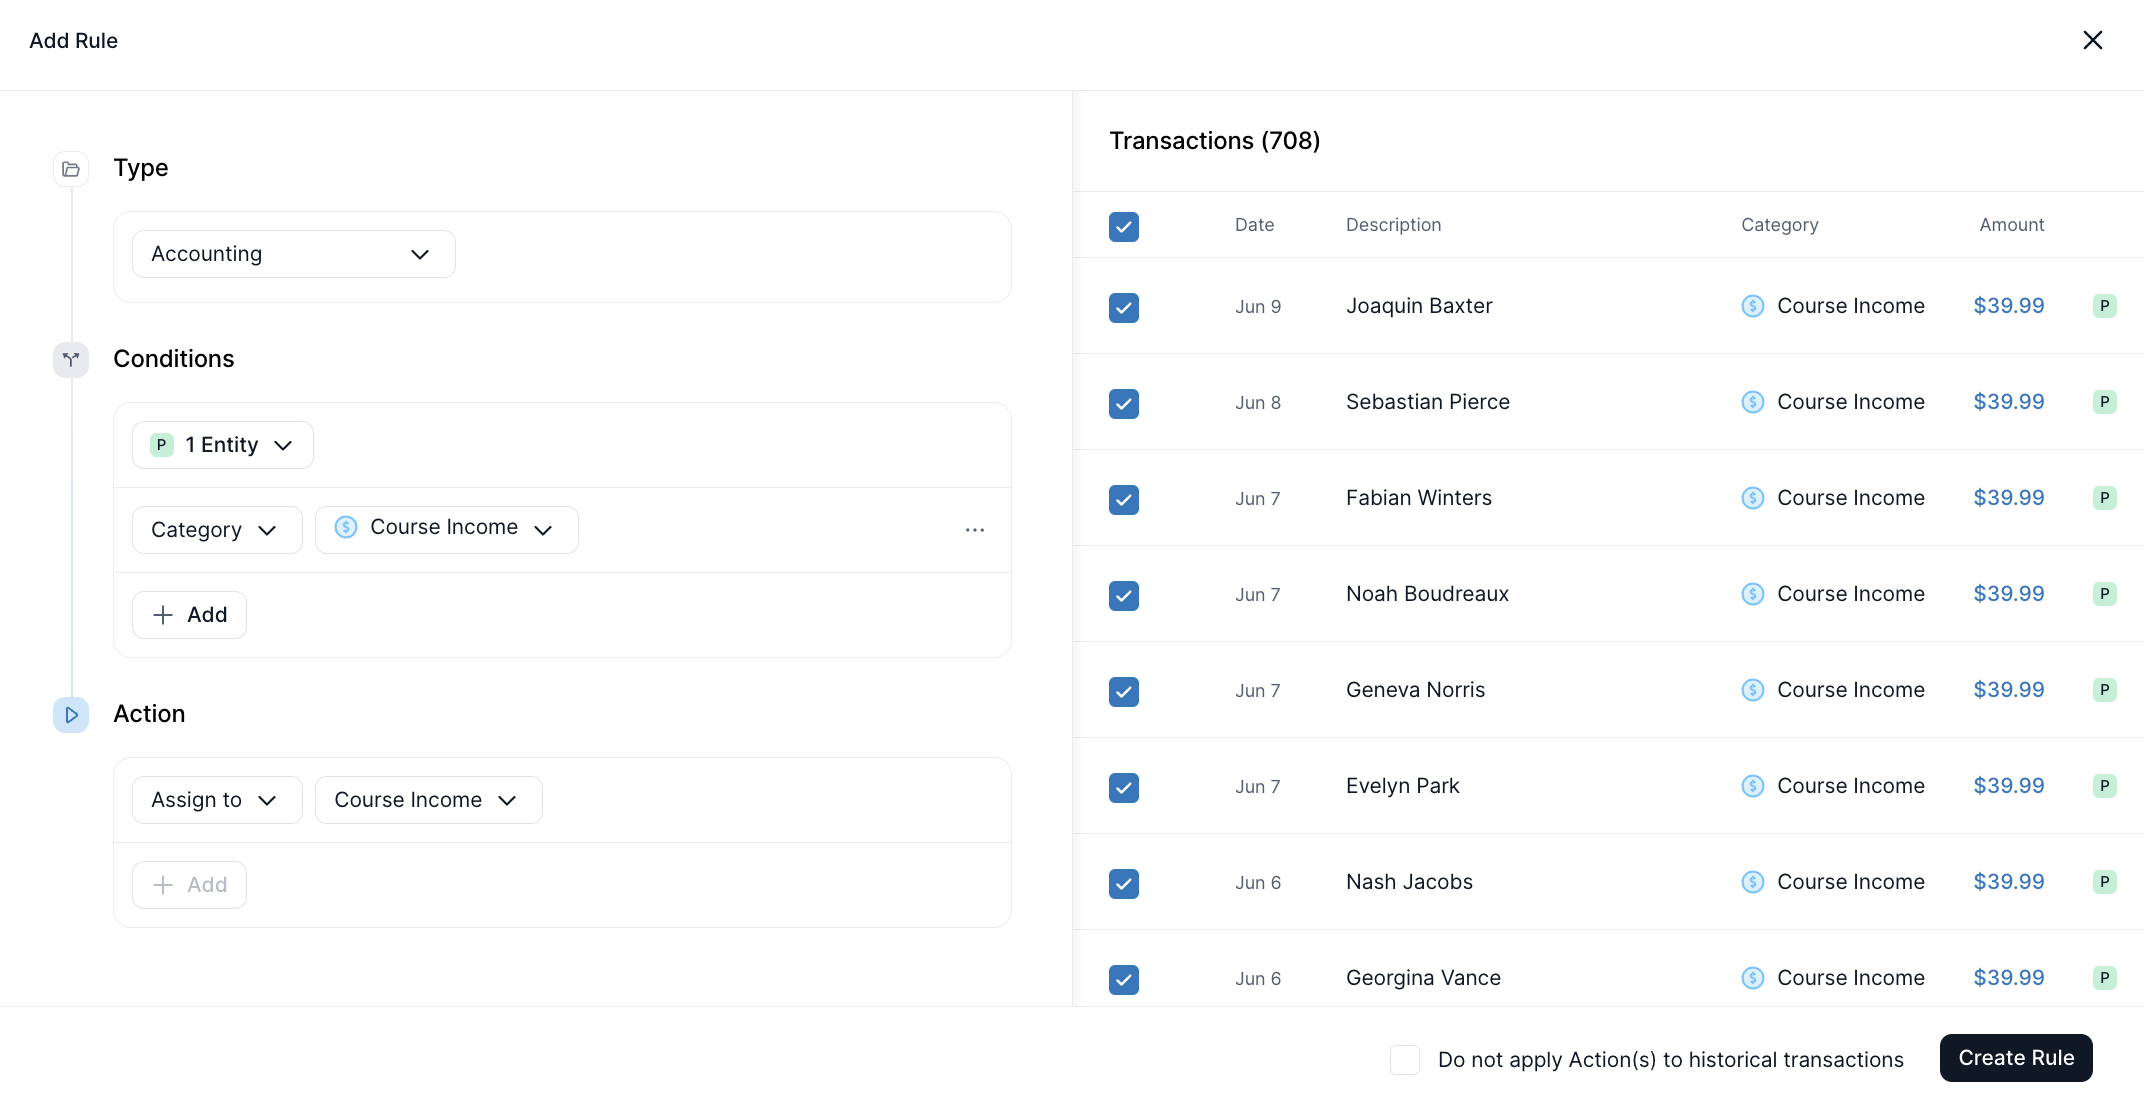
* Map custom category *Course Income* to custom Profit & Loss account *Course Income*

<div data-with-frame="true"><figure><img src="https://prod-uk-services-workspac-workspacefilespublicbuck-vs4gjqpqjkh6.s3.amazonaws.com/w_01JKXKPYB5Q0PBMZBNY0T9CKGA/wFile_01JXYEG1HRXKCGMY9XJHK3EB1A" alt=""><figcaption></figcaption></figure></div>

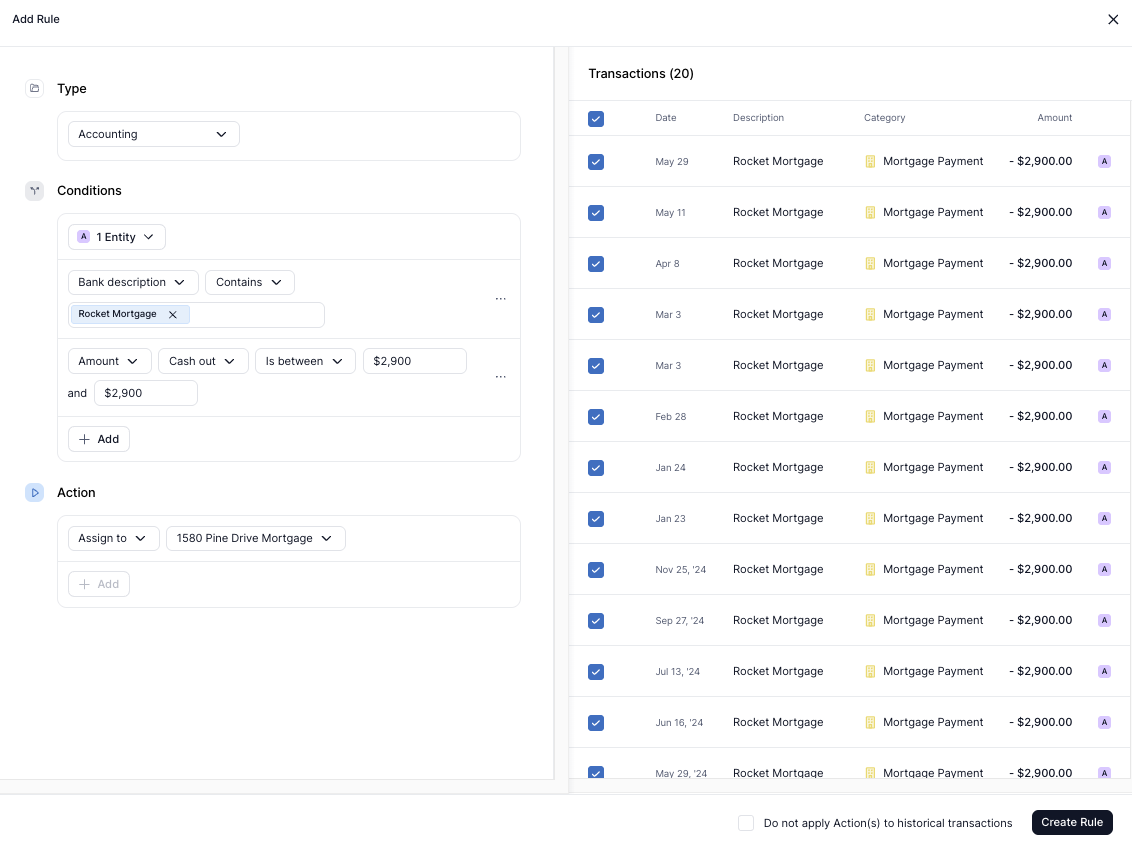
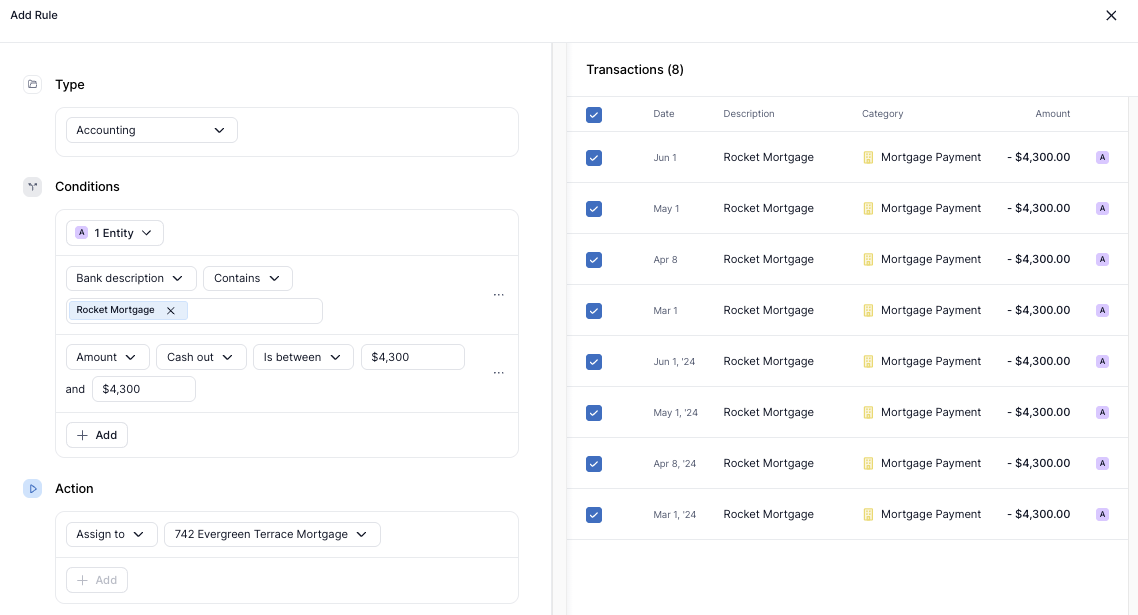
* Map transactions with Bank Description “Rocket Mortgage” and Amount $4,300 to a custom Balance Sheet account *742 Evergreen Terrace Mortgage* and transactions with Bank Description “Rocket Mortgage” and Amount $2,900 to a custom Balance Sheet account *1580 Pine Drive Mortgage* (accomplished via two separate Rules)

<div data-with-frame="true"><figure><img src="https://prod-uk-services-workspac-workspacefilespublicbuck-vs4gjqpqjkh6.s3.amazonaws.com/w_01JKXKPYB5Q0PBMZBNY0T9CKGA/wFile_01JXYEJC3XKMAZG0HWXDY125QC" alt=""><figcaption></figcaption></figure></div>

<div data-with-frame="true"><figure><img src="https://prod-uk-services-workspac-workspacefilespublicbuck-vs4gjqpqjkh6.s3.amazonaws.com/w_01JKXKPYB5Q0PBMZBNY0T9CKGA/wFile_01JXYEHCWS5RAGVNVSZX5JK7VS" alt=""><figcaption></figcaption></figure></div>

#### Kick Rules <a href="#kick-rules" id="kick-rules"></a>

Kick Rules apply to transactions that aren’t affected by any custom Accounting Rules. They serve as the default mapping between your transaction categories and the Chart of Accounts. If no Accounting Rule is triggered, Kick will use these built-in Rules to assign transactions to the appropriate accounts.

These Rules cannot be edited or deleted, but they’re easy to override by creating a custom Accounting Rule. Accounting Rules always take priority - Kick Rules will never override them.

***

#### **Transfer Rules** <a href="#transfer-rules" id="transfer-rules"></a>

Transfer Rules run automatically when new transactions sync into Kick or when you create a new rule. They let you set custom conditions to match transfers between accounts, ensuring both sides of the transaction are properly linked.

Transfers, such as bank-to-bank, payment processor-to-bank, or bank-to-credit card, should always be matched in Kick to keep your books accurate. If a transaction is categorized as **Transfer** or **Credit Card Payment** but no match is found, either:

* The other account involved in the transfer may need to be connected to Kick, or
* The transaction category may need to be updated.

Example:

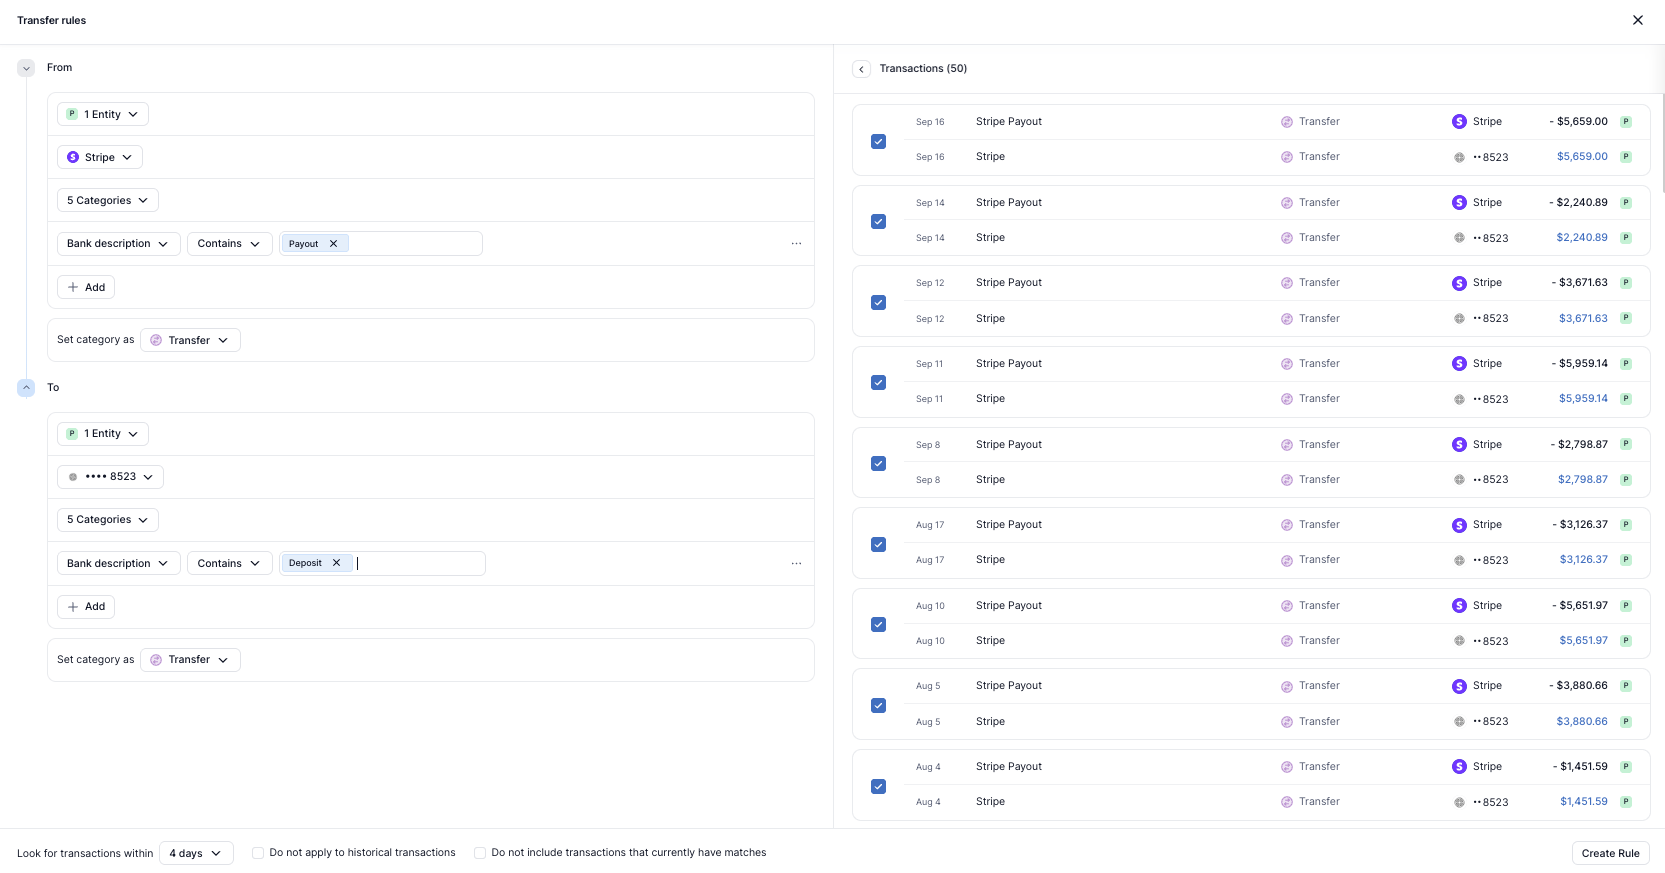
* Match *Stripe Payouts* from Stripe to *Stripe Deposits* into Mercury 8523

<div data-with-frame="true"><figure><img src="https://prod-uk-services-workspac-workspacefilespublicbuck-vs4gjqpqjkh6.s3.amazonaws.com/w_01JKXKPYB5Q0PBMZBNY0T9CKGA/wFile_01K5QH22VQC363X7C5F5953ZBD" alt=""><figcaption></figcaption></figure></div>

***

#### Split Rules <a href="#split-rules" id="split-rules"></a>

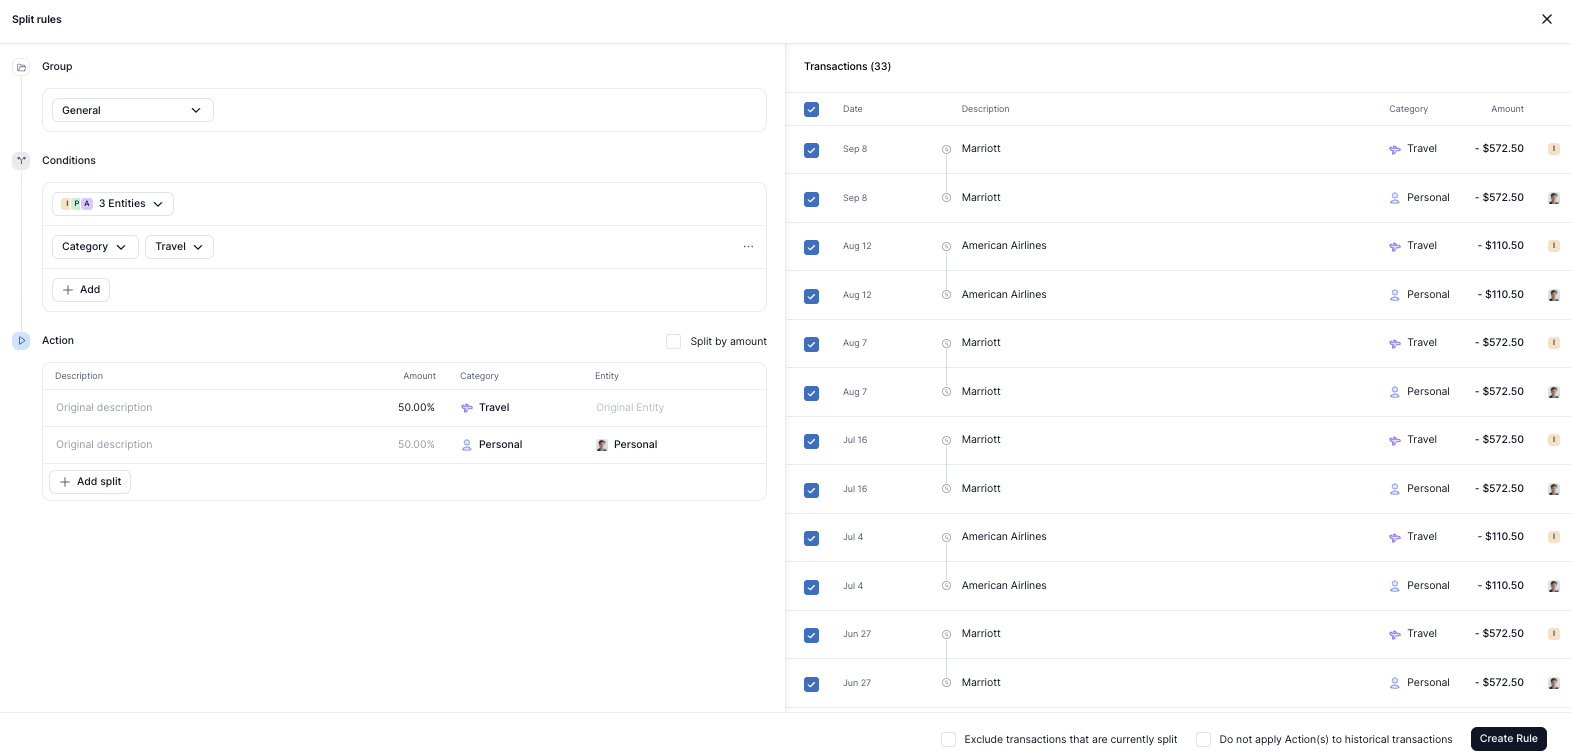
Split Rules run automatically when new transactions sync into Kick or when you create a new rule. They let you set custom conditions to split transactions across categories or entities based on percentage or amount.

Examples:

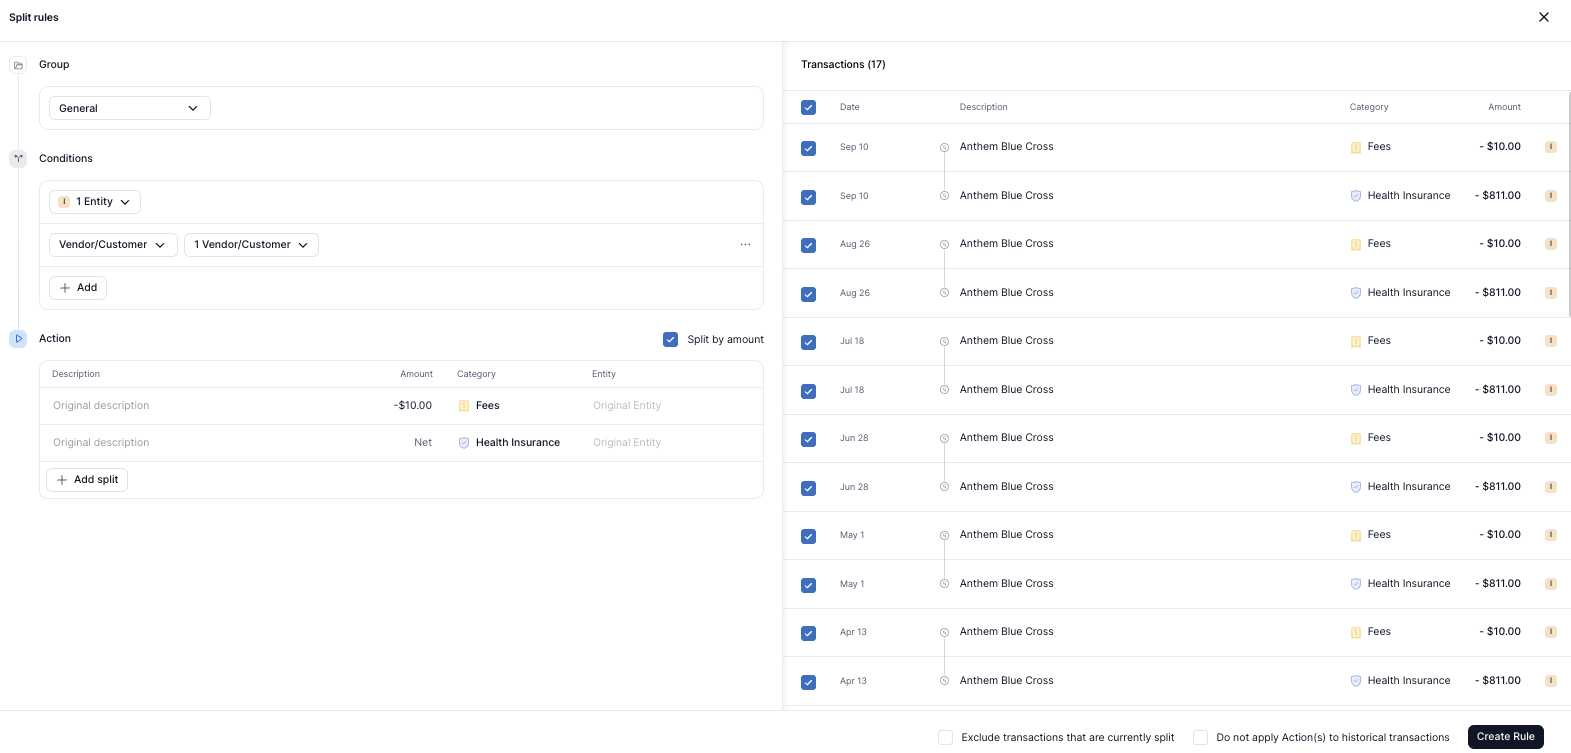
* Split *Anthem Blue Cross* transactions between *Health Insurance* and *Fees* by Amount

<div data-with-frame="true"><figure><img src="https://prod-uk-services-workspac-workspacefilespublicbuck-vs4gjqpqjkh6.s3.amazonaws.com/w_01JKXKPYB5Q0PBMZBNY0T9CKGA/wFile_01K5QHD3V2GEJ41FM0ZBY66Y9C" alt=""><figcaption></figcaption></figure></div>

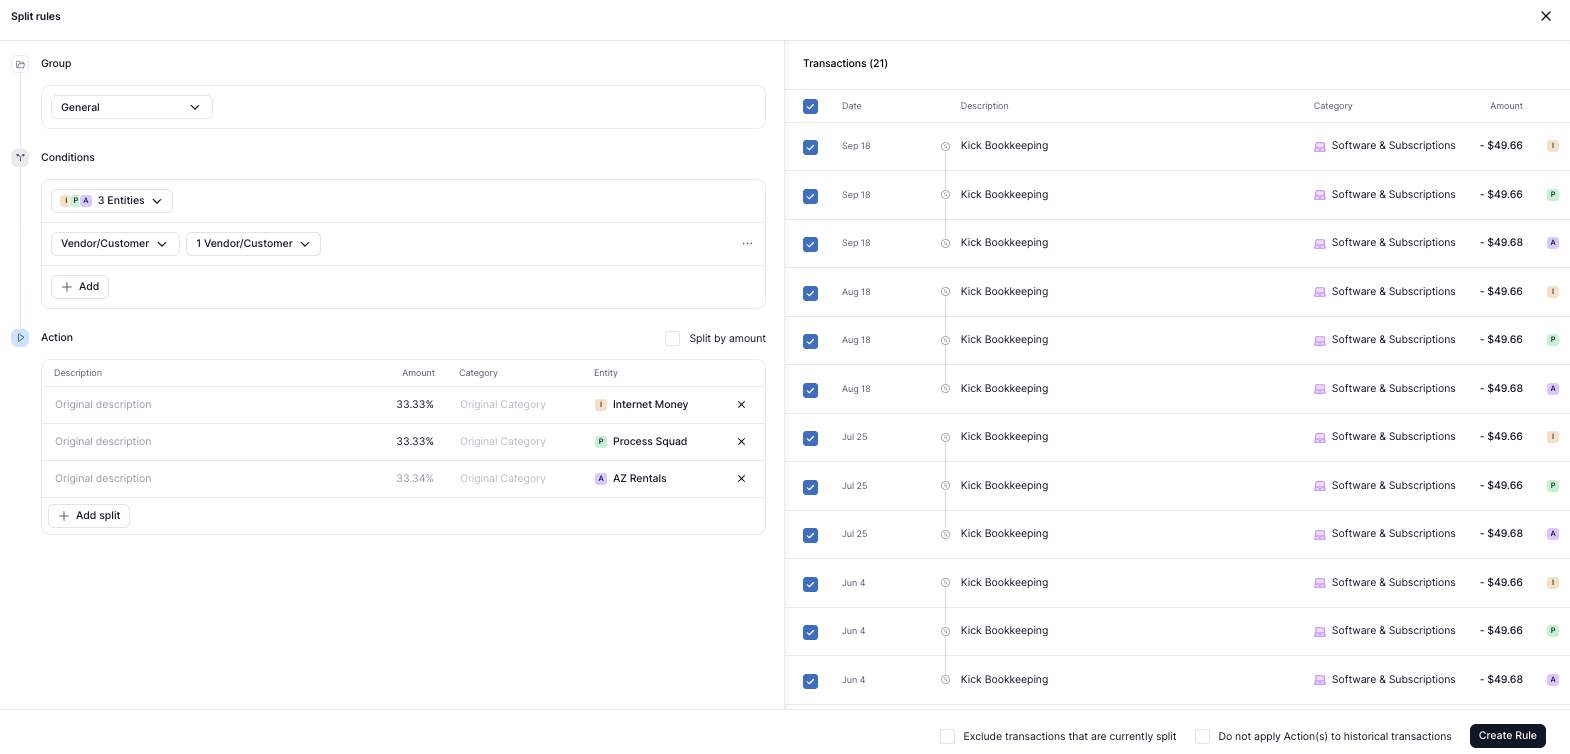
* Split my *Kick Bookkeeping* transactions evenly across my 3 business entities by percentage

<div data-with-frame="true"><figure><img src="https://prod-uk-services-workspac-workspacefilespublicbuck-vs4gjqpqjkh6.s3.amazonaws.com/w_01JKXKPYB5Q0PBMZBNY0T9CKGA/wFile_01K5QHHQ9VS708PX5W5M6QD32G" alt=""><figcaption></figcaption></figure></div>

* Move 50% of my *Travel* expenses to *Personal*

<div data-with-frame="true"><figure><img src="https://prod-uk-services-workspac-workspacefilespublicbuck-vs4gjqpqjkh6.s3.amazonaws.com/w_01JKXKPYB5Q0PBMZBNY0T9CKGA/wFile_01K5QHMVXXF83T307Z8DV3ZPYJ" alt=""><figcaption></figcaption></figure></div>

***

### Rule Groups <a href="#rule-groups" id="rule-groups"></a>

Most accounting rule engines rely on a long, disorganized list of Rules that are hard to manage at scale. Kick breaks this pattern with **Rule Groups**, a system that makes it easy to organize and prioritize your Rules with full transparency.

To create a Rule Group, click **Add rule group** in the top right corner of the Rules tab. To rename an existing group, including the default **General Rule Group**, click the three dots next to the group name and select **Edit**.

To change priority, drag and drop your Rule Groups into the order you want, so you always know exactly how Rules will be applied.

***

### Editing Rules <a href="#editing-rules" id="editing-rules"></a>

#### Editing a Rule <a href="#editing-a-rule" id="editing-a-rule"></a>

To edit a Rule, hover over it and click the three dots (`⋯`) at the far right of the row. From the dropdown menu, select **Edit**. This opens the Rule details so you can update the Conditions or Actions.

#### Archiving a Rule <a href="#archiving-a-rule" id="archiving-a-rule"></a>

To temporarily stop a Rule from running, click the three dots (`⋯`) and select **Archive**. Archived rules remain in your list but won't apply to future transactions until you select **Enable**. Use the **Rules status** filter to show **Enabled** or **Archived** rules.

#### Deleting a Rule <a href="#deleting-a-rule" id="deleting-a-rule"></a>

To permanently remove a Rule, use the same `⋯` menu and choose **Delete**. This action cannot be undone, so make sure you no longer need the Rule before deleting it.

#### Rule Prioritization <a href="#rule-prioritization" id="rule-prioritization"></a>

Rules are applied in order from top to bottom. You can drag and drop Rules to change their priority.

#### Conflicting Rules <a href="#conflicting-rules" id="conflicting-rules"></a>

If two or more Rules could apply to the same transaction, only the first matching Rule (based on priority) will run. Reorder or edit your Rules if one is unintentionally blocking another from applying.

***

### AI-created rules

When you confirm applying a change to similar transactions, Kick creates an AI rule that appears in your rules list. These rules can only be **Overridden**, not edited or archived. Select **Override** to create your own editable rule with the same conditions and actions.<br>


# Classes

Track performance by location, department, project, or any other dimension that matters to your business.

Classes let you tag transactions with a dimension beyond category, so you can see your P\&L broken down by location, department, project, or any other segment that matters to your business. Available on the Plus plan.

***

### What classes are for

By default, your reports show totals across your entire business. Classes let you slice those totals any way you want.

A few examples of how business owners use them:

* **Location** - see revenue and expenses for each store, office, or market separately
* **Department** - break out spending by team (sales, operations, marketing)
* **Project** - track profit and cost for individual client engagements or initiatives
* **Property** - for real estate, see income and expenses per property

Once you assign classes to transactions, every report in Kick - P\&L, Balance Sheet, General Ledger - can be filtered by class.

***

### Classes and subclasses

Classes work in two levels:

* A **class** is the grouping (e.g., Location)
* A **subclass** is the specific item within it (e.g., New York, Los Angeles, Chicago)

You can have as many classes and subclasses as you need. Subclasses can be reordered or moved between parent classes at any time.

***

### How to set up classes

1. Go to **Accounting** -> **Classes**
2. Click **Add class** and enter a name
3. To add subclasses, click the **+** icon next to a class and enter the subclass name

{% embed url="<https://player.mux.com/lRGxqcCYQYK2FBevXlbkNso7wvPspSiYGRzSc02tMsfs>" %}

Classes and subclasses can be reordered by dragging, and subclasses can be moved between parent classes at any time.

{% embed url="<https://player.mux.com/ekOjoRT02jizpF3HvgVnEyK7G3aP3R5hbNsai3NONPEc>" %}

***

### Assigning classes to transactions

**One at a time:** Open any transaction and select a class from the Class column dropdown.

**In bulk:** Select multiple transactions in the Transactions tab, click **Actions** (⌘K), and choose **Set class**.

{% embed url="<https://player.mux.com/n6YpPR1SwWijBSUhcOhrlE68wr74iIa2enmAYB29yrI>" %}

**Automatically with Rules:** Set up a [Rule](/common-workflows/rules) to assign a class based on conditions like bank description, account, counterparty, or amount. Once configured, matching transactions are classified automatically when they sync - no manual work needed.

{% embed url="<https://player.mux.com/tdi2v2npwAv19hHKU3ZcyRGk8761HI7iZ9bPvLIj7bo>" %}

***

### Gusto and Ramp

If you use [Gusto](/integrations/gusto) or [Ramp](/integrations/ramp), departments from those platforms sync into Kick as classes automatically. You don't need to set these up manually.

***

### Viewing class reports

Go to any report - [Profit & Loss](/reports/profit-and-loss), Balance Sheet, or General Ledger - and use the Class filter to view results for a specific class or subclass. This gives you a full financial picture for each segment of your business without maintaining separate books.


# Counterparties

Vendors and customers in Kick - how they work and how to manage them.

A counterparty is the vendor or customer on the other side of a transaction - who you paid, or who paid you. Kick identifies counterparties automatically from your transaction data and uses them to power categorization, reporting, and rules.

***

### How counterparties work

When a transaction syncs, Kick reads the merchant name or description and matches it to a counterparty. Over time, Kick builds a list of everyone your business transacts with.

Counterparties help Kick categorize more accurately. When you've told Kick that a specific vendor always maps to a specific category, it applies that every time a new transaction from that vendor comes in.

***

### Where to find them

Go to **Accounting** -> **Counterparties** to see a grouped directory of vendors and customers. Search, set a date range, and click **Filter** to narrow by entity, **General ledger** account, **Amount**, or **1099** status. Click any row to open a details panel. You can also rename a counterparty if the name that synced from your bank is messy or unclear - for example, turning "SQ \*COFFEE ROASTERS 12849" into "Blue Bottle Coffee."

***

### 1099 tracking

Kick lets you flag counterparties as **1099 eligible** so you and your accountant can review vendor payments at tax time. Built-in **1099 review** views help surface vendors that may need a 1099 form.

***

### Counterparties and the Expenses by Vendor report

The [Expenses by Vendor](/reports/expenses-by-vendor) report is built directly from your counterparty data. It shows you total spend per vendor over any time period - useful for understanding where your money is actually going and spotting vendors worth renegotiating.

***

### Merging counterparties

The same vendor can sometimes appear under slightly different names depending on how they show up in your bank feed. Merging duplicates consolidates them into one clean record across your reports and transaction history.

1. Find the duplicate you want to get rid of in the counterparty directory
2. Click the **⋯** menu at the end of its row and select **Merge**
3. Select the counterparty you want to keep
4. Click **Merge**

The duplicate is removed, and its journal entries and history are reassigned to the counterparty you kept.

{% hint style="warning" %}
Merging cannot be undone. Check that you have the direction right: the counterparty whose row you opened is the one that gets removed.
{% endhint %}

***

### Counterparties and Rules

[Rules](/common-workflows/rules) can be built around specific counterparties. For example: "Every transaction from this vendor goes to Software & Subscriptions." Once set, Kick applies it automatically - no manual categorization needed.


# Loans

How to record loan payments correctly so your books stay accurate and your Balance Sheet reflects what you actually owe.

Loan payments need special handling in Kick because each payment is made up of two parts - principal (reducing what you owe) and interest (an expense). If you record the full payment as a single expense, your books will overstate your costs and your Balance Sheet won't reflect the correct loan balance.

This is one of the areas where working with an accountant or bookkeeping partner makes the most sense, especially if you have multiple loans or years of history to catch up on.

***

### Why it matters

When you make a loan payment:

* The **principal** portion reduces your liability on the Balance Sheet - you owe less
* The **interest** portion is an expense that appears on your P\&L

Recording both correctly keeps your Balance Sheet accurate (showing what you actually owe) and your P\&L honest (showing only the real cost of borrowing, not the full payment amount).

***

### What you need

Before setting up loan accounting in Kick, you need your **amortization schedule** - the breakdown of each payment into principal and interest. Your lender provides this, usually at loan origination or available in your online account portal.

***

### How to record loan payments

**If your lender sends separate line items** for principal and interest, categorize each one directly to the right account.

**If payments come through as a single amount**, use [Splits](/common-workflows/splits) to divide the payment:

1. Open the loan payment transaction
2. Click **Split**
3. Allocate the principal portion to your loan liability account
4. Allocate the interest portion to your interest expense account
5. Reference your amortization schedule for the exact breakdown

**To automate this for fixed payments** (like a fixed-rate mortgage or car loan where the split ratio is consistent), set up a Split [Rule](/common-workflows/rules). Kick will split the payment automatically every time it syncs.

***

### Recording loan proceeds

When you receive a loan, the funds coming into your bank account are **not income** - they're a liability. Categorize the deposit to your loan liability account so it appears correctly on the Balance Sheet, not on your P\&L.

***

### Multiple loans

Keep separate accounts for each loan so you can track balances and payments independently. Your accountant can set these up in your Chart of Accounts.

***

### When to bring in a partner

If you have multiple loans, years of history to catch up on, or you're unsure about your amortization schedule, this is work worth handing off. A bookkeeping partner can set up the accounts, enter historical payments correctly, and reconcile each loan to your lender statements.

-> [Partner Program](/referrals-and-partnerships/partner-program)


# Payroll

How payroll transactions flow into Kick and what to do if you run payroll outside of Gusto.

Payroll is one of the more complex areas of bookkeeping because a single payroll run involves multiple expense types - wages, taxes, benefits, and contractor payments - that all need to land in the right places in your books.

***

### If you use Gusto

Kick has a direct integration with [Gusto](/integrations/gusto). When you run payroll, Kick pulls in each payroll run as a single transaction that's automatically split into individual line items and mapped to the right accounts:

* **Wages and salaries** - maps to your salaries and wages account
* **Employer payroll taxes** - maps to your payroll taxes account
* **Employee benefits** - maps to your benefits account
* **Retirement contributions** - maps to your retirement benefits account
* **Contractor payments** - maps to your contract labor account

This happens automatically - you don't need to manually categorize each component.

**If you use Gusto departments**, those sync into Kick as [Classes](/common-workflows/classes) so you can see payroll broken out by team or department in your reports.

**Reconciling benefits and retirement:** Most payroll items reconcile automatically. Benefits and retirement contributions, because they're paid out to separate providers on their own schedule, need a manual reconciliation step. You or your accountant can handle this on **Transactions**: select the payroll transactions, click **Actions**, and choose **Reconcile Gusto**.

***

### If you use a different payroll provider

If your payroll runs through ADP, Paychex, Rippling, QuickBooks Payroll, or any other provider, the transactions will sync from your bank account as a lump sum. They won't be automatically split.

In this case, the standard approach is:

1. Categorize the payment to a payroll clearing account (a temporary holding account for payroll until it's split into wages, taxes, and benefits)
2. Download the payroll journal report from your provider, which breaks the lump sum into wages, taxes, and benefits. Send it to your accountant if you work with one, or keep it open for the next step
3. You or your accountant create a [journal entry](/common-workflows/journal-entries) that reclassifies the payment into the correct expense accounts, using the report as the breakdown

This is typically done at the end of each quarter or tax year. If you run payroll frequently and want it reflected accurately in real time, set the reclassification up as a [recurring journal entry](/common-workflows/journal-entries#recurring-and-reversal-entries) so the split posts on a schedule.

***

### Payroll and tax prep

Payroll reconciliation is one of the more common reasons business owners bring in a bookkeeping partner at year-end. Each tax year requires its own reconciliation, and it involves matching payroll records to bank transactions and tax filings.

If you have payroll history that hasn't been reconciled, address this before generating your [Tax Package](/reports/tax-package).

-> [Tax Prep Guide](/best-practice-guides/tax-prep-guide)\
-> [Partner Program](/referrals-and-partnerships/partner-program)


# Memos

Add notes to transactions to explain what they were for - useful for your accountant, your records, and audit readiness.

A memo is a free-text note attached to a transaction. It's the simplest way to add context to a charge - who you met with, what a purchase was for, or anything else that isn't obvious from the merchant name or amount alone.

***

### When to use a memo

Memos are especially useful for:

* **Meals and entertainment** - note who you met and the business purpose (the IRS requires this for the deduction to hold up)
* **Unusual or one-off purchases** - explain what it was for so your accountant doesn't have to ask
* **Ambiguous vendors** - a vendor name like "Amazon" could be office supplies, software, or personal. A memo clarifies it
* **Transactions your accountant flagged** - if they opened a [Task](/working-with-your-team/tasks) asking about a charge, a memo on the transaction itself is the clearest way to answer

***

### Add a memo to a single transaction

1. Open any transaction by clicking on it
2. Click the **Memo** field
3. Type your note and save

{% embed url="<https://www.loom.com/share/a32b1a6cc9524f3d91385df1604a159c>" %}

***

### Add memos in bulk

If you need to add the same note to multiple transactions at once:

1. Select the transactions in the Transactions tab
2. Click **Actions** (⌘K) and choose **Set memo** (shortcut **M**)
3. Enter your note

You can also **Remove memo** from the same Actions menu when selected transactions already have memos.

{% embed url="<https://player.mux.com/SCSWzSpZBnPCcMzQPcvEVzEYmgMryri7R00lqS602E00Uk>" %}

***

### Memos and your accountant

Memos are visible to everyone with access to your workspace. Your accountant sees them when reviewing transactions, which means fewer back-and-forth questions and a faster close process. If you're preparing for [tax season](/best-practice-guides/tax-prep-guide), going through transactions with missing context and adding memos is one of the highest-value things you can do before handing off to your accountant.


# Documents

How to store, attach, and find business documents in Kick - contracts, statements, tax forms, and more.

Kick lets you store and attach business documents directly in your workspace: receipts, contracts, bank statements, tax forms, vendor agreements, and anything else your accountant or business might need on hand.

***

### What to store in Kick

Documents works best for records that are tied to specific transactions or need to be accessible to your accountant:

* **Bank and credit card statements** - useful for reconciliation and as backup if a connection ever gaps
* **Loan agreements** - important context when [splitting](https://github.com/KickApp/kick-accountant-help-center/tree/main/business-owners/splits.md) payments between principal and interest
* **Vendor contracts** - useful when a recurring charge needs context or changes amounts
* **Tax forms** - 1099s, W-2s, and year-end processor summaries from Stripe or PayPal
* **Payroll records** - supporting documentation for payroll journal entries
* **Large purchase invoices** - anything over $75 that might require documentation for a deduction

***

### How to upload and attach documents

**Attach to a transaction:**

1. Open any transaction by clicking on it
2. Click **Upload receipt**
3. Choose **Upload Receipt** to add a file from your device, or **Browse from documents** to link an existing file from your Documents library

The document is stored in Kick and linked to that transaction - so when your accountant opens it, everything is in one place.

**Upload to the Documents library:** For documents that aren't tied to a single transaction - like a loan agreement or a vendor contract - go to **Documents** in the left nav and upload directly. Search by filename or keyword to find files later. Scanned receipts are automatically renamed to `Merchant - Date - Amount` when Kick can read the receipt details. You can restore the original filename from the document row menu or as a bulk action.

***

### Sharing with your accountant

Any document you upload is immediately visible to team members with access to your workspace. There's no need to email files or share folders outside Kick - your accountant sees everything when they log in.

If your accountant needs a specific document, they can request it through [Tasks](/working-with-your-team/tasks) and you can attach it directly in the task thread.

***

### Documents at tax time

At year-end, having documents already in Kick means your accountant doesn't have to chase anything down. Before generating your [Tax Package](/reports/tax-package), do a quick check:

* Loan agreements are uploaded and linked to relevant transactions
* Year-end statements from Stripe, PayPal, or other processors are attached
* Any 1099s you've received are stored and accessible
* Large or unusual purchases have documentation attached

→ [Tax Prep Guide](/best-practice-guides/tax-prep-guide)\
→ [Receipts](/setting-up/receipts)


# Invoicing

View invoices synced from Stripe, Mercury, and BILL, and create and send invoices directly from Kick.

The **Invoicing** tab shows invoices from your connected **Stripe**, **Mercury**, or **BILL** accounts. Once an invoicing account is connected, invoices sync automatically with customer details, payment status, and line items (the individual products or services billed on an invoice).

Native invoicing, which lets you build and send an invoice from Kick itself, is rolling out gradually and may not be available in your workspace yet.

***

### Views

Use the dropdown in the top right to switch between three views:

* **By customer**: one row per customer with invoice totals
* **By invoice**: one row per invoice
* **By line item**: one row per line item on each invoice, which shows you which products or services actually bring in the revenue

The chart at the top summarizes invoice totals by status. Click a segment to filter the list below.

***

### Invoice status

Each invoice shows a status set by Stripe, Mercury, or BILL, whichever one it came from:

| Status        | Meaning                             |
| ------------- | ----------------------------------- |
| Draft         | Invoice created but not yet sent    |
| Open          | Sent and awaiting payment           |
| Paid          | Payment received                    |
| Void          | Cancelled, so nothing is owed on it |
| Uncollectible | Marked as unlikely to be paid       |

Kick tracks one more thing on its own: whether you have matched an incoming payment to the invoice it paid. Matching in Kick records the payment against the invoice in your books, but it does not change the status in Stripe, Mercury, or BILL.

***

### Filters

Filter by date range, entity, status, amount, account, and more using the filters at the top of the page. The Invoicing tab defaults to invoices from the last 90 days.

***

### Creating invoices in Kick

Click **Create invoice** in the top right. If native invoicing is available in your workspace, choose **Kick** to open the invoice composer. You can also open Stripe, Mercury, or BILL to create an invoice in those tools.

The composer opens with four sections. Expand them in whatever order you like:

* **Details**: customer information, invoice dates, and payment terms
* **Items**: the line items you are billing for
* **Design**: logo, colors, and font
* **Customize**: PDF size, memo, terms, and footer

When the invoice is ready, move to the send panel to preview the customer email, then send it immediately or schedule it for later.

→ [Connect Your Accounts](/setting-up/connect-your-accounts-and-integrations)


# Bill Pay

View and manage your bills in Kick, with real-time sync from Ramp or BILL.

Kick's Bill Pay tab gives you a live view of your outstanding bills, AP aging (how long unpaid bills have been outstanding), and vendor balances - synced directly from [Ramp](/integrations/ramp) or [BILL](/integrations/bill.com).

{% hint style="info" %}
Bill Pay in Kick requires a connected Ramp or BILL integration. Bills created in either platform sync into Kick automatically.
{% endhint %}

***

### What you'll see

The Bill Pay tab shows all bills from your connected Ramp or BILL account, including vendor, amount, status, and due date.

Use the view toggle in the top right to switch between:

* **By vendor** - one row per vendor, with open amounts broken out by aging bucket (1-30 days, 31-60 days, 61+ days, overdue)
* **By bill** - one row per bill
* **By line item** - one row per line item, for detailed ledger review

***

### Filters

Filter by time period, entity, status, due date, or amount using the controls in the top right and top left. The tab defaults to bills from the last 90 days.

***

### Connecting Ramp or BILL

Connect from the **Accounts** tab → **Add account** → **Ramp** or **BILL**, or click **Connect Ramp** or **Connect BILL** from the Bill Pay tab.


# Insights

A real-time view of how cash is moving through your business - what's coming in, what's going out, and what's left.

Insights is your live cash flow dashboard. It shows how money has moved through your business over any period - broken down into cash in, cash out, and net cash flow - with a chart you can drill into [transaction](/common-workflows/transactions) by transaction.

Go to **Insights** in the sidebar.

{% hint style="info" %}
Insights is a cash movement view built for business owners. It's different from the formal [**Cash Flow Statement**](/reports/cash-flow) under Accounting, which is an accrual-based accounting report. If you're looking for a report to share with a lender or investor, use the Cash Flow Statement. If you want to understand your day-to-day cash picture, use Insights.
{% endhint %}

***

### What you're looking at

Insights organizes your financial activity into sections:

* **Cash in** - income received: revenue, customer payments, refunds collected
* **Cash out** - money spent: all operating expenses by category
* **Capital** - money moving in or out that isn't operating income or expense - transfers, loan payments, owner contributions and distributions
* **Net cash flow** - the total change in your cash position for the period

Each section is expandable - click into any category to see the individual transactions behind the number.

***

### The chart

The chart at the top visualizes your cash movement over time. Use the **Cycle** dropdown to aggregate by week, month, or year. Click any bar or line segment to filter the table below to that period.

***

### Filters

Use the filters at the top to narrow your view:

* **Date range** - default is year to date; adjust to any period
* **Entities** - view one business or all of them combined
* **Accounts** - focus on specific bank or card accounts
* **Classes** - filter by department, location, or project (Plus plan)

Your filter settings are saved automatically and persist when you return.

***

### Drill into transactions

Click any cell in the table to open a drawer with the underlying transactions for that category and period. From there you can review, edit, or take action on individual transactions without leaving Insights.

***

### Compare periods

Use the comparison columns to see how the current period stacks up against the previous one - both the dollar change and the percentage change are shown side by side for every row.

***

### Export

Click the export button to download your Insights data as an Excel file.


# Profit & Loss

See your income and expenses for any period - your most important view of business performance.

The Profit & Loss (P\&L) report shows how much money your business made and spent over a given period. It's the primary report for understanding whether your business is profitable.

Go to **Accounting** → **Profit & Loss**. The report defaults to last year, broken down by month.

{% embed url="<https://player.mux.com/w64pvqxRxFH802FWIjPHE64ftR2PTHVv01OIVolAirbwM>" %}

***

### Change the date range

Use the date picker to select any period. Presets include: this/last month, this/last quarter, this/last year, year-to-date, last 12 months, and last 30/60/90 days.

If you have multiple entities, use the entity dropdown to switch between them. The report shows one business at a time. To see your businesses side by side, choose **By entity** in the column selector.

***

### What you're looking at

The report is organized into:

* **Income** - all revenue that came into the business
* **Cost of Goods Sold** - direct costs associated with your revenue (if applicable)
* **Gross Profit** - income minus cost of goods sold
* **Expenses** - operating costs broken out by category
* **Net Income** - what's left after all expenses

Click any line item to drill into the General Ledger, the complete transaction-by-transaction record behind your reports, filtered to that account and period.

***

### Columns and comparisons

Use the column selector to show a single **Total only** column, or to break the report down by month, quarter, year, or entity. Use the **Compare** dropdown to add a comparison to the previous period or previous year, with variance shown as a dollar amount or percentage.

***

### Filters

Click **Add filter** to narrow the report by class or counterparty (vendor or customer).

***

### Export

Use the download button in the top right to export the P\&L as **.xlsx** or **.pdf**.


# Balance Sheet

A snapshot of what your business owns, what it owes, and what's left over.

The Balance Sheet gives you a picture of your business's financial position at a specific point in time. Unlike the [P\&L](/reports/profit-and-loss) (which covers a period), the Balance Sheet is a snapshot - it answers the question: *what does my business look like right now?*

Go to **Accounting** → **Balance Sheet**.

***

### What you're looking at

The report is organized into three sections:

* **Assets** - what the business owns: cash, accounts receivable, equipment, and other holdings
* **Liabilities** - what the business owes: credit cards, loans, accounts payable
* **Equity** - the net value of the business (assets minus liabilities), including your contributions, distributions, and retained earnings

Assets always equal liabilities plus equity. If they don't, something is miscategorized - your accountant can help diagnose it.

***

### Change the date

Use the date picker to view the balance sheet as of any date. Presets include end of month, quarter, and year.

If you have multiple entities, use the entity dropdown to view a single business or all of them side by side.

***

### Drill into the numbers

Click any account line to see the individual [transactions](/common-workflows/transactions) and [journal entries](/common-workflows/journal-entries) that make up that balance. This is useful if a number looks off and you want to understand what's driving it.

***

### Columns and comparisons

Use the column selector to break the report down by month, quarter, year, or entity. Use **Compare** to show the prior period alongside the current one, with variance amounts or percentages.


# Cash Flow

Understand where your cash is actually coming from and where it's going.

The Cash Flow report shows the movement of cash through your business over a period - broken down by operating, investing, and financing activity. It answers a question the [P\&L](/reports/profit-and-loss) doesn't: *where did the money actually go?*

A business can be profitable on the P\&L but still run short on cash. The Cash Flow report helps you understand why. For a day-to-day cash picture, see [Insights](/reports/insights).

Go to **Accounting** → **Cash Flow**.

***

### What you're looking at

* **Operating activities** - cash generated or spent running the day-to-day business (revenue collected, expenses paid, changes in receivables and payables)
* **Investing activities** - cash spent on or received from long-term assets (equipment purchases, asset sales)
* **Financing activities** - cash from loans, owner contributions, or distributions

The bottom line is the **net change in cash** - how much your cash position increased or decreased over the period.

***

### Change the date range

Use the date picker to select any period. If you have multiple entities, use the entity dropdown to switch between them. The report shows one business at a time. To see your businesses side by side, choose **By entity** in the column selector.

***

### When to use it

* To understand why your bank balance changed even though your P\&L looks healthy
* To spot periods where cash got tight
* To prepare for upcoming large payments or investments
* To share with a lender or investor who wants to see your cash position

***

### Export

Use the download button in the top right to export the Cash Flow report as **.xlsx** or **.pdf**.


# Expenses by Vendor

See exactly who you're paying the most and how your vendor spending breaks down.

The Expenses by Vendor report shows a ranked list of every vendor you've paid, with totals for any period. It's the fastest way to see where your money is going and spot spending that's higher than expected.

Go to **Accounting** → **Expenses by Vendor**.

***

### What you're looking at

Each row represents a vendor (counterparty), with the total amount paid during the selected period. Click any vendor total to open the General Ledger, the complete transaction-by-transaction record behind your reports, filtered to that vendor and period.

***

### Change the date range

Use the date picker to select any period. If you have multiple entities, use the entity dropdown to switch between them. The report shows one business at a time.

***

### Period columns

Use the column selector to show a single **Total only** column, or to break vendor totals down **By month**, **By quarter**, or **By year**.

***

### Compare

Use the **Compare** dropdown to add **Previous period (PP)** or **Previous year (PY)** alongside the current period. Show variance as a **Percentage (%)** or **Amount ($)**.

***

### Export

Use the download button in the top right to export the report as **.xlsx** or **.pdf**.

***

### When to use it

* To review your biggest expenses at a glance
* To identify vendors you're paying regularly that you may want to renegotiate or cancel
* To prepare for a budget conversation with your accountant
* To answer the question: *who did I pay the most last year?*

***

### Counterparties

For vendors to appear accurately in this report, [transactions](/common-workflows/transactions) need to have a counterparty assigned. Kick assigns counterparties automatically for most transactions, and you can set [Rules](/common-workflows/rules) to ensure specific vendors are always tagged correctly.

→ [Rules](/common-workflows/rules)


# Tax Package

Download a complete year-end financial package to hand off to your tax preparer.

The Tax Package generates a single Excel file with everything your accountant or tax preparer needs to file your taxes - no manual exports, no assembling separate reports.

Go to **Accounting** → **Year-End Tax Package**.

***

### What's included

The package is an Excel workbook with five tabs:

* **Cover Page** - your business name, accounting basis, date range, entity type, and notes sections for you and your tax preparer
* [**Balance Sheet**](/reports/balance-sheet) - year-end account balances
* [**Profit & Loss**](/reports/profit-and-loss) - full-year income and expenses
* **General Ledger** - transaction-level detail for every account
* **Trial Balance** - monthly account balances across the full year (a listing of all account balances used to verify your books are in balance)

***

### Generate the package

1. Go to **Accounting** and select **2025 Year-End Tax Package** from the reports list
2. Click the row to download the `.xlsx` file

The package covers the full prior calendar year. For example, **2025 Year-End Tax Package** produces reports for January 1 - December 31, 2025.

{% embed url="<https://www.loom.com/share/382a4357fa5744818c842ddd3d5a5377>" %}

{% hint style="info" %}
Use the Cover Page notes section to flag anything your accountant should know - unusual transactions, missing receipts, or questions you have. It keeps everything in one place instead of a separate email.
{% endhint %}

**What the downloaded file looks like:**

{% embed url="<https://player.mux.com/1CTjVeZnyw00n16QdgWdvLRs2Sw3JS8FWVU8pc6hBqyA>" %}

***

### Before you download

For the Tax Package to be accurate, your books need to be in good shape:

* All [transactions](/common-workflows/transactions) for the year should be [categorized](/common-workflows/categorization)
* [Transfers](/common-workflows/transfers) should be matched
* Any questions from your accountant (via [Tasks](/working-with-your-team/tasks)) should be resolved

If you're not sure whether your books are ready, ask your accountant to review before generating the package.


# Tasks

How your team or accountant sends you questions and requests, and how to respond.

Tasks is how your team or accountant communicates with you inside Kick. Instead of emails back and forth, they assign you a task directly tied to the [transactions](/common-workflows/transactions) that need your attention.

***

### What you can do with Tasks

* **See what's assigned to you** with due dates and priorities
* **Review attached transactions** that need receipts, clarification, or a category update
* **Respond in context** using the task chat thread
* **Track status** as you work through open items
* **Create tasks** for your team or accountant when you need something from them

***

### When you receive a task

Your accountant or a teammate may assign you a task when they need something from you: a receipt, an explanation for a charge, or a decision on how to categorize a transaction.

1. Go to **Tasks** in the sidebar
2. Open the task to see the title, due date, priority, and any attached transactions
3. Use the chat thread to ask questions or share updates
4. Add a **Memo** on individual transactions when the explanation belongs on that charge (see below)
5. Set the task to **Done** when you're finished

You'll receive a daily digest at **6 AM PT / 9 AM ET** when:

* A new task is assigned to you
* Someone comments on one of your tasks
* A task is due that day

***

### Adding transactions to a task

When you need to flag specific transactions for your accountant or team, attach them directly to a task so everyone sees the same context.

1. Go to **Transactions** and select one or more transactions
2. In the footer at the bottom of the screen, click **Actions** (or press ⌘K)
3. Select **Create task** (or press T)
4. Fill in the task details and click **Create task**

The task displays the same columns shown in your Transactions view. Configure visible columns before creating the task to customize the table.

**Use this when:**

* You need a receipt or explanation for specific expenses
* You're flagging transactions for your accountant to review
* You're handing off a batch of uncategorized transactions to someone on your team

***

### Chat on a task

Each task has a chat thread for back-and-forth discussion with your accountant or team.

**Best practice:**

* Use the task chat for questions and status updates
* Add a **Memo** on the transaction when the explanation is specific to that charge

***

### Creating a task

You can also create tasks yourself when you need something from your accountant or team.

1. Go to **Tasks** in the sidebar
2. Click **New task**
3. Enter a title describing what needs to be done
4. Set the **Assignee**, **Due date**, **Entity**, and **Priority**
5. Click **Create task**

***

### Editing a task

1. Go to **Tasks** in the sidebar
2. Click any field to edit inline: Title, Due date, Entity, Priority, Assignee, Status
3. Click the task row to open the detailed view for comments and attachments

***

### Choosing the right tool

| Tool                  | Best for                                               | Where it lives              |
| --------------------- | ------------------------------------------------------ | --------------------------- |
| **Tasks**             | Questions, requests, and follow-ups tied to your books | Tasks tab                   |
| **Memo**              | A short note on a specific transaction                 | Memo column on Transactions |
| **Transaction links** | Quick questions when someone isn't in Kick             | Share via email or Slack    |


# Activity

A complete log of every change made in your workspace - who did what and when.

The Activity tab is a full audit trail of everything that's happened in your workspace. Every transaction change, categorization update, and sync event is logged with a timestamp and the name of whoever or whatever made the change.

Go to **Activity** in the sidebar to view the log.

***

### What you can see

Each entry shows:

* **Date** - the exact time the change happened
* **Updated by** - the team member, integration, or Kick automation that made the change
* **Activity** - a description of what changed
* **Entity** - the business the change applies to

***

### Who shows up in the log

* **Your team members** - any change made by your accountant, bookkeeper, or other workspace members appears under their name
* **Kick** - automated categorization, transfer matching, and other AI actions are logged under the relevant Kick agent
* **Integrations** - transactions synced from [Ramp](/integrations/ramp), [Mercury](/integrations/mercury), Stripe, etc. are logged under the integration
* [**Rules**](/common-workflows/rules) - when a rule updates a transaction, it's logged and attributed to that rule

***

### When to use it

* To see what your accountant changed and why
* To verify that a specific transaction was updated correctly
* To check whether an integration synced recently
* To understand why a report number changed unexpectedly


# Locks

What it means when your accountant locks a period, and what you can still do.

When your accountant finishes reviewing and closing a period, they lock it. A lock protects the finalized books for that period from being changed - by anyone, including you.

***

### What a locked period means for you

Once a period is locked, you can still:

* View all transactions and reports for that period
* Upload and attach receipts
* Add notes to transactions

You cannot:

* Change categories or other transaction details
* Split or unsplit transactions
* Move transactions between entities

If you need to make a change to a locked period, ask your accountant to unlock it.

***

### Why accountants lock periods

Locking a period means your accountant is confident the books for that time are accurate and complete. It prevents accidental changes - like a rule retroactively recategorizing transactions, or a sync pulling in data that shifts the numbers.

It's a sign the work is done, not a restriction on your access.

***

### Locked periods and reports

Reports for locked periods remain accurate and stable. If you pull a [P\&L](/reports/profit-and-loss) for a locked month in the future, the numbers will be the same as when it was locked. This is important for taxes, audits, or any time you need to reference historical financials with confidence.


# Overview

Connect your banks, payment tools, and financial apps to bring all your transactions into Kick automatically.

Kick connects to your financial accounts in three ways:

* **Plaid:** connects to 12,000+ banks and credit cards. The primary method for most accounts.
* **Direct integrations:** native connections for Ramp, Mercury, Gusto, Stripe, PayPal, and BILL with richer data syncing, automatic splits, and receipt matching.
* [**Universal Importer**](/setting-up/universal-importer)**:** upload PDF bank statements or CSVs for institutions not supported by Plaid, or to backfill historical data.

***

### Connect an account

1. Go to the **Accounts** tab
2. Click **Add account**
3. Select your institution or integration and follow the prompts

Once connected, transactions sync automatically.

***

### Available integrations

<table data-view="cards"><thead><tr><th></th><th></th><th data-hidden data-card-target data-type="content-ref"></th></tr></thead><tbody><tr><td><strong>Google Sheets</strong></td><td>Pull your Kick reports into a spreadsheet and keep them refreshed</td><td><a href="/pages/Dns1Hx39ahsaSorWtyU1">/pages/Dns1Hx39ahsaSorWtyU1</a></td></tr><tr><td><strong>Stripe &#x26; PayPal</strong></td><td>Sync payments, fees, and payouts automatically</td><td><a href="/pages/Et6FZS7X6laUuynAcsDQ">/pages/Et6FZS7X6laUuynAcsDQ</a></td></tr><tr><td><strong>Ramp</strong></td><td>Sync credit card transactions, reimbursements, and bills</td><td><a href="/pages/ubhh7AHiZ5CFf3DGGJmN">/pages/ubhh7AHiZ5CFf3DGGJmN</a></td></tr><tr><td><strong>Mercury</strong></td><td>Sync bank transactions and statements directly</td><td><a href="/pages/7cmLLhAnm806MgFV1D7W">/pages/7cmLLhAnm806MgFV1D7W</a></td></tr><tr><td><strong>Gusto</strong></td><td>Sync payroll runs broken out by expense type automatically</td><td><a href="/pages/lUuB6E6rmQLb4OFrCAQW">/pages/lUuB6E6rmQLb4OFrCAQW</a></td></tr><tr><td><strong>BILL</strong></td><td>Sync bills, invoices, vendors, and payments directly</td><td><a href="/pages/ygIlfv22pP2pFMyfv0Yn">/pages/ygIlfv22pP2pFMyfv0Yn</a></td></tr><tr><td><strong>Manage Integrations</strong></td><td>Fix disconnections, reassign accounts, and update settings</td><td><a href="/pages/BtBt0KBWRYy4AT1IRYDC">/pages/BtBt0KBWRYy4AT1IRYDC</a></td></tr></tbody></table>


# Google Sheets

Import your Kick financial reports directly into Google Sheets - no downloading, no copy-paste.

**Kick to Google Sheets™** pulls your financial reports from Kick into any spreadsheet in seconds. Add a report, turn on auto refresh, and build on top of live data — all without leaving Sheets.

Install it from the [Google Workspace Marketplace](https://workspace.google.com/marketplace/app/kick/83078251972).

{% hint style="success" %}
**Kick reports land as live spreadsheet data, so Gemini, Claude, ChatGPT, or other AI tools can summarize trends, build forecast tabs, and run month-end review on your client's numbers - all in the same workbook**

→ [**Read how to use AI with Kick to Google Sheets**](broken://pages/reY9fhWAe16axyIB0mj6)
{% endhint %}

***

## Common use cases

Once your reports are in Sheets, you can do more than view them. Some common ways business owners use Kick to Google Sheets:

* **Share live financials:** Instead of exporting a PDF every month, share a Google Sheet with your accountant, team, or investors. They always see the latest numbers.
* **Build your own dashboard:** Add charts, KPIs, and commentary on top of Kick data in whatever layout works for you.
* **Create a reusable template:** Set up dashboard tabs with formulas that reference your Kick report tabs, then refresh the report data each period. Your dashboard tabs stay intact.
* **Cash flow forecasting:** Import historical Cash Flow Statement data on a dedicated report tab, build your forecast on a separate tab, and refresh actuals on a schedule.

***

## One-time Set up

### Install the add-on

1. Open the [Kick listing on the Google Workspace Marketplace](https://workspace.google.com/marketplace/app/kick/83078251972)
2. Click **Install** and grant the requested permissions

### Open the add-on

1. Open a Google Sheet file from your Google Drive. You can create a new spreadsheet or open an existing one.
2. Open the Kick add-on under **Extensions → Kick**, or via the **side bar menu** (look for the Kick icon)

{% embed url="<https://files.gitbook.com/v0/b/gitbook-x-prod.appspot.com/o/spaces%2FTsUh7dYWCHIjWnWTAnxQ%2Fuploads%2FZwEpBf4io64WuoliBWbu%2FOpen%20Kick%20add-on%20in%20Google%20Sheets.mp4?alt=media&token=effc3e8c-e97d-40d1-9dfe-2c80af7121b5>" %}

1. If you're not signed in yet, click **Sign in to Kick**
2. Complete the login flow that opens in a new browser tab and approve access to Kick
3. When you see the confirmation message, close the tab and return to your spreadsheet
4. The sidebar updates to show your Kick profile when sign-in is complete

To disconnect, open the settings icon (gear) at the top of the sidebar and click **Sign out**.

{% hint style="info" %}
**Pop-up blockers:** Kick sign-in opens in a new tab. If nothing happens when you click **Sign in to Kick**, allow pop-ups for Google Sheets (`docs.google.com`) and Kick (`kick.co`). See [Troubleshooting](#troubleshooting) below.
{% endhint %}

***

## Add a report

The sidebar has two tabs: **Reports** for adding new reports, and **Refresh** for keeping existing ones up to date.

1. On the **Reports** tab, select your **Workspace**
2. Select your **Entity**. This is a multi-select: check individual entities, or choose **All** to include everything in the workspace.
3. Choose a **Report type**, such as Profit & Loss, Balance Sheet, or General Ledger
4. Set your **Date range**
5. Adjust the **Advanced filters** if you need them
6. Click **Add report to sheet**

{% embed url="<https://files.gitbook.com/v0/b/gitbook-x-prod.appspot.com/o/spaces%2FTsUh7dYWCHIjWnWTAnxQ%2Fuploads%2F6N3yMF9kQgvjLF16yIF0%2FHow%20to%20add%20a%20Kick%20Report%20to%20Google%20Sheet.mp4?alt=media&token=a4630e8e-e351-4e02-b886-25204fbcc817>" %}

The report loads in a few seconds, and the sidebar confirms **Report imported.** Add as many reports as you'd like to the same spreadsheet.

### Advanced filters

The filters available are similar to those each report has in Kick:

* **Columns:** how the report is broken out, for example **Total only** or **By month**
* **Class:** limit the report to specific classes
* **Counterparty:** limit the report to specific customers or vendors
* **Compare:** add comparison columns, such as the prior year and the percentage change

<figure><img src="/files/Z2mVXzBz1Zxm0jttokCJ" alt="Advanced filters in the Kick to Google Sheets sidebar: Columns, Counterparty, and Compare"><figcaption></figcaption></figure>

Each report goes into its own tab named after the entity and report type.

{% hint style="warning" %}
For dashboards, charts, or custom formulas, use **separate tabs** that reference the report tabs. Do not add columns or formulas directly to a report tab, because refresh rewrites report tabs in full.
{% endhint %}

***

## Refresh reports

Open the **Refresh** tab in the sidebar to see every report you've added to the **current spreadsheet**, grouped by entity. Each report shows when it was last updated, and the top of the tab shows when the spreadsheet last synced.

<figure><img src="/files/3IRrfQnKyWV9Wf0xmD8n" alt="The Refresh tab showing one report and the auto refresh toggle" width="375"><figcaption></figcaption></figure>

There are 2 available options to sync live data from Kick:

**1. One time refresh**

* **Refresh a single, selected report:** Click the refresh icon on the report row to pull the latest data from Kick.
* **Refresh all reports in the worksheet:** Click **Refresh all reports** at the bottom of the tab to update every report in the spreadsheet at once.

**2. Auto refresh**

Turn on the **Auto refresh** toggle to have Kick keep the reports in this spreadsheet updated for you, so the numbers are current whenever someone opens the file.

**What refresh changes**

Kick rewrites the full report. Any extra columns, formulas, or formatting you added to a report tab will be **overwritten**. Tabs you created yourself, such as a dashboard or summary, are **not** touched by refresh.

***

## Share a spreadsheet

You can share a spreadsheet that contains your Kick data with your accountant, team, investors, or anyone else. Sharing is handled entirely by **Google**, not Kick.

**How to share**

1. Open the spreadsheet in Google Sheets
2. Click **Share** in the top-right corner (or go to **File → Share → Share with others**)
3. Add people by email, or click **Copy link** to generate a shareable URL
4. Set each person's role:
   * **Viewer:** can see the data but not edit or refresh
   * **Commenter:** can view and leave comments
   * **Editor:** can change the spreadsheet contents
5. Click **Send** or **Copy link**, depending on how you are sharing

**Who can refresh Kick data**

Only a Kick user with permissions to the data can add or refresh reports. People you share the sheet with can view (or edit) the spreadsheet in Google, but they cannot pull new data from Kick unless they sign in with their own Kick account that has access to that workspace.

**Limit access to people who need it**

Spreadsheets you share may contain sensitive financial data. We recommend sharing with the smallest group necessary and using **Viewer** access when someone only needs to read the numbers.

Kick is **not responsible for who can access a spreadsheet once you share it through Google**. Kick cannot see, manage, or revoke Google sharing permissions. You control access from the **Share** button in Google Sheets at all times.

{% hint style="warning" %}
Before sharing externally, review who has access under **Share** and remove anyone who no longer needs it. Treat shared links like credentials. Anyone with the link may be able to open the file, depending on your Google sharing settings.
{% endhint %}

***

## Where your data is saved

Kick does **not** store your spreadsheet on Kick's servers. Everything is saved in **your Google account**:

* **Which file:** The report is written into whichever Google Sheet you have open when you click **Add report to sheet**. Open or create that spreadsheet first. Kick does not create a separate file for you.
* **Which tab:** Kick adds the report to a **tab** inside that spreadsheet, named after the entity and report type.
* **Where it lives:** The spreadsheet is stored in **Google Drive**, like any other Google Sheet you own or have access to. You can move it to a shared drive folder, rename it, or organize it however you normally manage files in Drive.

If you run multiple entities in one workspace, you can use a single spreadsheet with separate tabs for each entity, or keep each entity in its own spreadsheet.

***

## Troubleshooting

<details>

<summary>Can't sign in to Kick / nothing happens when I click Sign in</summary>

Kick sign-in opens a **new browser tab**. If no tab opens, a pop-up blocker is usually the cause.

1. **Allow pop-ups** for `docs.google.com` and `kick.co` (check the blocked-pop-up icon in your browser's address bar, and disable pop-up blocking in ad blockers or privacy extensions)
2. Click **Sign in to Kick** again and complete login in the new tab
3. Click **Authorize** or **Approve** on the Kick connection screen. Do not close the tab before this step.
4. Return to your spreadsheet; the sidebar should update within a few seconds

If it still fails: open the settings icon (gear) → **Sign out**, try again in a private/incognito window, or confirm you are signing into the correct Kick account.

</details>

<details>

<summary>Sign-in completed but the sidebar still shows "Not signed in"</summary>

1. Close the authorization tab and return to your spreadsheet
2. Reopen the sidebar: **Extensions → Kick → Open**
3. Wait up to 2 minutes. The sidebar checks for sign-in automatically.
4. If it still shows **Not signed in**, sign out and sign in again

</details>

<details>

<summary>"Sign-in not completed. Try again."</summary>

The sidebar did not detect a finished sign-in within about 2 minutes. Usually the Kick tab was blocked, closed early, or authorization was skipped. Allow pop-ups, complete the full flow (sign in → approve → see the success message), and try again.

</details>

<details>

<summary>No workspaces or no entities appear</summary>

Confirm your Kick account has access to the workspace and entity you need. Sign out and back in to refresh the list. If you work with an accountant, confirm they have access to the entity in Kick.

</details>

<details>

<summary>Report does not appear after clicking Add report to sheet</summary>

Make sure you have a Google Sheet open, the date range is valid, and your connection is active. Try adding the report into a blank tab. If the issue persists, sign out and sign back in.

</details>

<details>

<summary>Connection failure or a similar login error</summary>

Your session with Kick has likely expired. Open the settings icon (gear) → **Sign out**, sign back in, and add the report again.

</details>

<details>

<summary>Balance Sheet or Trial Balance is empty or fails</summary>

These reports require opening balances in Kick. Go to **Accounting → Balance Sheet** in Kick, complete any opening balance setup, then try again.

</details>

<details>

<summary>Refresh does not update my data</summary>

Use the refresh icon on the report row in the **Refresh** tab, or **Refresh all reports** to update everything at once. For hands-off updates, turn on the **Auto refresh** toggle. Only a Kick user with access to the data can refresh. Shared viewers cannot.

</details>

<details>

<summary>Data formatting looks wrong</summary>

Existing formatting on a tab can interfere. Try adding the report into a blank tab, or clear formatting on the target tab first.

</details>

<details>

<summary>I see the wrong workspace or entity data</summary>

The add-on uses whichever Kick account is signed in. Sign out, sign in with the correct account, and re-select the right **Workspace** and **Entity**.

</details>

***

## FAQs

<details>

<summary>What happens to my other tabs and formulas when I refresh?</summary>

Refresh rewrites the **report tab** with the latest data from Kick. Any columns, formulas, or formatting you added to that tab will be overwritten.

**Other tabs are preserved.** If you build dashboards, charts, or summary formulas on separate tabs that reference the report data, those tabs are not changed by refresh, as long as your formulas point to cells that still exist after the refresh.

</details>

<details>

<summary>Can I add reports for multiple entities?</summary>

Yes. The **Entity** selector is a multi-select, so you can check several entities or choose **All**. Each report is added to its own tab, and the **Refresh** tab groups them by entity.

</details>

<details>

<summary>Is there an extra cost?</summary>

No. Kick to Google Sheets is included with your Kick account.

</details>

***

Need help? [Contact Kick support](https://kick.co/support).

***

*Google Sheets™, Google Drive™ and Google Account™ are trademarks of Google LLC. Kick is not endorsed by or affiliated with Google LLC.*


# Use with AI

Use Gemini, Claude, or ChatGPT on live Kick report data in Google Sheets. Summarize trends, build forecasts, and extend your own dashboards with AI.

Your Kick reports land as live spreadsheet data in your workbook, so Gemini, Claude, or ChatGPT can read and reason over them. Summarize trends, build forecast tabs, and answer questions about your numbers without exporting from Kick.

{% hint style="info" %}
Want a quick start? use our [/advisory Agents](https://www.kick.co/agent-builder)
{% endhint %}

Build dashboards and custom analysis on **separate tabs** that reference your Kick report tabs. Do not add columns or formulas directly to a report tab, because refresh rewrites report tabs in full. See [Google Sheets](/integrations/google-sheets#add-a-report) for setup.

***

## Prompts vs skills

|              | Prompts                                   | Skills                                                           |
| ------------ | ----------------------------------------- | ---------------------------------------------------------------- |
| **What**     | One-off copy-paste asks                   | Guided workflows — get started, monthly review, budget vs actual |
| **Best for** | Exploration and ad-hoc questions          | Repeat use every month                                           |
| **Where**    | [Example prompts](#example-prompts) below | Free in [Agent Builder](https://www.kick.co/agent-builder)       |

***

## Connect your AI tool

### Gemini in Google Sheets

Gemini is already built into Google Sheets, so there's nothing to install. Open the Gemini side panel from the top-right of your spreadsheet and ask it to summarize trends, flag anomalies, or draft commentary on your Kick data.

**Best for:** quick questions and summaries without any setup.

### Claude for Chrome

The [Claude for Chrome extension](https://chromewebstore.google.com/detail/claude/fcoeoabgfenejglbffodgkkbkcdhcgfn) puts Claude in a side panel that can read the spreadsheet you have open, reason across all of its tabs, and build new tabs for you. It requires a paid Claude plan.

{% embed url="<https://files.gitbook.com/v0/b/gitbook-x-prod.appspot.com/o/spaces%2FiOfJtU5BnOhuPqTiOHth%2Fuploads%2FhJoPbrLAnhngEZqLO6Ci%2FHow%20to%20use%20Claude%20with%20Kick%20to%20Google%20Sheets.mp4?alt=media&token=e4aa3564-b00d-4049-9af0-a635a3481199>" %}

From there you can ask analyst-style questions across your whole report package, such as which property or product line is carrying the business, what happens to revenue if you lose the weakest one, or where your customer concentration risk sits.

Claude can also write back to the spreadsheet when you ask it to — for example, a new sensitivity tab modelling forecast net income at several revenue growth rates.

**Best for:** deep analysis across many tabs, and having AI build new analysis tabs for you.

{% hint style="info" %}
Claude for Chrome asks for permission before it acts. Keep it in **Ask before acting** mode so you approve any change before it touches your spreadsheet, and point it at your own dashboard tabs rather than your Kick report tabs, since report tabs are overwritten on refresh.
{% endhint %}

### ChatGPT in Google Sheets

OpenAI's [ChatGPT add-on for Google Sheets](https://workspace.google.com/marketplace/app/chatgpt/870214997678) runs in a sidebar inside your spreadsheet. Install it from the Marketplace, then open it under **Extensions → ChatGPT → Open** and sign in with your OpenAI account. It can read your cells and formulas, and build or edit tabs in place.

**Best for:** building spreadsheet structure and formulas with natural language.

***

## Example prompts

Copy-paste into Gemini, Claude, or ChatGPT after your Kick reports are in the spreadsheet. Send **Ground rules** first when using Claude for Chrome.

| Use case                  | Prompt                                                                                                                                                                          |
| ------------------------- | ------------------------------------------------------------------------------------------------------------------------------------------------------------------------------- |
| **Ground rules** (Claude) | `I'm going to ask you questions about this spreadsheet data. Act as a professional financial analyst and return all answers in this chat. Don't edit tabs unless I ask you to.` |
| **Learn the business**    | `Summarize what this P&L tells you about the business: revenue drivers, margin, and anything unusual in the last 3 months.`                                                     |
| **Budget vs actual**      | `Add a budget vs actual tab by month. Flag variances over 10%.`                                                                                                                 |
| **Rolling forecast**      | `Add a 12-month rolling forecast tab.`                                                                                                                                          |
| **OpEx changes**          | `What changed most in operating expenses vs last month, and what should I look into?`                                                                                           |
| **Month-end variances**   | `Summarize the top three variances for my month-end review.`                                                                                                                    |

***

## Prefer to work outside of Sheets?

Kick also supports access to your financial data via MCP, which lets AI tools query your reports directly without needing to export anything. [Learn more about Kick AI & Automation →](https://docs.kick.co/ai)

Any AI tool you connect to a spreadsheet containing Kick data can read that financial data, and third-party tools are governed by their own privacy and data-training policies, not Kick's. Review those settings before pointing an AI tool at sensitive financials.

***

← [Google Sheets](/integrations/google-sheets)


# Ramp

Sync your Ramp credit card transactions, reimbursements, and bills directly into Kick.

Connecting Ramp gives you a live view of all your Ramp card transactions, employee reimbursements, and bills inside Kick - categorized and posted to your books automatically.

{% hint style="info" %}
You must be an **admin** of your Ramp account to connect the integration.
{% endhint %}

***

### Connect Ramp

**From the Accounts tab:**

1. Go to the **Accounts** tab
2. Click **Add account** and select **Ramp**
3. Authenticate with your Ramp admin credentials and follow the prompts

**From the Bill Pay tab:**

1. Go to the **Bill Pay** tab
2. Click **Connect Ramp**
3. Authenticate with your Ramp admin credentials

Both methods connect the full integration - card transactions, reimbursements, and bills all sync regardless of where you connect.

***

### What syncs

* **Credit card transactions** - all Ramp card spend, [categorized](/common-workflows/categorization) automatically
* **Reimbursements** - employee expense reimbursements processed through Ramp
* **Bills** - bills created in Ramp, visible in Kick's [Bill Pay](/common-workflows/bill-pay) tab with AP aging and vendor details

***

### Bills in Kick

Once Ramp is connected, your bills appear in the **Bill Pay** tab. You can view them by vendor, by bill, or by line item - and see which are upcoming, overdue, or paid.

→ [Bill Pay](/common-workflows/bill-pay)


# Mercury

Connect Mercury to sync your transactions and bank statements directly into Kick.

Connecting Mercury gives Kick a direct feed of your transactions and bank statements - no manual downloads, no uploads. Statements sync automatically and are ready for [reconciliation](/common-workflows/reconciliation).

***

### Connect Mercury

1. Go to the **Accounts** tab
2. Click **Add account** and select **Mercury**
3. Authorize the connection through Mercury's login flow
4. Select the entity your Mercury accounts belong to
5. Click **Continue**

All Mercury accounts associated with your login are connected - checking, savings, credit card, and treasury.

***

### What syncs

| Account type | Transactions | Bank statements |
| ------------ | ------------ | --------------- |
| Checking     | ✅            | ✅               |
| Savings      | ✅            | ✅               |
| Credit card  | ✅            | ❌               |
| Treasury     | ✅            | ❌               |

Bank statements for checking and savings accounts sync automatically each month and are stored in your **Documents** tab - no manual downloading required.


# Gusto

Connect Gusto to sync your payroll runs into Kick automatically, broken out by expense type.

When you connect Gusto, every payroll run syncs into Kick as a split transaction - automatically broken out into wages, payroll taxes, employee benefits, and reimbursements. No manual entry, no spreadsheets.

{% hint style="info" %}
You must be an **admin** on your Gusto account to connect the integration.
{% endhint %}

***

### Connect Gusto

1. Go to the **Accounts** tab
2. Click **Add account** and select **Gusto**
3. Authenticate with your Gusto credentials and follow the prompts

Once connected, Kick begins syncing payroll data automatically.

***

### What syncs

* **Payroll runs** - each run syncs as a split transaction broken out by: wages, payroll taxes, employee benefits, and other payroll expenses
* **Contractor payments** - domestic contractor payments sync alongside payroll runs
* **Reimbursements** - employee expense reimbursements sync automatically
* **Departments** - if you use departments in Gusto, they sync as Classes in Kick for department-level reporting

{% hint style="info" %}
International contractor payments don't sync through the Gusto integration. Categorize those directly from your connected bank account.
{% endhint %}

***

### Departments and Classes

If you track departments in Gusto, those sync automatically as Classes in Kick - so you can see payroll costs broken out by department on your [P\&L](/reports/profit-and-loss) without any extra setup.

→ [Reports](/reports/profit-and-loss)


# Stripe & PayPal

Connect Stripe or PayPal to sync your payments, fees, and payouts into Kick automatically.

When you connect Stripe or PayPal, Kick pulls in your payment transactions and automatically splits them into gross revenue and fees - so you can see exactly what you earned and what you paid in processing costs, without any manual work.

***

### Stripe

#### What syncs

* Payments from customers, split into gross revenue and fees
* Refunds
* Payouts to your bank account
* Invoice line item detail
* Customer and product names
* Stripe Capital loan payments (split into principal, fees, and other expenses)

#### Connect Stripe

1. Go to the **Accounts** tab
2. Click **Add account** and select **Stripe**
3. Authorize the connection through Stripe's login flow
4. Select the entity your Stripe account belongs to
5. Click **Continue**

Repeat to connect multiple Stripe accounts if needed.

***

### PayPal

#### What syncs

* Payments from customers, split into gross revenue and fees
* Refunds
* Payouts to your bank account
* Customer and product names
* PayPal loan payments
* Expense transactions and vendor names

{% hint style="info" %}
Only USD transactions sync from PayPal. Foreign currency transactions need to be converted to USD and added manually.
{% endhint %}

#### Connect PayPal

1. Go to the **Accounts** tab
2. Click **Add account** and select **PayPal**
3. Authorize the connection through PayPal's login flow
4. Select the entity your PayPal account belongs to
5. Click **Continue**

***

### Cash App, Venmo, and others

Cash App and Venmo connect through Plaid like a standard bank account. Go to **Accounts** → **Add account** and search for the institution.

For payment processors that don't support Plaid, use the [Universal Importer](/setting-up/universal-importer) to upload transactions manually.

***

### Transfers from your processor to your bank

When your processor pays out to your bank account, both sides of that movement need to be matched as a transfer - otherwise Kick will count the deposit as income and double your revenue.

Kick handles this automatically for connected accounts. For recurring payouts (like daily Stripe deposits), you can also create a [Transfer Rule](/common-workflows/rules) to ensure matching is always applied.

→ [Transfers](/common-workflows/transfers)


# BILL

Sync your BILL bills, invoices, vendors, and payments directly into Kick.

Connecting BILL brings your bills, invoices, vendors, and payment data into Kick - so your AP and AR activity is reflected in your books without manual entry. Bills sync to the [Bill Pay](/common-workflows/bill-pay) tab; invoices sync to the [Invoicing](/common-workflows/invoicing) tab.

{% hint style="info" %}
You must be an **admin** of your BILL account to connect the integration.
{% endhint %}

***

### Connect BILL

**From the Accounts tab:**

1. Go to the **Accounts** tab
2. Click **Add account** and select **BILL**

**From the Bill Pay tab:**

1. Go to the **Bill Pay** tab
2. Click **Connect BILL**
3. Complete the token setup steps below

Both methods connect the full integration - bills, invoices, vendors, customers, and payments all sync regardless of where you connect.

#### Step 1: Start the connection in Kick

If you started from the **Bill Pay** tab, Kick opens the connection flow automatically. Otherwise:

1. Go to the **Accounts** tab
2. Click **Add account** and select **BILL**

#### Step 2: Create an API token in BILL

1. [Sign in to BILL](https://login.us.bill.com/neo/login)
2. In the left navigation, open **Settings**
3. Go to **Sync & Integrations → Tokens**
4. Click **Create token**, enter a token name (for example, `kick-bill-integration`), and save
5. Copy the **token value** (the secret string BILL shows once, like a password) to your clipboard before you leave the screen

{% hint style="warning" %}
Copy the token value to your clipboard before closing the screen - BILL only shows it once.
{% endhint %}

{% embed url="<https://player.mux.com/h2LpCNirnB7uBXrs01EgJQ6IOUfQmtL4hC37nIu6X5N8>" %}

#### Step 3: Complete the connection in Kick

1. Return to Kick
2. Enter the **token name** (you can use the same name you chose in BILL) and paste the **token value**
3. Click **Connect**

{% embed url="<https://www.loom.com/share/fd750c5a46d249b88b7d405056dbd770>" %}

***

### Map your accounts

To make sure bills and invoices are categorized to the right accounts automatically, upload your Kick Chart of Accounts to BILL.

**Export from Kick:**

1. Go to **Accounting** → **Chart of Accounts**
2. Click the download icon and select **Chart of Accounts (.csv)**

**Import to BILL:**

1. In BILL, open **Settings** in the left navigation, then go to **Import & export**
2. Click **Custom File Integration** in the sidebar
3. Scroll to **Accounts** and click **Import**
4. Upload the CSV from Kick

Your Kick accounts are now available when categorizing bills and invoices in BILL, and those assignments sync into Kick automatically.

***

### What syncs

* **Bills** - bills created in BILL, visible in Kick's [Bill Pay](/common-workflows/bill-pay) tab with AP aging and vendor details
* **Invoices** - invoices created in BILL, visible in Kick's [Invoicing](/common-workflows/invoicing) tab with customer details and payment status
* **Vendors and customers** - contact information syncs to [Counterparties](/common-workflows/counterparties)
* **Payments** - payment transactions and status updates
* **GL account assignments** - account categorizations for bills and invoices sync into Kick automatically

***

### Bills and invoices in Kick

Once BILL is connected, your bills appear in the **Bill Pay** tab and your invoices appear in the **Invoicing** tab. You can view bills by vendor, by bill, or by line item - and see which are upcoming, overdue, or paid.

→ [Bill Pay](/common-workflows/bill-pay)\
→ [Invoicing](/common-workflows/invoicing)


# Manage Integrations

Fix disconnected accounts, reassign accounts to entities, and manage your integration settings.

All your connected accounts are managed from the **Accounts** tab. Click the options menu (⋯) on any account to access its settings.

***

### Fix a disconnected account

Bank connections can occasionally disconnect, usually because your bank requires re-authentication after a password change or security update. When this happens, the account shows a connection error on the Accounts tab.

1. Go to the **Accounts** tab
2. Click **Fix connection** on the affected account
3. Re-authenticate with your bank

Once reconnected, Kick automatically syncs any missed transactions.

#### When Fix connection won't reconnect

Sometimes a connection drops completely and **Fix connection** won't bring it back, even though your bank may show the login as successful. This usually means the account has *churned* on the bank's side: your bank changed the underlying account details (a new card, a renamed account, a replacement after fraud, or a migration), and Plaid lost its link to the original account. The original connection no longer exists to restore, so it has to be reconnected as a new account and merged back into the original.

1. On the **Accounts** tab, click **Add account**, *not* **Fix connection** on the broken account
2. Complete the login flow with your bank
3. When asked whether this is a new login or the same login, select **This is a new login**. This creates a duplicate account, which is expected
4. [Contact support](/troubleshooting/contact-us) with your bank name and which account(s) you reconnected
5. We merge the new connection into your original account on the back end

The merge moves the live connection onto your original account, removes the duplicate account and its transactions, and preserves your existing categorizations, rules, and manual edits, so you keep your full history with nothing to re-categorize.

{% hint style="warning" %}
Choosing **This is a new login** intentionally creates a duplicate. Don't remove the original account, support needs it in place to complete the merge.
{% endhint %}

***

### Reassign an account to a different entity

If an account is connected to the wrong business entity, you can reassign it without disconnecting.

1. Go to the **Accounts** tab
2. Click ⋯ on the account → **Settings**
3. Change the entity in the **Details** section

***

### Change the sync start or end date

The start date controls how far back Kick pulls in [transactions](/common-workflows/transactions). It defaults to your bookkeeping start date. The end date stops syncing after a specific date.

1. Go to the **Accounts** tab
2. Click ⋯ on the account → **Settings**
3. Click **Edit** next to the **Start date** or **End date**
4. Pick a new date and click **Set Date**

{% hint style="warning" %}
Changing the start date may pull in additional historical transactions or remove existing ones. If you've already categorized transactions in that range, check with your accountant before making changes.
{% endhint %}

***

### Remove an account

To disconnect an account entirely, go to the **Accounts** tab → click ⋯ → **Remove account**. Transactions already synced are not deleted, so they remain in your books.


# FAQs

Answers to the most common questions from Kick business owners.

<details>

<summary><strong>How does Kick get my transactions?</strong></summary>

Kick connects to your bank accounts and financial tools through Plaid (which covers 10,000+ institutions) and direct integrations with Ramp, Mercury, Gusto, Stripe, PayPal, and BILL. Once connected, transactions sync automatically - typically within a few hours of settling.

</details>

<details>

<summary><strong>How accurate is the automatic categorization?</strong></summary>

Kick [categorizes](/common-workflows/categorization) approximately 97% of transactions correctly on the first pass. When it's not confident, it leaves the transaction uncategorized for you to review. The more corrections you make (or [Rules](/common-workflows/rules) you set), the more accurate Kick becomes for your specific business.

</details>

<details>

<summary><strong>Can I manage more than one business in Kick?</strong></summary>

Yes. You can add multiple entities to a single workspace and manage them all from one place. Multi-entity requires a **Plus** plan or above. On Plus, an additional entity costs nothing until it reaches 250 transactions; once it passes that mark it stays billed at $50/month for unlimited transactions. Older Plus plans are capped at 5 entities until you move to current pricing.

→ [Multi-Entity](/setting-up/multi-entity)

</details>

<details>

<summary><strong>Can my accountant access my Kick workspace?</strong></summary>

Yes. Invite them from **Settings** → **Members**, choose the appropriate role, select which entities they should access, and click **Send invite**.

For details on roles → [Invite Your Team](/setting-up/invite-your-team)

</details>

<details>

<summary><strong>What if I use a personal card for business expenses?</strong></summary>

Connect your personal accounts to the Personal entity. Transactions there won't hit your books until you review and move them across. It's the best way to make sure no business expense gets missed.

→ [Personal to Business](/common-workflows/personal-to-business)

</details>

<details>

<summary><strong>How far back does Kick pull in transaction history?</strong></summary>

Typically 6 to 24 months depending on your bank. For older data, use the [Universal Importer](/setting-up/universal-importer) to upload historical bank statements.

</details>

<details>

<summary><strong>What's the difference between the Free and paid plans?</strong></summary>

The Free plan covers up to 250 transactions per year and includes core features like auto-categorization, reporting, and integrations. Paid plans unlock unlimited transactions, reconciliation, and other advanced features. Multi-entity support requires Plus or above.

→ [Plan Comparison](/reference/plan-comparison)

</details>

<details>

<summary><strong>Is my financial data secure?</strong></summary>

Yes. Kick uses bank-level encryption and industry-standard security practices to protect your data.

→ [Security](/reference/security)

</details>


# Contact Us

Reach the Kick team through in-app chat or email.

### In-app support

Click the **chat icon** in the bottom-left corner of your screen to send our support team a message directly from Kick. Available to all logged-in users.

***

### Email

Reach us at [**help@kick.co**](mailto:help@kick.co) for general inquiries or if you're unable to access the app.


# Glossary

Plain-English definitions for terms you'll encounter in Kick.

**Accrual accounting**\
A method of accounting where income and expenses are recorded when they're earned or incurred, not when cash actually changes hands. The alternative is cash basis accounting.

[**Balance Sheet**](/reports/balance-sheet)\
A financial report showing what your business owns (assets), what it owes (liabilities), and what's left over (equity) at a specific point in time.

**Cash basis accounting**\
A method of accounting where income and expenses are recorded when cash is actually received or paid. Simpler than accrual, and common for small businesses.

[**Categorization**](/common-workflows/categorization)\
The process of labeling a transaction with a category - like *Meals & Entertainment* or *Software* - so it appears in the right place on your reports.

**Chart of Accounts (CoA)**\
A structured list of all the accounts used to record transactions in your books. You or your accountant can manage this. Most business owners don't need to interact with it directly.

**Class**\
A way to segment transactions by department, location, project, or product line for more granular reporting. Available on the Plus plan.

**Counterparty**\
The vendor or customer on the other side of a transaction - who you paid or who paid you.

**Entity**\
A single business within your Kick workspace. If you own multiple businesses, each one is a separate entity.

**General Ledger (GL)**\
The complete record of all financial transactions in your business, organized by account. The underlying source of truth for all your reports.

[**Lock**](/working-with-your-team/locks)\
A setting that prevents changes to a closed period. Your accountant typically locks periods after they've reviewed and finalized the books.

**Memo**\
A free-text note attached to a transaction for context - useful for explaining what a charge was for.

**Personal entity**\
A special entity in Kick for connecting personal bank accounts and credit cards. Transactions here don't post to your business books until you move them across.

[**Profit & Loss (P\&L)**](/reports/profit-and-loss)\
A financial report showing your income, expenses, and net profit or loss over a period. Also called an income statement.

[**Reconciliation**](/common-workflows/reconciliation)\
The process of matching your transactions in Kick against your official bank statements to confirm everything is accurate. You or your accountant can handle this.

[**Rule**](/common-workflows/rules)\
An automated instruction that tells Kick how to handle specific transactions - for example, always categorizing Amazon transactions as *Supplies & Equipment*.

[**Split**](/common-workflows/splits)\
Dividing a single transaction into multiple line items, each with its own category, entity, or class assignment.

[**Task**](/working-with-your-team/tasks)\
A communication tool in Kick that lets your accountant or team assign you requests, questions, or action items tied directly to specific transactions.

[**Transfer**](/common-workflows/transfers)\
Money moving between two accounts you own - like a bank-to-bank transfer or a credit card payment. Both sides need to be matched in Kick so the movement doesn't inflate your income or expenses.

**Workspace**\
Your Kick account environment - the single place that contains all your entities, transactions, reports, and settings.


# Security

How Kick protects your financial data and what you should know about privacy.

Your financial data is sensitive, and Kick is built to protect it. Here's what you should know about how Kick handles your data and keeps your account secure.

***

### Data encryption

All data transmitted to and from Kick is encrypted in transit using TLS. Data at rest is encrypted using AES-256 - the same standard used by banks and major financial institutions. Your credentials are never stored in plain text.

***

### Bank connections

Kick connects to your financial institutions through Plaid, a trusted third-party service that powers bank connections for thousands of financial apps. Kick never sees or stores your bank login credentials - authentication happens directly through Plaid's secure, encrypted flow.

***

### Access controls

Kick uses role-based access control so you decide exactly who can see and do what in your workspace. You can add or remove team members at any time, scope access to specific entities, and change roles as your needs evolve.

→ [Roles & Permissions](/reference/roles-and-permissions)

***

### Data retention

Kick retains your financial data for as long as your account is active and as long as necessary to provide the service. Data may also be retained where required by law or for legitimate business purposes such as fraud prevention. Backup copies may exist in secure systems for a limited period as protection against data loss.

***

### Privacy

For full details on how Kick collects, uses, and protects your personal information, see the [**Privacy Policy**](https://www.kick.co/legal#privacy) and [**Terms of Service**](https://www.kick.co/legal#terms-of-service).

For privacy-specific questions or requests, contact [**privacy@kick.co**](mailto:privacy@kick.co).


# Roles & Permissions

Control what each person on your team can see and do in your workspace.

Every person you invite to your Kick workspace is assigned a role. Roles control what they can access - from viewing reports to managing accounts and billing.

***

### Workspace roles

<table><thead><tr><th width="160.3104248046875">Role</th><th>What they can do</th></tr></thead><tbody><tr><td><strong>Admin</strong></td><td>Workspace-wide access. Manage team members, entities, accounting settings, and view billing.</td></tr><tr><td><strong>Member</strong></td><td>Assigned entities only. Access to reports, transactions, documents, connect bank accounts, and create tasks.</td></tr><tr><td><strong>Accountant</strong></td><td>Assigned entities only. Everything a Member can do plus manage team members, and edit chart of accounts, locks and Accounting settings.</td></tr></tbody></table>

***

### Choosing the right role.

**Admin** is the right role for someone who needs full control across your workspace: managing team members, entities, and accounting settings. Admins automatically have access to all current and future entities, and can view your plan and billing details in Stripe.

**Member** is the right role for a business partner, office manager, or collaborator who needs to work in the books on specific entities - reviewing reports and transactions, uploading documents, connecting bank accounts, and creating tasks - without changing accounting settings or managing team members.

**Accountant** is the right role for a bookkeeper or outside accountant who needs to do everything a Member can do plus manage team members and edit chart of accounts, categories, locks, and settings. You can scope their access to specific entities.

***

### Entity access

When you invite someone, you choose which entities they can access - one specific business, or all of them. You can also enable **New business entities** so they automatically get access to any entity you add in the future.

Admins always have access to all entities, current and future. This cannot be scoped.

***

### Change a team member's role

1. Go to **Settings → Members**
2. Click **⋯** next to the person's name
3. Select **Configure permissions**
4. Update their role and entity access
5. Click **Save**

***

### The Primary Admin

Every workspace has one Primary Admin - typically the business owner. The Primary Admin is the only person who can manage billing and transfer the Primary Admin role to someone else. There can only be one Primary Admin per workspace, and the role cannot be removed - only transferred.

***

### FAQs

<details>

<summary><strong>Can a Member invite other people?</strong></summary>

No. Only Admins and Accountants can invite and manage team members.

</details>

<details>

<summary><strong>What's the difference between Admin and Accountant?</strong></summary>

Both have the same ability to manage your books. The difference is scope - Admins automatically get access to all entities, while Accountants are scoped to the specific entities you assign them.

</details>

<details>

<summary><strong>Can I have more than one Admin?</strong></summary>

Yes. You can have multiple Admins. There is only one Primary Admin, but you can have as many Admins as you need.

</details>

<details>

<summary><strong>What if I need to remove someone's access?</strong></summary>

Go to **Settings → Members**, click **⋯** next to their name, and select **Remove from workspace**. Their access is revoked immediately.

</details>


# Plan Comparison

Start free, or choose the plan that fits where your business is today.

Kick offers four plans. You can start for free and upgrade as your business grows - most features that matter day-to-day are available on every plan.

***

## Choosing a plan

Here's what you need to know to pick the right fit for your business.

| Plan         | Best For                                                                        | Price   | What's included                                                         |
| ------------ | ------------------------------------------------------------------------------- | ------- | ----------------------------------------------------------------------- |
| **Free**     | Getting started or evaluating Kick                                              | $0/mo   | 1 entity, up to 250 transactions/year, core features                    |
| **Basic**    | Full-time businesses that want automation and unlimited transactions            | $40/mo  | 1 entity, unlimited transactions, reconciliation, AI automation         |
| **Plus**     | Businesses with multiple entities, accrual needs, or department-level reporting | $100/mo | Unlimited entities\*, classes, accrual ledger, AR & AP                  |
| **Advanced** | Complex businesses or those migrating from another platform                     | Custom  | Everything in Plus, plus migration support and a dedicated support team |

\*Plus plan includes the first 250 transactions per entity per year for free, and $50/month per entity for unlimited transactions.

Two of those Plus features are worth a plain-English definition. An **accrual ledger** records income and expenses when they're earned or owed, not only when cash moves. **AR & AP** track money owed to you and money you owe.

***

## How to decide

**Start with Free** - if you're evaluating Kick or your business has under 250 transactions per year. All the core features are available so you can get a real feel for how it works before committing.

**Move to Basic** - as soon as you need unlimited transactions, want to reconcile your accounts, or want to use Kick's AI automation tools. The right upgrade for most single-entity businesses.

**Upgrade to Plus** - as soon as you have more than one business to manage, need accrual accounting, or want to track performance by location, department, or project using [Classes](/common-workflows/classes). Pricing scales predictably as you add entities.

**Choose Advanced** - if your business has complex needs, you're migrating from QuickBooks or another platform, or you want a dedicated support team. [Contact us](/troubleshooting/contact-us) to learn more.

***

## Feature comparison

See our [Pricing page](https://kick.co/pricing) for a detailed, by-feature breakdown of every plan.


# Keyboard Shortcuts

Keyboard shortcuts to help you move faster in Kick.

### Command portal

Press **⌘ + K** to open the command portal. From here you can search, navigate to any page, or trigger quick actions like adding an account, transaction, or task.

***

### Global shortcuts

* **⌥ + H** - Show all keyboard shortcuts
* **⌥ + S** - Focus the search box on pages that have one
* **⌘ + K** - Open command portal
* **⌘ + B** - Open / close the left sidebar

***

### Transactions tab

{% hint style="info" %}
The blue line to the left of a transaction row indicates the focused row.
{% endhint %}

#### Row shortcuts

| Shortcut       | Action                                                                                                                                                         |
| -------------- | -------------------------------------------------------------------------------------------------------------------------------------------------------------- |
| Enter or x     | Select or deselect a transaction                                                                                                                               |
| Esc            | Remove bulk select or exit selection                                                                                                                           |
| ⌘ + → / ←      | Control pagination                                                                                                                                             |
| ↑ / ↓ or j / k | Move row focus up or down                                                                                                                                      |
| Shift + A      | Select or deselect all rows on the current page                                                                                                                |
| Shift + ↑ / ↓  | Select multiple transactions                                                                                                                                   |
| ⌘ + ↑ / ↓      | Jump to first or last row                                                                                                                                      |
| → / ←          | Open or close the details panel                                                                                                                                |
| c              | Open category selector for the focused row                                                                                                                     |
| m              | Add or edit a memo for the focused row                                                                                                                         |
| e              | Open entity selector for the focused row                                                                                                                       |
| g              | Choose the ledger account the focused transaction posts to in your chart of accounts. If your view shows the accrual ledger column instead, it opens that one. |

The c, m, e, and g keys act on the focused row only. They do nothing while transactions are selected, because bulk edits run through the command portal instead.

#### Command portal shortcuts

With transactions selected, press ⌘ + K to open the command portal. Type an action's letter to bring it to the top of the list, then press Enter.

| Key | Action             |
| --- | ------------------ |
| T   | Create task        |
| C   | Set category       |
| V   | Set counterparty   |
| L   | Set class          |
| G   | Set cash ledger    |
| R   | Revert cash ledger |
| A   | Set accrual ledger |
| E   | Set entity         |
| M   | Set memo           |
| U   | Unmatch all        |
| S   | Unsplit all        |

{% hint style="info" %}
The portal only lists actions that apply to the current selection, so not every key is available every time. The ledger actions, for example, appear only when your workspace uses those columns.
{% endhint %}

***

### Navigation shortcuts

| Shortcut | Navigates to      |
| -------- | ----------------- |
| G then A | Accounts          |
| G then B | Billing           |
| G then C | Categories        |
| G then D | Documents         |
| G then F | Classes           |
| G then G | General Ledger    |
| G then H | Chart of Accounts |
| G then I | Invoicing         |
| G then J | Reconciliation    |
| G then K | Profit & Loss     |
| G then L | Balance Sheet     |
| G then M | Accounting        |
| G then N | Trial Balance     |
| G then Q | Tasks             |
| G then R | Rules             |
| G then S | Settings          |
| G then T | Transactions      |
| G then V | Counterparties    |
| G then W | Insights          |
| G then Y | Activity          |


# Refer & Earn

Share Kick with other business owners and earn a reward for every paid signup through your link.

### Program overview

Kick's referral program lets you earn $100 for every business owner who signs up through your referral link and subscribes to a paid plan. There's no limit to how many people you can refer.

***

### Get your referral link

1. Click your **profile image** in the top right corner of Kick
2. Select **Refer & Earn**
3. Copy your personal referral link and share it

Anyone who signs up through your link and activates a paid subscription is attributed to you. Your reward is issued once they convert.

{% embed url="<https://www.loom.com/share/e1f7c6d1efe647af9eae7485038a5926>" %}

***

### Who to refer

The referral program works best when you share with other business owners who are spending time on bookkeeping or using a platform that isn't working for them. If someone you know is on QuickBooks, using a spreadsheet, or getting started with their books, your referral link is the fastest way to get them set up.

***

### Looking for an accountant - or looking for clients?

Kick's Partner Program connects business owners with vetted accountants and bookkeepers who know the platform - and gives accounting professionals the tools to grow and manage their client base in one place.

Whether you're a business owner who wants hands-on support, or an accountant looking to grow your practice, the Partner Program is the right starting point.

→ [Partner Program](/referrals-and-partnerships/partner-program)


# Partner Program

Find a trusted accountant or bookkeeper through Kick, or apply to become a Kick Partner yourself.

Kick's Partner Program connects business owners with vetted accounting and bookkeeping professionals who know the platform - and gives accountants and bookkeepers the tools to grow and manage their client base efficiently.

***

### Find an accountant or bookkeeper

If you want hands-on support - monthly bookkeeping, reconciliations, tax preparation, or financial strategy - Kick can match you with a trusted professional who works directly in Kick.

Partners in the program are familiar with the platform, so there's no ramp-up time. They can access and manage your books directly, at whatever level of involvement you need.

[**Get connected with an Accounting Partner →**](https://kick.co/partners)

***

### Do I need a bookkeeping partner for my past books?

Kick handles your current and future transactions automatically. Getting your historical books up to date may require additional work, depending on your situation.

You likely don't need a partner if your business has no payroll or loans and you're comfortable importing past transactions manually using [Import Transactions](/setting-up/universal-importer).

A partner is worth considering if:

* **You need data older than 2 years** - Kick retrieves up to 2 years of transaction history via Plaid. Older data or closed accounts need to be imported manually.
* **You have payroll history to reconcile** - each tax year requires a manual payroll reconciliation via journal entry. This is specialized work most business owners prefer to hand off.
* **You have loans** - each loan payment needs to be split between principal and interest. If you have multiple years of loan history, a partner can complete this accurately and efficiently.

If any of these apply and you'd rather not handle them yourself, Kick can match you with a bookkeeping partner who can take over the catch-up work - often starting the next business day.

***

### Become a Kick Partner

If you're an accountant or bookkeeper looking to grow your practice, the Kick Partner Program is designed for you. Partners get:

* [**Multi-entity support**](/setting-up/multi-entity) - manage bookkeeping across multiple client businesses from a single workspace
* **Client collaboration tools** - work directly in your clients' Kick accounts with [role-based access controls](/reference/roles-and-permissions)
* **Client referrals** - get matched with small businesses in your area looking for accounting and bookkeeping services

[**Apply to become a Kick Partner →**](https://kick.co/partners/apply)


# Get a Demo

See Kick in action with a personalized walkthrough built around your business.

See exactly how Kick would work for your business - live, with someone who can answer your specific questions.

On the call we'll cover:

* How Kick connects to your accounts and starts categorizing automatically
* How to set up Kick around the way your business actually runs
* Which plan fits your situation, and what onboarding looks like

No prep needed. No commitment.

[**Book a call →**](https://calendly.com/d/cv28-cyy-56c/kick-introduction-call)

***

Prefer to reach out directly? Email us at [**sales@kick.co**](mailto:sales@kick.co) and we'll get back to you.


# Kick Docs for Accountants

### Frequently accessed

<table data-view="cards"><thead><tr><th></th><th></th><th></th><th data-hidden data-card-target data-type="content-ref"></th></tr></thead><tbody><tr><td><i class="fa-rocket-launch">:rocket-launch:</i></td><td><strong>Setup Guide</strong></td><td>Get your firm and first client set up in minutes</td><td><a href="/pages/NFhswuyBTbBuG2tzjWwo">/pages/NFhswuyBTbBuG2tzjWwo</a></td></tr><tr><td><i class="fa-book-open">:book-open:</i></td><td><strong>Close Guide</strong></td><td>Close the books faster using Kick best practices</td><td><a href="/pages/GKN5bYKBSQz2kCvgEvnX">/pages/GKN5bYKBSQz2kCvgEvnX</a></td></tr><tr><td><i class="fa-triple-chevrons-right">:triple-chevrons-right:</i></td><td><strong>Catch-Up Guide</strong></td><td>Clean up multiple historical periods for new clients with ease</td><td><a href="/pages/EHL3RFx242XezqbE403a">/pages/EHL3RFx242XezqbE403a</a></td></tr><tr><td><i class="fa-buildings">:buildings:</i></td><td><strong>Multi-Entity</strong></td><td>Streamline intercompany review and build automations that run across entities</td><td><a href="/pages/qBFpLDfxURr0uxHV39u7">/pages/qBFpLDfxURr0uxHV39u7</a></td></tr><tr><td><i class="fa-transporter-6">:transporter-6:</i></td><td><strong>Categorization</strong></td><td>Learn how Kick's model works with Rules to automate categorization with accuracy</td><td><a href="/pages/IlDvB8b6JC5Lh9NjthWt">/pages/IlDvB8b6JC5Lh9NjthWt</a></td></tr><tr><td><i class="fa-bars-staggered">:bars-staggered:</i></td><td><strong>Chart of Accounts</strong></td><td>Use Kick's CoA templates to automate reporting based on entity type, or create one custom</td><td><a href="/pages/dzEy416fNEKnmChpmjDT">/pages/dzEy416fNEKnmChpmjDT</a></td></tr><tr><td><i class="fa-arrow-left-arrow-right">:arrow-left-arrow-right:</i></td><td><strong>Transfers</strong></td><td>Best practices for clearing account review and transfer automations</td><td><a href="/pages/sk3zINIcwRCdtxufY4gl">/pages/sk3zINIcwRCdtxufY4gl</a></td></tr><tr><td><i class="fa-sparkles">:sparkles:</i></td><td><strong>Rules</strong></td><td>Automate every part of your month-end close</td><td><a href="/pages/o7nz0oqjWz9ryUW9xXSj">/pages/o7nz0oqjWz9ryUW9xXSj</a></td></tr><tr><td><i class="fa-comments-question-check">:comments-question-check:</i></td><td><strong>Contact Us</strong></td><td>Need help? Our team is here to support.</td><td><a href="/pages/ZR3G3I5nAUN9ZGBaML5c">/pages/ZR3G3I5nAUN9ZGBaML5c</a></td></tr></tbody></table>


# Set Up Your Firm


# Register for Kick

Turn your firm into an AI-enabled practice—set up your Kick account to get started

Create your firm account at [use.kick.co/register](http://use.kick.co/register). This is the parent account that houses all your client workspaces.

***

### What You Get

After registration, you'll have access to:

* **Accountant Home** — Your dashboard for managing all client workspaces
* [**Free Firm Workspace**](/accountants/start-here/set-up-your-firm/free-firm-workspace) — A Plus-tier sandbox for testing workflows, prepping your own books, or demoing to prospects
* [**Team management**](/accountants/start-here/set-up-your-firm/invite-your-team) — Add your staff and configure their access to client workspaces

{% hint style="info" %}
**Tip:** Looking for hands-on onboarding, training, and client leads? The Kick Accountant AI Program includes 1-on-1 support and a dedicated Slack channel with the Kick team. Book a demo during sign-up or [contact us](/accountants/troubleshooting/contact-us) to learn more.
{% endhint %}


# Invite your Team

Add accountants, bookkeepers, and staff to your firm so they can access client workspaces.

{% hint style="info" %}
Before you invite: Review the available permission levels to choose the right access. See [Roles & Permissions](/accountants/managing-clients/roles-and-permissions) for details.
{% endhint %}

### Add a Team Member

1. From the sidebar, click **Team**.
2. Click **Add Team** (top right).
3. Enter one or more email addresses (comma-separated).
4. Select the appropriate role.
5. Choose which **Clients** they should have access to.
   * Check **New clients** to automatically grant access to clients you add in the future.
6. Click **Send invites**.

Your team member will receive an email invitation to join your organization.

{% embed url="<https://www.loom.com/share/1bc4f4877bbd455c8efaf47ef76085a2>" %}

***

### Manage Pending Invites

If someone hasn't accepted their invite yet:

1. Go to **Team** from the sidebar.
2. Find the team member with **Invite pending** status.
3. Click the **⋯** menu and select:
   * **Copy invite link** — Share the link directly
   * **Resend invite** — Send another email
   * **Cancel invite** — Revoke the invitation

{% embed url="<https://www.loom.com/share/abafaa97325a4723bcbf2a2cdbecada1>" %}

***

### Update Permissions or Remove Access

To change a team member's client access or remove them from your organization:

1. Go to **Team** from the sidebar.
2. Find the team member and click the **⋯** menu.
3. Select:
   * **Configure permissions** — Change which clients they can access
   * **Remove from organization** — Revoke all access

{% embed url="<https://www.loom.com/share/59890aad91dd4b4593a1cac0e4fec3fb>" %}

***

### FAQ

<details>

<summary><strong>Can I invite multiple people at once?</strong></summary>

Yes. Enter multiple email addresses separated by commas when adding team members.

</details>

<details>

<summary><strong>What happens when they accept the invite?</strong></summary>

They'll create a Kick account (or sign in with an existing one) and immediately see the clients you granted them access to.

</details>

<details>

<summary><strong>Can team members see all clients?</strong></summary>

Team members can only see the clients you've granted them access to. You can also enable **New clients** to automatically include future clients.

</details>

<details>

<summary><strong>How is this different from inviting clients?</strong></summary>

Team members are added to your *organization* and can access multiple client workspaces. Clients are invited to their own *workspace* to view their books. Learn more in [Invite your Clients](/accountants/setting-up/invite-your-clients).

</details>


# Free Firm Workspace

Your firm workspace is a Plus-tier environment where you can run your firm's own books, demo Kick to prospects, and test new workflows before rolling them out to clients

### Where to find it

Your firm workspace appears on the Clients page, named after your firm. It's created automatically when you register and stays on a free [Plus plan](/accountants/reference/plan-comparison-guide) indefinitely.

<div data-with-frame="true"><figure><img src="/files/1hf9zp2MwVmpGFVFov0Q" alt=""><figcaption></figcaption></figure></div>

### Use cases

* **Run your firm's books** — Connect your firm's bank accounts, categorize transactions, and close periods using the same workflow you use for clients.
* **Demo to prospects** — Walk potential clients through real workflows, show how transactions auto-categorize on sync, and demonstrate how quickly books can close.
* **Test before you deploy** — Try new Rules, Split configurations, or Chart of Accounts changes here before applying them to client accounts.

{% hint style="info" %}
**Tip:** Build template Rules and Chart of Accounts configurations here that you can reference when onboarding new clients.
{% endhint %}

***

### What's included

Your firm workspace includes all Plus plan features at no cost:

* Collaboration tool with your team and clients
* Unlimited transactions
* Custom Chart of Accounts
* Rules (Transaction, Split, Transfer, and Accounting)
* Balance Sheet and Reconciliation
* Classes for segment reporting
* Multi-entity with automatic intercompany journal entries
* Receipt matching and document storage
* And more...

***

### Next steps

→ [Invite Your Team](/accountants/start-here/set-up-your-firm/invite-your-team)

→ [Add Your First Client](/accountants/managing-clients/add-your-first-client)


# Add a Client Workspace

Each client in Kick gets their own workspace where you manage their books, connect accounts, and collaborate with their team.

### Add a new client

From the [**Clients**](https://use.kick.co/clients) tab, click **Add client** in the top right. It takes less than a minute to get a client set up.

1. Enter the client name and business name.
2. Select the entity type for the first business entity.
3. Choose the services you offer to this client.
4. Set the bookkeeping start date.
5. Select the client's [subscription](/accountants/managing-clients/subscription-and-billing) - Free, Basic, or Plus.
6. Optionally, invite your client.

{% hint style="info" %}
The bookkeeping start date controls when transaction data starts syncing and is the default for all connected accounts. You can update the start date at any time from the Clients tab.
{% endhint %}

***

### After setup

Your client's first entity is created during this process. From here:

* [Add additional entities](/accountants/setting-up/multi-entity/adding-and-removing-entities) if your client operates multiple businesses
* [Connect accounts](/accountants/setting-up/integrations/connect-accounts) via Plaid, direct integrations, or the Universal Importer

***

### If your client is already on Kick

If your client already has a Kick workspace, don't create a new one from your Clients tab. Instead, have them invite your firm to their existing workspace.

→ [Add Existing Kick Users as Clients](/accountants/managing-clients/add-your-first-client/add-existing-kick-users-as-clients)

***

### Invite your client

Once the workspace is set up, you can [invite your client](/accountants/setting-up/invite-your-clients) and their team. Many firms prefer to get accounts connected and workflows dialed in before granting access.

→ [Roles & Permissions](/accountants/managing-clients/roles-and-permissions)

### **FAQs**

<details>

<summary><strong>I am part of the Accountant AI Program, do I still need to enter billing details?</strong></summary>

Yes. You still need to enter billing details when adding a client, but you will not be charged again for clients included in your Accountant AI Program annual licenses.

</details>

<details>

<summary>C<strong>an I add additional entities to an existing client?</strong></summary>

Additional entities can be added at any time for clients on the Plus plan. See [Adding & Removing Entities](/accountants/setting-up/multi-entity/adding-and-removing-entities).

</details>


# Setup Guide

A step-by-step guide for setting up your firm and onboarding clients to Kick.

## Firm Setup

Get your firm account configured before onboarding clients.

* **Register your firm** — [Register for Kick](/accountants/start-here/set-up-your-firm/register-for-kick) to create the parent account that will house all your client workspaces.
* **Invite your team** — [Add team members](/accountants/start-here/set-up-your-firm/invite-your-team) and assign roles (Owner, Admin, Manager, Member) based on what each person needs to access.
* **Use your free workspace** — Test workflows in your [free firm workspace](/accountants/start-here/set-up-your-firm/free-firm-workspace) before going live — it's a full Plus-tier sandbox for prepping your own books, or demoing to prospects.

***

## Client Onboarding

Set up each client's workspace, connect their data, and give them access.

* **Create the workspace** — [Create a client workspace](/accountants/start-here/add-your-first-client) and [add entities](/accountants/setting-up/multi-entity/adding-and-removing-entities) if they have multiple businesses — this keeps related companies organized and enables intercompany automations.
  * If your client is already on Kick, have them [invite your firm](/accountants/managing-clients/add-your-first-client/add-existing-kick-users-as-clients) instead.
* **Migrate historical data** — Follow the [migration guide](/accountants/setting-up/migration) to migrate historical data for your clients.
* **Set up the Chart of Accounts** — If not already completed in migration, [import your Chart of Accounts](/accountants/setting-up/chart-of-accounts/import-your-chart-of-accounts) and verify opening balances against prior period financials.
* **Connect financial accounts** — [Connect accounts](/accountants/setting-up/integrations/connect-accounts) via Plaid or direct integration ([Stripe and PayPal](/accountants/setting-up/integrations/payment-processors), [Ramp](/accountants/setting-up/integrations/ramp), [BILL](/accountants/setting-up/integrations/bill), [Mercury](/accountants/setting-up/integrations/mercury), [Gusto](/accountants/setting-up/integrations/gusto)), or import data manually via the [Universal Importer](/accountants/setting-up/universal-importer).
  * **Connect personal accounts too** — to capture business expenses that occurred in personal accounts, and to improve categorization accuracy for contributions and distributions ([read more](/accountants/bookkeeping-workflows/personal-to-business) about personal accounts in Kick).
* **Invite the client** — [Invite your client](/accountants/setting-up/invite-your-clients) with the **Member** role so locked periods are view-only.

***

## Automation and Personalization

Reduce manual work and keep processes consistent across clients.

* **Rules** — Create [Rules](/accountants/bookkeeping-workflows/rules) to automate [categorization](/accountants/bookkeeping-workflows/categorization) and more — rules always override AI, so use them for client-specific patterns that reduce review time.
* **Classes** — Use [Classes](/accountants/bookkeeping-workflows/classes) to segment transactions by department, location, or project for granular reporting.
  * Using [Gusto](/accountants/setting-up/integrations/gusto) or [Ramp](/accountants/setting-up/integrations/ramp)? Departments you've created will automatically sync as Classes in Kick.
* **Collaborate** — Streamline communication with [Tasks](/accountants/close-workflows/tasks) for open item requests or confirmations, create [Memos](/accountants/collaboration/memos) for shared transaction context, apply [Locks](/accountants/close-workflows/locks) to protect closed periods, and view [Activity](/accountants/close-workflows/activity) for audit trails (who did what, and when).

***

## Onboarding Checklist

* [ ] Register firm and invite team
* [ ] Create client workspace and add entities
* [ ] Migrate data (if applicable)
* [ ] Import Chart of Accounts (if not already completed in migration) and verify opening balances
* [ ] Connect all financial accounts (including personal)
* [ ] Invite clients to Kick
* [ ] Set up automations
* [ ] Collaborate with your team


# Close Guide

A step-by-step guide for executing a period close in Kick.

## Before You Start

Before beginning any close, confirm the following:

* **Previous period is** [**locked**](/accountants/close-workflows/locks)**.** This prevents backdated entries from contaminating a period you've already closed. If you haven't locked the prior month yet, do that first.
* **All accounts are connected and syncing.** Check the Accounts tab for disconnection warnings. If an account dropped, [reconnect](/accountants/setting-up/integrations/manage-integrations) it or request statements from the client.
* **Prior period retained earnings agree with the last financial package.** If they don't, something was posted to a closed period — investigate before proceeding.
* **Client has been invited with** [**correct permissions**](/accountants/managing-clients/roles-and-permissions)**.** We recommend adding clients as Members so locked periods are view-only for them.

***

## Step 1: Confirm Transaction Completeness

Start with [reconciliation](/accountants/close-workflows/reconciliation) — not categorization. The goal is to answer one question: do we have every transaction the bank has?

In Kick, every transaction imported is immediately posted to the ledger — reconciliation here is about confirming completeness, not posting.

**What to do:**

* Navigate to Accounting → Reconciliation
* Upload statements for the period if they haven't synced automatically through [Plaid](/accountants/setting-up/integrations/connect-accounts)
* Follow the steps in the reconciliation article for each bank and credit card account
* Confirm opening and closing balances match the bank statements
* Resolve any exceptions (missing transactions, date discrepancies, duplicates)

**Why Kick does it this way:** Reconciling first ensures data completeness before you start reviewing or categorizing. This prevents the common problem of discovering missing transactions halfway through a close.

***

## Step 2: Review and Resolve Transfers

Before categorizing, check that [transfers](/accountants/bookkeeping-workflows/transfers) between accounts are properly matched. Unmatched or miscategorized transfers can show up as non-zero balances in your clearing accounts on the [Balance Sheet](/accountants/reports/balance-sheet).

**What to do:**

* Review the Balance Sheet for non-zero clearing account balances:
  * Bank Transfer Clearing
  * Payment Transfer Clearing
  * Credit Card Clearing
* [Match any unmatched transfers](/accountants/bookkeeping-workflows/transfers) manually, or investigate why they're unmatched (the other account may not be connected)
* For recurring transfers, set up a [Transfer Rule](/accountants/bookkeeping-workflows/rules) so Kick handles the matching automatically going forward

**Ideally, clearing accounts are at $0 after matching.** A non-zero balance is always worth investigating, but it's not always an error.

**Likely needs fixing:**

* A transaction has been **miscategorized** (e.g., a transfer coded as an expense)
* A transfer didn't clear because the **other account is disconnected or not yet connected** in Kick

**May be expected:**

* The offsetting transaction **clears after the period ends** — the balance will resolve in a future period, but confirm that's expected

***

## Step 3: Transaction Review

Kick's tiered [categorization](/accountants/bookkeeping-workflows/categorization) system auto-categorizes \~97% of transactions on first pass. Your job is to review the exceptions — the transactions where the AI wasn't confident enough to make a call.

**What to do:**

To review **similar transactions** →

1. Open the [Transactions](/accountants/bookkeeping-workflows/transactions) page, toggle to the General Ledger Review [View](/accountants/collaboration/views), filter for the period you are reviewing, sort Bank description alphabetically by clicking on the column header.
2. Select transactions (see [Keyboard shortcuts](/accountants/reference/keyboard-shortcuts)) to update [categorization](/accountants/bookkeeping-workflows/categorization), [counterparties](/accountants/bookkeeping-workflows/counterparties), [classes](/accountants/bookkeeping-workflows/classes), etc.
   1. Kick will ask you if you'd like to make changes to similar transactions. Click **Review** when you see this pop-up and **Assign** to confirm the bulk update. Kick will learn from these changes over time.
3. For recurring transactions, ensure your updates are always applied consistently by creating [Rules](/accountants/bookkeeping-workflows/rules).

To review **uncategorized transactions** →

1. Open the [Transactions](/accountants/bookkeeping-workflows/transactions) page, toggle to the General Ledger Review [View](/accountants/collaboration/views), filter for the period you are reviewing, filter for Category → Uncategorized.
2. Assign categories to transactions that do not need to be confirmed with your client.
3. If you need client input, generate a [Task](/accountants/close-workflows/tasks) from the transactions to request more info.

To review **material transactions** →

1. Open the [Transactions](/accountants/bookkeeping-workflows/transactions) page, toggle to the General Ledger Review [View](/accountants/collaboration/views), filter for the period you are reviewing, click the Amount column to sort largest cash in → largest cash out.
   1. Click Amount again to reverse the sorting.
2. Alternatively, use the Amount filter to review transactions above a materiality threshold.
3. Confirm categorization, taking particular care to review Contributions, Distributions, Transfers, and Revenue.

To review transactions **without a counterparty** →

1. Open the [Transactions](/accountants/bookkeeping-workflows/transactions) page, toggle to the General Ledger Review [View](/accountants/collaboration/views), filter for the period you are reviewing, filter for Counterparty → No counterparty.
   1. Add additional filters for scenarios where all transactions require a counterparty (e.g. General Ledger = Contract Labor).
2. Assign a [counterparty](/accountants/bookkeeping-workflows/counterparties) to each transaction, making bulk updates to selected transactions when possible.

To review **personal accounts** →

1. Open the [Transactions](/accountants/bookkeeping-workflows/transactions) page, toggle to the General Ledger Review [View](/accountants/collaboration/views), filter for the period you are reviewing, filter for Entity → Personal.
2. Move business transactions that occurred in personal accounts to the relevant entity, and assign the appropriate category.
   1. See [Personal to Business](/accountants/bookkeeping-workflows/personal-to-business) for additional guidance.

{% hint style="info" %}
**Key distinction:** In Kick, you work from the Transactions page — not the Profit & Loss. The Transactions page is your command center for categorization, rule creation, and bulk actions.
{% endhint %}

***

## Step 4: Payroll Reconciliation

If the client uses a payroll provider (Gusto, ADP, etc.), verify that payroll entries for the period are complete and match the provider's reports.

{% hint style="info" %}
**What to do when using Gusto**

Follow the [Payroll reconciliation guide](/accountants/close-workflows/payroll) to reconcile the Gusto payroll liability account, including net pay, taxes, benefits, and contractor payments.
{% endhint %}

**What to do:**

* Compare payroll-related transactions in Kick against the payroll provider's period summary
* Confirm wages, taxes, employer contributions, and other deductions are recorded correctly for each period
* Make adjusting [journal entries](/accountants/close-workflows/journal-entries), as needed
* For [Gusto-integrated](/accountants/setting-up/integrations/gusto) clients, Kick automatically maps standard payroll accounts — confirm the mapping is correct

This step is especially important at year-end when reconciling to the W-3, but a quick check each month prevents surprises. For recurring payroll adjustments, set them up as [recurring entries](/accountants/close-workflows/journal-entries/create-recurring-entries).

***

## Step 5: Loan Reconciliation

[Loans](/accountants/close-workflows/loans) are common enough to warrant their own review. If the client has any outstanding loans, lines of credit, or financing arrangements, reconcile them separately.

**What to do:**

* Verify loan balances in Kick against lender statements for the period
* Confirm principal and interest [splits](/accountants/bookkeeping-workflows/splits) are recorded correctly on each payment
* Check that loan amortization schedules are being followed — set up [recurring entries](/accountants/close-workflows/journal-entries/create-recurring-entries) for monthly interest accruals if needed
* For new loans originated during the period, confirm the proceeds and any associated fees are booked correctly
* Reconcile any line-of-credit draws and repayments

***

## Step 6: Post Adjusting Journal Entries

After the categorization review and Balance Sheet review are complete, post any period-end adjustments.

**Common adjustments:**

* Loan interest accruals
* Prepaid expense amortization
* Depreciation or amortization
* Deferred revenue recognition
* Receivable write-offs
* Reclassifications

For entries that repeat each period (depreciation, amortization), set them up as [recurring entries](/accountants/close-workflows/journal-entries/create-recurring-entries) so they post automatically. See [Journal entries](/accountants/close-workflows/journal-entries) for full details on creating and managing JEs.

***

## Step 7: Financial Statement Review

**What to do:**

* Navigate to Accounting → Balance Sheet
* Confirm prior period retained earnings agree with what was reported in the last financial package. If they don't, something was posted to a closed period — investigate before proceeding
* Scan for stale balances: prepaid amounts that should have been amortized, receivables that should have been written off, clearing accounts that should be at zero

**Note:** Kick's [Balance Sheet](/accountants/reports/balance-sheet) includes [clearing accounts](/accountants/bookkeeping-workflows/transfers) (Bank Transfer Clearing, Payment Transfer Clearing, Credit Card Clearing). These should be at $0 after completing Step 2. A remaining balance isn't necessarily an error — it may indicate a transfer that clears in a future period, or an account that hasn't been connected yet. If a balance remains, make sure you can explain it before moving on. See Step 2 for the full diagnostic checklist.

***

## Step 8: Lock the Period

**What to do:**

* Navigate to your profile icon → [Locks](/accountants/close-workflows/locks)
* Select the month and click Lock
* Locking a month also locks all prior months

Once locked, clients with Member permissions have view-only access to the period. Firm team members, client Admins, and Accountants can unlock.

***

## Step 9: Share with Client

Deliver the financial package to the client.

**What to do:**

* Create a [Task](/accountants/collaboration/tasks) with the period's financials attached (P\&L, Balance Sheet, and any notes). You can export financials in multiple formats directly from the [Balance Sheet](/accountants/reports/balance-sheet) and [Profit & Loss](/accountants/reports/profit-and-loss) report pages.
  * Alternatively, invite your client as a Member so they have view-only access to the Accounting tab for locked periods. Using a Task, instruct them to navigate to each report and filter for the closed period to complete their review.
* For year-end, the Year-End [Tax Package](/accountants/reports/tax-package) can be downloaded from the Accounting page to bundle all financials into a single download.


# Catch-Up Guide

A step-by-step guide for bringing a client's books up to date in Kick — whether they're months or years behind.

## Before You Start

Before beginning, determine:

1. **How far back are we going?** Decide on a [start date](/accountants/managing-clients/entity-management/editing-entity-start-and-end-dates) based on the client's needs — this is typically the start of the earliest unfiled tax year, or the date they stopped maintaining books.

{% hint style="info" %}
This becomes the entity's bookkeeping start date in Kick. Set it to the first day of the catch-up period, not today's date. This is the most common setup mistake for catch-up clients — the start date controls what Kick treats as historical and affects reconciliation behavior.
{% endhint %}

2. **What data do we have?** Gather bank statements, credit card statements, and payroll provider reports for the entire catch-up period. PDFs, CSVs, and scanned paper statements all work.
3. **Is there a prior system?** If the client has usable data in a prior accounting system (QBO, Xero, etc.), consider [migrating](/accountants/setting-up/migration) their historical data rather than rebuilding from raw transactions.
4. **Set up the client workspace first.** [Add the client](/accountants/start-here/add-your-first-client), create any [additional entities](/accountants/setting-up/multi-entity/adding-and-removing-entities), and import the [Chart of Accounts](/accountants/setting-up/chart-of-accounts/import-your-chart-of-accounts) from the client's prior system before importing transactions. This ensures transactions land in the right accounts from the start. See the [Setup Guide](/accountants/best-practice-guides/setup-guide) for the full setup sequence.

***

## Step 1: Connect Accounts & Import Historical Data

The goal is to get every transaction for the catch-up period into Kick — with no gaps. Do not proceed to subsequent steps until every account's transaction history is fully loaded.

**What to do:**

1. Connect bank and credit card accounts via [Plaid](/accountants/setting-up/integrations/connect-accounts). Plaid typically pulls 6–24 months of history depending on the institution.
2. For data older than Plaid's lookback, unsupported banks, or for accounts that were closed during the catch-up period, use the [Universal Importer](/accountants/setting-up/universal-importer) to upload PDFs or CSVs.
   1. Feel free to "data dump" during this step — drop in all CSVs and PDFs for all historical periods. Kick will sort it out for you.
3. Set up direct integrations for [Stripe](/accountants/setting-up/integrations/payment-processors), [Gusto](/accountants/setting-up/integrations/gusto), [PayPal](/accountants/setting-up/integrations/payment-processors), [Ramp](/accountants/setting-up/integrations/ramp), [BILL](/accountants/setting-up/integrations/bill), and [Mercury](/accountants/setting-up/integrations/mercury) where applicable.
4. If you imported historical data and later connect a live Plaid feed for the same account, [merge them](/accountants/setting-up/integrations/manage-integrations) into a single account to avoid duplicates.

{% hint style="info" %}
**No gaps.** Make sure there are no gaps in statement coverage across the catch-up period. Reconciliation in Step 3 will catch gaps, but it's faster to get it right here. Partial data leads to duplicate work later.
{% endhint %}

***

## Step 2: Verify Opening Balances

If you're starting from a specific date, you’ll need opening balances that reflect the client's financial position as of that date.

**What to do:**

1. If migrating from a prior system, verify opening balances on the [Balance Sheet](/accountants/reports/balance-sheet) against the prior system's trial balance or the last filed tax return.
2. If starting fresh with catch-up (no prior financials), opening balances are zero and will build as you import transactions.
3. If the client has a prior balance sheet (i.e., their books were accurate at some point), import opening balances as of the day before the catch-up period starts. This gives you a clean starting point.
   1. Kick has an opening balance importer accessible from Accounting → [Balance Sheet](/accountants/reports/balance-sheet) → **Import balances** — use it to load prior-period balances directly rather than creating manual journal entries.
4. If opening balances need adjustments, you'll have the opportunity to create them during [reconciliation](/accountants/close-workflows/reconciliation).

{% hint style="info" %}
**Key check:** Once opening balances are set, they become the anchor for everything else. If these are wrong, every subsequent period will be off.
{% endhint %}

***

## Step 3: Reconcile All Historical Periods

[Reconciliation](/accountants/close-workflows/reconciliation) during catch-up is sequential — you cannot reconcile March until February is reconciled, because February's ending balance is March's starting balance.

**What to do:**

1. Navigate to Accounting → [Reconciliation](https://use.kick.co/reconciliation).
2. Start with the first month of the catch-up period. Upload statements for each period — Kick supports multi-period reconciliation, so you can upload an entire year (or years) of statements at once.
3. Reconcile each bank account to the ending statement balance for that month, then each credit card account.
4. Statements must be uploaded in sequence with no gaps. You can't reconcile January, February, and April without March.
5. Resolve every exception before moving to the next month. Don't carry unresolved items forward — they create cascading problems.
6. Mark the period as reconciled and move to the next month. Repeat until all periods are reconciled up to the current month.

***

## Step 4: Review and Resolve Transfers

Before categorizing, check that [transfers](/accountants/bookkeeping-workflows/transfers) between accounts are properly matched across the entire catch-up period. With historical data, there are often many unmatched transfers. A missed or incorrect transfer match is one of the most common causes of catch-up reconciliation failures.

**What to do:**

1. Check the [Balance Sheet](/accountants/reports/balance-sheet) for non-zero clearing account balances: Bank Transfer Clearing, Payment Transfer Clearing, Credit Card Clearing.
2. [Match unmatched transfers](/accountants/bookkeeping-workflows/transfers) manually, or investigate why they're unmatched (the other account may not be connected or may not have been imported yet).
   1. The easiest way to do this is to navigate to [Transactions](/accountants/bookkeeping-workflows/transactions) → reveal the **Matched transfer** column using [Views](/accountants/collaboration/views) → filter for Transfer, Credit Card Payment categories → filter for Match: Is not matched.
3. For recurring transfers, set up [Transfer Rules](/accountants/bookkeeping-workflows/rules) to match them automatically. This is especially valuable for catch-up since the same pattern likely repeats across many periods.
4. Check every transfer. Review all transfers between accounts for the period before proceeding.

{% hint style="info" %}
**Target:** All clearing accounts at $0. Non-zero balances may mean transfers are still unmatched or miscategorized.
{% endhint %}

***

## Step 5: Batch Review Transactions

Leverage filters and sorting to review the most critical transactions in batches.

**What to do:**

To review **similar transactions** →

1. Open the [Transactions](/accountants/bookkeeping-workflows/transactions) page, toggle to the General Ledger Review [View](/accountants/collaboration/views), sort Bank description alphabetically by clicking on the column header.
2. Select transactions in bulk (see [Keyboard shortcuts](/accountants/reference/keyboard-shortcuts)) to update [categorization](/accountants/bookkeeping-workflows/categorization), [counterparties](/accountants/bookkeeping-workflows/counterparties), [classes](/accountants/bookkeeping-workflows/classes), etc. for all historical periods.
   1. Kick will ask you if you'd like to make changes to similar transactions. Click **Review** when you see this pop-up and **Assign** to confirm the bulk update. Kick will learn from these changes over time.
3. For recurring transactions, ensure your updates are always applied consistently by creating [Rules](/accountants/bookkeeping-workflows/rules).

To review **uncategorized transactions** →

1. Open the [Transactions](/accountants/bookkeeping-workflows/transactions) page, toggle to the General Ledger Review [View](/accountants/collaboration/views), filter for Category → Uncategorized.
2. Assign categories to transactions that do not need to be confirmed with your client.
3. If you need client input, generate a [Task](/accountants/close-workflows/tasks) from the transactions to request more info.

To review **material transactions** →

1. Open the [Transactions](/accountants/bookkeeping-workflows/transactions) page, toggle to the General Ledger Review [View](/accountants/collaboration/views), click the Amount column to sort largest cash in → largest cash out.
   1. Click Amount again to reverse the sorting.
2. Alternatively, use the Amount filter to review transactions above a materiality threshold.
3. Confirm categorization, taking particular care to review Contributions, Distributions, Transfers, and Revenue.

To review transactions **without a counterparty** →

1. Open the [Transactions](/accountants/bookkeeping-workflows/transactions) page, toggle to the General Ledger Review [View](/accountants/collaboration/views), filter for Counterparty → No counterparty.
   1. Add additional filters for scenarios where all transactions require a counterparty (e.g. General Ledger = Contract Labor).
2. Assign a [counterparty](/accountants/bookkeeping-workflows/counterparties) to each transaction, making bulk updates to selected transactions when possible.

To review **personal accounts** →

1. Open the [Transactions](/accountants/bookkeeping-workflows/transactions) page, toggle to the General Ledger Review [View](/accountants/collaboration/views), filter for Entity → Personal.
2. Move business transactions that occurred in personal accounts to the relevant entity, and assign the appropriate category.
   1. See [Personal to Business](/accountants/bookkeeping-workflows/personal-to-business) for additional guidance.

***

## Step 6: Payroll Reconciliation

If the client had payroll during the catch-up period, verify that payroll entries are complete and accurate for each period.

**What to do:**

1. Compare payroll-related transactions in Kick against the payroll provider's period summaries.
2. Confirm wages, taxes, employer contributions, and other deductions are recorded correctly for each period.
3. Make adjusting [journal entries](/accountants/close-workflows/journal-entries), as needed.
4. For Gusto-integrated clients, follow the [Payroll reconciliation guide](/accountants/close-workflows/payroll) to reconcile the Gusto payroll liability account.
   1. Gusto integration data is available for all historical periods. Reach out to the Kick team to sync data older than 24 months for your clients.
5. For year-end periods, reconcile to the W-3 or annual payroll summary reports.

For recurring payroll adjustments, create [recurring entries](/accountants/close-workflows/journal-entries/create-recurring-entries).

***

## Step 7: Post Adjusting Journal Entries

For each period in the catch-up window, post any necessary manual adjustments. Some examples include:

1. **Depreciation:** If the client has fixed assets, depreciation needs to be posted for each historical period.
   1. Similarly, amortization should be booked for any intangible assets.
2. **Loan interest:** Verify that interest and other loan expenses are booked correctly for all historical periods.
3. **Accruals:** Record adjustments to accounts payable, accounts receivable, deferred revenue, and prepaid expense accounts, if your client is on an accrual basis.

For entries that repeat each period, set them up as [recurring entries](/accountants/close-workflows/journal-entries/create-recurring-entries) — you can backdate the start date to post them across the entire catch-up period.

***

## Step 8: Final Review

Before locking, review reports and make any final adjustments.

**What to do:**

1. Review the [Balance Sheet](/accountants/reports/balance-sheet) one more time — any stale items that require adjustment?
   1. For multi-year catchup, filter the report for the full date range (e.g. 1/1/2023 - 12/31/2025) and view columns By year to see annual data side-by-side.
   2. Confirm all clearing accounts are at $0, or have justified balances.
2. Review the [Profit & Loss](/accountants/reports/profit-and-loss) for each year — do revenue, expenses, and net income look reasonable?
   1. If the client uses [classes](/accountants/bookkeeping-workflows/classes), filter reports by class to confirm nothing is misallocated.
3. Export reports to Excel or PDF if you need to review offline or share with a third party before locking.

***

## Step 9: Lock & Transition to Recurring Close

Once each period is reviewed and finalized, [lock it](/accountants/close-workflows/locks). Then establish the ongoing workflow before the engagement ends.

**Lock completed periods:**

1. Navigate to your profile icon → Locks.
2. Lock each period as you complete it, starting from the earliest. Locking a month also locks all prior months, so work forward through the catch-up window.
3. Lock periods as you go rather than waiting until the end. This prevents accidental changes to periods you've already reviewed.
4. Once locked, clients with Member permissions have **view-only** access to the period.

**Transition to monthly close:**

1. Connect live [Plaid](/accountants/setting-up/integrations/connect-accounts) or direct integration feeds for all accounts going forward (if not already connected). If you imported historical data and then connected a live feed for the same account, [merge them](/accountants/setting-up/integrations/manage-integrations) into a single account.
2. Confirm all [rules](/accountants/bookkeeping-workflows/rules) are set up for ongoing use — the rules you built during catch-up will continue to apply to new transactions automatically.
3. [Invite the client](/accountants/setting-up/invite-your-clients) to their workspace with appropriate [permissions](/accountants/managing-clients/roles-and-permissions) if they haven't been added yet.
4. Transition to the [Close Guide](/accountants/best-practice-guides/close-guide) workflow for ongoing monthly closes.


# Chart of Accounts

Every entity in Kick comes with a standard Chart of Accounts, designed to map to that entity type's tax form. The Chart of Accounts is fully customizable to support your client's reporting needs.

### Navigating the Chart of Accounts

View and manage all general ledger accounts across entities by navigating to **Accounting →** [**Chart of Accounts**](https://use.kick.co/chart-of-accounts) in your client's workspace.

Accounts are organized by type and subtype. Use the **Expand/Collapse All** button in the top right to show or hide all account rows at once.

The rightmost column shows which entities each account belongs to, so you can see at a glance which accounts are shared across entities and which are scoped to a single one. To narrow the view to a specific entity, use the **Entity** filter in the top right.

To export the full Chart of Accounts, click the **Download** icon in the top right and choose CSV or Excel.

#### Filters

Use the filters in the top left to narrow the view:

* **Status** — Active or Disabled
* **Source** — Kick-created or Custom
* **Type** — Account types such as Cash, Equity, Income, or Operating Expenses
* **Subtype** — Account subtypes such as Bank Account, Contributions, Refunds & Returns, or Insurance

***

### Classifications and account types

Every account carries a classification and a type. The type determines the classification, so the type you pick when creating an account also fixes where that account lands in your reports. Neither can be changed afterward.

* **Assets**
  * Cash
  * Accounts Receivable
  * Inventory
  * Other Current Assets
  * Investments
  * Fixed Assets
  * Intangible Assets
  * Other Assets
  * Prepaid Expenses
* **Liabilities**
  * Accounts Payable
  * Credit Cards
  * Payroll Liabilities
  * Short-Term Loans
  * Other Current Liabilities
  * Long-Term Loans
  * Other Liabilities
* **Equity**
  * Equity
* **Income**
  * Income
  * Other Income
* **Expenses**
  * COGS
  * Operating Expenses
  * Other Expenses
  * Tax Expenses

***

### Standard accounts

Every entity in Kick comes with a standard Chart of Accounts built to map to that entity type's tax form — simplifying reporting for both you and your clients. The standard accounts vary by entity type. For example, a partnership includes accounts like Guaranteed Payments, while a single-member LLC would not.

The Chart of Accounts is fully customizable. You can add, edit, import, and disable accounts to match your client's reporting needs or accommodate industries where the standard set doesn't cover everything required.

{% hint style="info" %}
Standard accounts cannot be deleted, but they can be disabled. Disabled accounts are hidden from the GL account picker and journal entry editor while preserving all historical data.
{% endhint %}

→ [Import your Chart of Accounts](/accountants/setting-up/chart-of-accounts/import-your-chart-of-accounts)

→ [Add, Edit, and Delete Accounts](/accountants/setting-up/chart-of-accounts/add-edit-and-delete-accounts)

***

### Account numbers

Kick's standard Chart of Accounts includes six-digit account numbers, assigned automatically based on account type:

| Account type   | Starting digit |
| -------------- | -------------- |
| Assets         | 1              |
| Liabilities    | 2              |
| Equity         | 3              |
| Income         | 4              |
| Expenses       | 5, 6, 7, 9     |
| Other Income   | 8              |
| Other Expenses | 8              |

Account numbers can be edited on any account. To hide them entirely, go to **Accounting Settings** and toggle off **Show Account Numbers**. This removes account numbers from the Chart of Accounts and all reports across Kick.


# Import your Chart of Accounts

Import your previous Chart of Accounts into Kick, map accounts to Kick's standard Chart of Accounts, or create custom accounts in bulk.

### Import your Chart of Accounts

Go to **Accounting → Chart of Accounts** and click **Add Accounts** in the top right.

An upload modal appears with two options:

* **Upload a file** — import a CSV or Excel export from your previous software
* **Add manually** — type account names directly and select a type and subtype for each

***

### Uploading a file

Click **Upload file** and select your exported Chart of Accounts. Once uploaded, your previous accounts appear on the left, with Kick's suggested mappings on the right.

Kick suggests mapping your accounts to its standard Chart of Accounts wherever possible. Mapping to standard accounts lets your client take advantage of the automations Kick has built around its Chart of Accounts. For accounts where the standard account works, accept the suggestion. For accounts where you need more detail, delete the mapping to create the account as a custom account instead.

{% hint style="info" %}
**Tip:** This is a good opportunity to consolidate duplicates and clean up your client's Chart of Accounts before bringing it into Kick.
{% endhint %}

{% embed url="<https://www.loom.com/share/eb529382b0be4226b3183177967f615d>" %}

#### Reviewing mappings

For each account, you have three options:

* **Accept the mapping** — the suggested standard Kick account will replace the account from your previous accounting software
* **Delete the mapping** — removes the suggestion and creates your original account name as a custom account in Kick
* **Change the mapping** — click the dropdown to select a different Kick account

You can select multiple rows at once to delete mappings in bulk.

For accounts you're keeping as custom, review the **Type** and **Subtype** columns and adjust if needed. For mapped accounts, type and subtype are handled by the standard account — no changes required.

Click **Save** to create the accounts.

***

### Adding accounts manually

To add accounts without importing a file, use the same modal to type account names directly, then select the appropriate type and subtype for each. This is useful for adding a handful of accounts in bulk without a file export.

To add a single account, go to **Accounting → Chart of Accounts**, find the subtype row you want to add to, and click the **+** icon on that row.

{% hint style="info" %}
**Note:** The Bank Account, Credit Card, and Payment Processor subtypes are typically populated automatically when you connect a financial account. If you try to add an account under one of these subtypes manually, Kick will suggest connecting an account instead.
{% endhint %}

***

### Finding your custom accounts

After saving, custom accounts are labeled **Source: Custom** in the Chart of Accounts. Use the **Source** filter to isolate them.


# Add, Edit, and Delete Accounts

Add custom accounts to any subtype, edit account names and numbers, or disable and delete accounts you no longer need.

### Adding an account

Go to **Accounting → Chart of Accounts**, find the subtype you want to add an account to, and click the **+** icon on that row.

In the **Add Account** window:

1. Type the account name
2. If your client has multiple entities, select the entity or entities the account should apply to
3. Click **Create**

{% hint style="info" %}
The Bank Account, Credit Card, and Payment Processor subtypes are typically populated automatically when you connect a financial account. If you try to add an account under one of these subtypes manually, Kick will suggest connecting an account instead.
{% endhint %}

To add accounts in bulk or import from your previous software, use the importer.

→ [Import your Chart of Accounts](/accountants/setting-up/chart-of-accounts/import-your-chart-of-accounts)

***

### Editing an account

Go to **Accounting → Chart of Accounts**, find the account you want to edit, and click the options menu (⋯) next to it. Select **Edit** to update the account name or account number.

{% hint style="info" %}
Kick's standard account names can be edited, but the associated account type and subtype cannot be changed.
{% endhint %}

***

### Disabling an account

Disabling an account removes it from the Chart of Accounts dropdown throughout Kick and prevents any new transactions from mapping to it. Existing transactions and balances are preserved.

{% hint style="warning" %}
Any rules that map transactions to a disabled account will fall back to Uncategorized Income or Uncategorized Expenses, depending on the direction of the transaction. Review your rules before disabling an account.
{% endhint %}

Go to **Accounting → Chart of Accounts**, find the account, click the options menu (⋯), and select **Disable**.

Disabled accounts remain visible in the Chart of Accounts with a **Disabled** label but won't appear in any general ledger dropdowns going forward.

Not all accounts can be disabled:

* Accounts linked to a connected financial account (bank, credit card) — disable from the [Accounts](https://use.kick.co/accounts) tab instead
* The default Uncategorized Income and Uncategorized Expenses accounts

#### Re-enabling an account

To re-enable a disabled account, find it in the Chart of Accounts, click the options menu (⋯), and select **Enable**. Once re-enabled, the account is available to use throughout Kick again. Rules mapping transactions to these accounts will apply for all transactions that sync after the account was re-enabled.

***

### Deleting an account

Deleting permanently removes an account from the Chart of Accounts. This is only possible for custom accounts with no activity. Kick's standard accounts cannot be deleted, but can be disabled if needed.

Go to **Accounting → Chart of Accounts**, find the account, click the options menu (⋯), and select **Delete**. Confirm the deletion.


# Import Opening Balances

Import a Balance Sheet from your previous accounting system to set opening balances in Kick.

You can import the prior period Balance Sheet to establish opening balances in Kick. The importer extracts account names, classifications, and balances from your uploaded file, then maps them to your Chart of Accounts.

Opening balances are dated one day before the entity's bookkeeping start date — this anchors the Balance Sheet so all subsequent activity builds from the correct starting point.

***

## How to import

The importer is a three-step flow: **Upload → Extract → Map**.

{% stepper %}
{% step %}
**Upload**

Go to **Accounting → Balance Sheet** and click **Import balances**. Select the entity and upload a Balance Sheet exported from your previous accounting system.

The file should be dated one day before the entity's bookkeeping start date. For example, if bookkeeping starts January 1, 2025, upload a Balance Sheet as of December 31, 2024.
{% endstep %}

{% step %}
**Extract**

Kick uses AI extraction to parse your uploaded document. The result appears in a split view — source document on the left, editable spreadsheet on the right — with columns for **Account**, **Classification** (Asset, Liability, or Equity), and **Balance**.

Review the extracted data and correct any misreads. A running balance check at the bottom confirms whether Assets equal Liabilities + Equity. The balance sheet must balance before you can continue.
{% endstep %}

{% step %}
**Map**

Each imported account needs to be mapped to an existing Kick account or a new one.

Kick auto-maps accounts where the name and classification match your Chart of Accounts, and suggests mappings for close matches (e.g., "A/R" to "Accounts Receivable"). Review the suggestions and adjust as needed.

For accounts that don't match anything in your Chart of Accounts, click **Create account** to add a new one. The account name, classification, and subtype are pre-filled from the imported data.

All accounts must be mapped before you can submit.
{% endstep %}
{% endstepper %}

***

## Opening Balance journal entries

When you import opening balances, Kick creates journal entries with the **Opening Balance** entry source. These are distinct from manual journal entries — they are system-managed and tied directly to the import.

{% hint style="info" %}
To view opening balance entries on the General Ledger, go to **Accounting → General Ledger**, click **Add filter**, select **Entry source**, and choose **Opening Balance**.
{% endhint %}

***

## Opening balances during reconciliation

For bank accounts and credit cards, opening balances can also be set during [reconciliation](/accountants/close-workflows/reconciliation). When you reconcile an account for the first time, Kick suggests an opening balance journal entry based on the extracted statement data. This is the recommended approach for connected financial accounts.

***

## Re-importing

You can run the importer more than once per entity. If opening balances already exist for any of the accounts being imported, Kick shows a confirmation listing each account with its current balance and asks whether to overwrite.

***

## Requirements

* The balance sheet date must be exactly one day before the bookkeeping start date
* Assets must equal Liabilities + Equity
* Requires the Chart of Accounts edit permission

***

## Removing an opening balance

To remove an opening balance from an individual account after importing, see [Remove an opening balance](/accountants/setting-up/chart-of-accounts/remove-an-opening-balance).

→ [Chart of Accounts](/accountants/setting-up/chart-of-accounts)

→ [Catch-Up Guide](/accountants/best-practice-guides/catch-up-guide)


# Remove an Opening Balance

Remove an opening balance entry from an individual account in the Chart of Accounts.

If an opening balance was set incorrectly — either through the importer or during reconciliation — you can remove it from the Chart of Accounts.

{% stepper %}
{% step %}
**Find the account**

Go to **Accounting → Chart of Accounts** and find the account with the incorrect opening balance.
{% endstep %}

{% step %}
**Remove the opening balance**

Click the options menu (⋯) on the account and select **Remove opening balance**.
{% endstep %}

{% step %}
**Confirm the removal**

Confirm the removal in the dialog.
{% endstep %}
{% endstepper %}

{% hint style="danger" %}
This permanently deletes the opening balance for that account. This action cannot be undone.
{% endhint %}

The **Remove opening balance** option only appears on accounts that have an opening balance entry.

***

## After removing

Removing an opening balance deletes both sides of the underlying journal entry — the balance on the account itself and the corresponding debit or credit on the offsetting account (e.g., Retained Earnings). If the account is linked to a connected financial account, its stored opening balance is also cleared.

To set a new opening balance, re-import via **Accounting → Balance Sheet → Import balances**, or complete a bank or credit card [reconciliation](/accountants/close-workflows/reconciliation).

→ [Import Opening Balances](/accountants/setting-up/chart-of-accounts/import-opening-balances)

→ [Journal Entries](/accountants/close-workflows/journal-entries)


# Ledgers

An overview of how the Cash and Accrual ledgers work in Kick.

### Cash vs. Accrual

|                | Cash        | Accrual           |
| -------------- | ----------- | ----------------- |
| Availability   | All clients | Plus plan only    |
| Setup required | None        | Must be enabled   |
| Posting        | Real-time   | Upon confirmation |

***

### Cash ledger

The Cash ledger is Kick's real-time ledger. When transactions sync from connected accounts or are imported manually, they are categorized by Kick's categorization model or by rules you've created and post to the Cash ledger immediately — giving you an up-to-date view of your client's financials at all times.

***

### Accrual ledger

The Accrual ledger is not real-time. When you first create an Accrual ledger for a client, it starts blank. Transactions post to the Accrual ledger only after accrual accounts have been confirmed: either by completing the accrual tasks on the Tasks tab, creating accrual rules, or by setting Accrual ledger accounts manually on the Transactions tab.

Because accrual requires more review and adjustment, Kick gives you tools to automate the process: you can create rules that post directly to the Accrual ledger, and the Tasks tab generates tasks to guide your accrual review.

→ [Accrual tasks](/accountants/close-workflows/tasks/accrual-tasks)\
→ [Rules](/accountants/bookkeeping-workflows/rules)

***

### Setting up the Accrual ledger

The Accrual ledger can be enabled in two places:

1. **During client setup:** When adding a new client, select the required ledgers as part of the setup flow.
2. **In Accounting Settings:** From within the client's workspace, click your profile icon in the top right and click **Create Accrual Ledger**.

<div data-with-frame="true"><figure><img src="/files/K60lxY5sU9d6OflzylQZ" alt=""><figcaption></figcaption></figure></div>

{% hint style="warning" %}
**Important:** If you're migrating an Accrual client from QuickBooks Online, enable the Accrual ledger **before** starting the migration.
{% endhint %}

→ [Migration](/accountants/setting-up/migration)

***

### Working with both ledgers

When the Accrual ledger is enabled, an Accrual ledger column becomes available across all Transactions views. To switch between Cash and Accrual on reports, go to the **Accounting** tab and use the ledger basis toggle.

<div data-with-frame="true"><figure><img src="/files/mWXIOoT8z8oXxAVJIBCF" alt=""><figcaption></figcaption></figure></div>


# Organization vs Workspace

Your organization is where you manage your team and client roster. A workspace is where you manage one client's books — including multiple entities under a single roof.

## Organization

Your organization represents your firm in Kick — the company that owns the subscription and manages the team.

At the organization level, you:

* Manage your team and their client access from **Team** in the sidebar
* View and manage all clients from **Clients** in the sidebar
* Control organization-level settings and billing (for Owners)

Everyone under your organization belongs to the same firm, even if they only work on some clients. Organization roles (Owner, Admin, Manager, Member) determine what someone can do at the firm level: creating clients, inviting team members, or managing billing.

→ [Invite your Team](/accountants/start-here/set-up-your-firm/invite-your-team)

***

## Workspace

A workspace is the environment for one client. It contains the chart of accounts, transactions, rules, documents, and an unlimited number of entities — each entity representing a separate set of books. This makes it easy to manage clients with multiple businesses, holding companies, or related LLCs in one place.

Common setups:

* One workspace per client
* A free firm workspace for your firm's own books and to test workflows

Each workspace has its own members and roles. A team member's workspace role determines what they can do inside that workspace — independent of their organization role.

→ [Roles & Permissions](/accountants/managing-clients/roles-and-permissions)

***

## How they work together

| Organization                                           | Workspace                                                         |
| ------------------------------------------------------ | ----------------------------------------------------------------- |
| Your firm                                              | One client (with one or more entities)                            |
| Team, clients, firm settings, firm billing             | Entities, transactions, COA, workspace members, workspace billing |
| "Should this team member work on this client's books?" | "What can this person do inside this client's workspace?"         |


# Migration

Bring your clients' historical financial data into Kick from QuickBooks Online, or any other accounting software.

#### QuickBooks Online

Kick connects directly to QBO and migrates your client's data automatically, including the Chart of Accounts, all general ledger data, and counterparties (customers and vendors).

Migration brings over data for unlimited historical periods.

{% hint style="info" %}
Looking for a step-by-step checklist? See the [QuickBooks Online → Kick Migration Checklist](/accountants/setting-up/migration/quickbooks-migration-checklist).
{% endhint %}

{% hint style="warning" %}
Migrate before canceling the client's QBO subscription. Once the subscription is inactive, you won't be able to pull data from the API.
{% endhint %}

**Add the client and start migration**

When you add a new client, you'll be asked how you'd like to set up your Chart of Accounts. Options include **QuickBooks Online**, **Intuit Enterprise Suite**, **Xero**, **Digits**, **Puzzle**, **Bench**, and **Other**.

Selecting **QuickBooks Online** connects to the client's QBO account and starts an automated migration (see below). Selecting any of the other systems sets up Chart of Accounts upload and mapping during onboarding. That path brings over the chart of accounts structure, not a full general ledger migration.

<div data-with-frame="true"><figure><img src="/files/9b3hibQK4ueWvDi6vVPJ" alt=""><figcaption></figcaption></figure></div>

After connecting, you'll set a few migration parameters:

* **Accounting basis:** select Cash, Accrual, or both. Selecting both migrates the historical financials in each basis. Accrual migration requires the **Plus** plan.
* **General ledger:** a complete, transaction-level record of your clients' historical financials.
* **Counterparties:** opt in to migrate customers and vendors from QBO. These will be available in Kick immediately after migration completes.
* **Migration date range:** set the start date to the earliest date you have data in QBO. The end date should be the last fully closed period in QBO. The bookkeeping start date in Kick will be set to the day after your migration end date.
* **Client details:** confirm the business name, display name, entity type, and plan.

{% hint style="info" %}
If your client has multiple entities, repeat these steps for each one.
{% endhint %}

You can manage existing migrations from **Settings → Accounting → Accounting migration**. Use this page to review migration status, start a migration for an existing entity, or remove a migration if you need to start over.

<div data-with-frame="true"><figure><img src="/files/U9waRGphjwAGgvAWD1JI" alt="Accounting settings showing Accounting migration and New migration"><figcaption></figcaption></figure></div>

**Complete the migration tasks**

After adding the client, a set of tasks will be generated in their workspace.

**1. Map accounts** — Review the chart of accounts mapping.

<div data-with-frame="true"><figure><img src="/files/0tFrUnARhIg2JtOuVmXk" alt=""><figcaption></figcaption></figure></div>

Kick suggests a mapping from each QBO account to a Kick account. For each row, you can accept the suggested mapping, select a different existing account, or create a new account.

{% hint style="info" %}
Account numbers aren't visible during mapping and will need to be updated on the [Chart of Accounts](https://use.kick.co/chart-of-accounts) tab after migration completes.
{% endhint %}

Bank and credit card accounts in QBO will show a "task created" indicator, meaning Kick has generated a connect account task for each one automatically.

{% hint style="info" icon="lightbulb" %}
The mapping step is a good opportunity to clean up the chart of accounts. You can create new accounts, adjust types and subtypes, and leave accounts with no data unmapped. They won't bring anything over.
{% endhint %}

**2. Finish migration:** confirm the mapping and complete the import. Migration runs instantly and data appears as soon as you submit.

**3. Connect accounts:** additional tasks are generated for each bank or credit card account identified in QBO. Connect each account to pull in live transactions going forward.

After completing the Map Accounts task, go to the Accounting tab to verify the migrated data. Use the cash/accrual toggle at the top of any report to switch between bases if you migrated both.

{% hint style="info" %}
If you need to make changes in QBO that fall within the migration date range, let the Kick team know and they can resync the migration for you.
{% endhint %}

***

#### Other accounting software

For clients migrating from software other than QBO, including Xero, Sage, and others, Kick supports GL-based migration. The Kick team handles this manually using an exported General Ledger and Chart of Accounts from your current software.

To start a manual migration, reach out to your Kick contact or post in your shared Slack channel. The team will request the necessary export files and walk you through the process.

***

#### A note on timing

You don't need to be completely finished in QBO before migrating. Migrate when you're done with bulk workflows for the period. Minor cleanup like categorization corrections that surface during tax prep can be handled in Kick post-migration.


# QuickBooks Online → Kick Migration Checklist

A phase-by-phase checklist for migrating a client from QuickBooks Online to Kick.

## Phase 1: Pre-migration

{% hint style="info" %}
The QuickBooks migration feature is currently in beta and available to select firms. Reach out to your Kick contact if you don't see it in your workspace.
{% endhint %}

* [ ] **If migrating accrual data:** Enable the accrual ledger in Kick before starting — go to Settings (your profile icon on the top right of the workspace, or CMD+K) → Accounting → Accrual Ledger → Create Accrual Ledger for each relevant client. This must be done before migration begins; once a cash basis migration is complete, you can't start a new migration — the only option is to remove the existing migration entirely and restart.

***

## Phase 2: Scope the migration

* [ ] **Confirm how far the books are closed in QuickBooks** (see [Migration](/accountants/setting-up/migration) for timing guidance)
  * Migrate when you're done with bulk workflows for the period. Minor cleanup can happen post-migration via edits to migration entries or manual JEs.
  * Migrated transactions come over as individual journal entries — bulk categorization workflows on that historical data won't carry over
  * *To check how far back your QBO data goes: open P\&L in QBO → toggle Display columns by Year with All Dates*
* [ ] **Agree on a migration start date.** Everything before this date comes from QBO; Kick takes over from that date forward *(the bookkeeping start date in Kick will be set to the day after your migration end date)*

***

## Phase 3: Start the migration in Kick

*Full reference:* [*Migration*](/accountants/setting-up/migration)

**Option A: New client (not yet in Kick)**

* [ ] From the Clients tab, click **Add client** (top right). You'll land on the **How would you like to set up your Chart of Accounts?** screen.
* [ ] Select **QuickBooks Online** and connect to the client's QBO account
* [ ] Fill in client details, entity type, bookkeeping start date, and plan
* [ ] Set the migration date range and confirm client details to kick off the migration

**Option B: Client already exists in Kick**

* [ ] Confirm the Kick start date matches the agreed takeover date *(set during client setup, viewable in the Clients tab; see* [*Editing Entity Start and End Dates*](/accountants/managing-clients/entity-management/editing-entity-start-and-end-dates)*)*
* [ ] Open **Settings** for the workspace → select **Accounting** in the left sidebar
* [ ] In the **Accounting migration** section, click **New migration** → select **QuickBooks Online**

<div data-with-frame="true"><figure><img src="/files/U9waRGphjwAGgvAWD1JI" alt="Accounting settings showing Accounting migration and New migration"><figcaption></figcaption></figure></div>

* [ ] Select your firm → select the client
* [ ] Click **Next** → **Connect** *(read-only, one-way sync)*
* [ ] Enter the migration end date → click **Continue** and wait for the page to load

{% hint style="danger" %}
**During Quickbooks Online authorization, do NOT click "Install for your firm".** This is a common mistake. Select your firm first, then select the specific client only.
{% endhint %}

***

## Phase 4: Map the chart of accounts

*Reference:* [*Chart of Accounts*](/accountants/setting-up/chart-of-accounts) *·* [*Add, Edit & Delete Accounts*](/accountants/setting-up/chart-of-accounts/add-edit-and-delete-accounts)

* [ ] After migration completes, Kick automatically generates a set of tasks. Go to the **Tasks** tab to see them. Tip: switch the group-by filter to **By task group** to stay organized

<figure><img src="/files/WtFzKrR1sCV8Kv4bpoNU" alt=""><figcaption></figcaption></figure>

* [ ] Open the **Map Accounts** task → click **Map Accounts** at the bottom
* [ ] Walk through the COA list (QBO on left, Kick on right):
  * Bank and credit card accounts will show "task created"; skip these for now, they'll be connected in Phase 6
  * For custom accounts: hover the row → click **Create Account** on the right side
  * To undo a custom mapping: click the undo icon on that row
* [ ] Pay extra attention to **equity accounts**: multi-owner entities often need custom mapping (e.g. splitting contributions vs. distributions per owner)
* [ ] Click **Accept Mapping** (bottom right) to confirm

{% hint style="info" %}
This is a good opportunity to clean up the chart of accounts. You can create new accounts, adjust types and subtypes, and leave accounts with no data unmapped; they won't bring anything over.
{% endhint %}

***

## Phase 5: Verify the migration

*Reference:* [*Profit & Loss*](/accountants/reports/profit-and-loss) *·* [*Balance Sheet*](/accountants/reports/balance-sheet)

* [ ] Go to **Accounting → Profit and Loss**
* [ ] Confirm the P\&L ties to QuickBooks for the migrated period
* [ ] Note: beginning balances for reconciliation are auto-calculated, so no manual entry is needed *(see* [*Import Opening Balances*](/accountants/setting-up/chart-of-accounts/import-opening-balances) *if adjustments are ever needed)*

***

## Phase 6: Connect live accounts

*Full reference:* [*Connect Accounts*](/accountants/setting-up/integrations/connect-accounts)

* [ ] Go to the **Tasks** tab. Individual **Connect Account** tasks are auto-generated for each bank and credit card account identified during migration. Open each task to connect that account.
* [ ] Alternatively, go to the **Accounts** tab (top of the page) to connect accounts directly
* [ ] Connect bank accounts and credit cards via Plaid. The client can do this directly, or together if you have the logins *(for unsupported banks, use the* [*Universal Importer*](/accountants/setting-up/universal-importer)*)*
* [ ] Rename accounts if needed: hover the row → 3 dots → **Settings → Edit name** *(see* [*Manage Integrations*](/accountants/setting-up/integrations/manage-integrations)*)*

***

## Phase 7: Map migrated accounts to live feeds

*Reference:* [*Tasks*](/accountants/close-workflows/tasks)

* [ ] Go to the **Tasks** tab → find **Map migrated data** under To Do and open it
* [ ] For each migrated bank/CC account, map it to the matching live integration account; this creates one continuous transaction feed
* [ ] For any accounts that are **no longer active**: click **Mark as closed** to complete that step

***

## Phase 8: Important things to know

* [ ] **Migration is static.** It does not auto-refresh. If your QBO data changes after migration or you want to extend the date range, reach out to the Kick team to resync *(see* [*Migration*](/accountants/setting-up/migration)*)*
* [ ] **Need to redo the migration?** Go to **Settings → Accounting → Accounting migration** and remove and restart the QuickBooks migration from there. This deletes the migration so you can start completely fresh.

***

## Common gotchas: quick reference

| Situation                                  | What to do                                                                                                        |
| ------------------------------------------ | ----------------------------------------------------------------------------------------------------------------- |
| Clicked "Install for your firm" by mistake | Back out and re-select firm → then select the client only                                                         |
| Books aren't substantially closed in QBO   | Hold off. Minor cleanup is fine post-migration, but bulk workflows are lost                                       |
| QBO data was updated after migration       | Migration is static; contact the Kick team to resync                                                              |
| Account mapping went wrong                 | Settings → Accounting → Accounting migration, remove and restart the QuickBooks migration, then redo from Phase 3 |
| Bank account is no longer active           | Mark as closed in the Tasks mapping step                                                                          |
| Institution not supported by Plaid         | Use the [Universal Importer](/accountants/setting-up/universal-importer) to upload statements                     |


# Multi-Entity

Kick is built for clients with multiple businesses, holding companies, or any structure that requires separate books under one workspace. Each entity gets its own chart of accounts, financial statements, and transaction history — while shared tools like rules, categories, and the transactions feed work across all of them.

{% hint style="info" %}
Adding entities beyond the first requires a **Plus** plan or above. Workspaces on Free or Basic will see an upgrade prompt when clicking **Add entity**.
{% endhint %}

***

### How entities work in Kick

A workspace contains one or more entities. The first entity is created when you add a client. Additional entities can be added at any time from the Clients tab or from within the client's workspace.

Each entity has its own:

* [Chart of Accounts](/accountants/setting-up/chart-of-accounts)
* Financial statements (Balance Sheet, P\&L, Trial Balance, General Ledger, etc.)
* Integrations
* Documents
* Tasks
* Transactions

These operate independently — but Kick gives you tools to work across entities without switching between them.

→ [Adding & removing entities](/accountants/setting-up/multi-entity/adding-and-removing-entities)

***

### Consolidated transactions feed

The Transactions tab shows transactions for all entities in a single feed. This is useful when entities share similar categorization — you can review and categorize across the entire workspace without switching context.

To focus on a single entity, filter by entity in the top right.

{% hint style="info" %}
**Tip:** The consolidated feed is especially helpful for reviewing intercompany activity. Matched Transfers between entities are clearly surfaced, making it easier to confirm both sides are categorized correctly
{% endhint %}

→ [Transactions](/accountants/bookkeeping-workflows/transactions)

***

### Intercompany journal entry automation

When you move a transaction from one entity to another — or split a transaction across entities — Kick automatically generates the intercompany payable and receivable journal entries on both sides.

This means you don't need to manually create offsetting entries. The expense is booked to the correct entity, and the intercompany balances on each entity's Balance Sheet stay in sync.

This applies to:

* **Moving transactions between entities** — Change the entity on a transaction from the Transactions tab. The expense posts to the destination entity, and intercompany entries are created automatically.
* **Cross-entity splits** — [Split](/accountants/bookkeeping-workflows/splits) a shared expense (rent, software, insurance) across multiple entities by amount or percentage. Each entity's portion is booked with the correct intercompany entries.
* **Matched transfers between entities** — when you move funds from one entity to another, Kick will identify it as an intercompany transfer and generate the appropriate journal entries.

***

### Multi-entity rules

Rules can apply across multiple entities, so you don't need to recreate the same rule for each one. This includes:

* **Transaction Rules** that categorize, assign counterparties, or set classes across entities
* **Split Rules** that allocate shared expenses across entities automatically
* **Transfer Rules** that match intercompany transfers

→ [Rules](/accountants/bookkeeping-workflows/rules)

***

### Multi-entity Chart of Accounts

All entities in a workspace share a single Chart of Accounts view. You can see which accounts are shared across entities and which are unique to a specific entity. Custom accounts can be created and scoped as needed.

→ [Chart of Accounts](/accountants/setting-up/chart-of-accounts)

***

### The Personal entity

Every workspace includes a Personal entity where clients can connect their personal bank accounts and credit cards. Transactions in the Personal entity do not post to the General Ledger — they sit on the Transactions tab for review.

When a personal transaction has a business purpose, move it to the appropriate business entity. The expense posts to that entity's books, and the other side is recorded as a contribution.

The Personal entity can be disabled if not needed.

→ [Personal to business](/accountants/bookkeeping-workflows/personal-to-business)


# Adding & Removing Entities

Add or remove entities as your client's business structure changes.

### Adding an entity

Adding entities beyond the first requires a **Plus** plan or above.

**From the Accounts tab:**

1. Go to the **Accounts** tab.
2. Click **Add entity** in the top right. This opens a guided full-page flow to set up the new entity.

You can also press **⌘K** and select **Add entity**.

**From the Clients tab:**

1. Navigate to the client and click the options menu (⋯).
2. Click **Add entity**.

Kick generates a standard (but completely customizable → see [Chart of Accounts](/accountants/setting-up/chart-of-accounts)) chart of accounts for the new entity based on the entity type you select.

{% hint style="info" %}
**Tip:** The bookkeeping start date you set during entity creation controls when transaction data begins syncing for connected accounts. This can be updated later from the Clients tab.
{% endhint %}

***

### Removing an entity

Deleting an entity permanently removes **all** associated data. Take this action with caution.

1. Go to the **Clients** tab.
2. Hover over the entity and click the options menu (⋯).
3. Click **Delete entity**.

Not all roles can delete entities. See [Permissions](/accountants/managing-clients/roles-and-permissions) for more.


# Integrations


# Connect Accounts

Bring your client's financial accounts into Kick via Plaid, direct integrations, or file import.

### Connection methods

There are three ways to bring financial data into Kick:

* **Plaid** — Connect to over 12,000 banks and credit cards ([supported institutions](https://plaid.com/docs/institutions/)). This is the primary connection method for most accounts.
* **Direct integrations** — Native connections for payment processors and financial platforms with richer data syncing, including auto-splits and receipt matching. Kick's direct integrations currently include:
  * Gusto
  * Ramp
  * BILL
  * Mercury
  * PayPal
  * Stripe
* [**Universal Importer**](/accountants/setting-up/universal-importer) — Upload PDF bank statements or CSVs for institutions not supported by Plaid, or to backfill historical data beyond Plaid's lookback window.

***

### Before you connect

Make sure all of your client's entities are created before connecting accounts. Each account is assigned to an entity during the connection flow, so the entity structure needs to be in place first.

→ [Add additional entities](/accountants/setting-up/multi-entity/adding-and-removing-entities)

If you assign an account to the wrong entity after connecting, you can reassign it without disconnecting.

→ [Manage integrations](/accountants/setting-up/integrations/manage-integrations)

***

### Connect an account

<figure><img src="/files/2VIIXa0giUzGIZpLJcSq" alt=""><figcaption></figcaption></figure>

1. Go to the **Accounts** tab
2. Click **Add account**
3. Select your institution from the list. If it doesn't appear, click **Add other bank institutions with Plaid** to search Plaid's full network.
4. Complete the login flow to authorize the connection
5. Confirm whether each account is **Personal** or **Business**. If you have multiple business entities, select the entity from the dropdown.
6. Click **Continue**

Once connected, Kick begins syncing transactions automatically. The connection start date defaults to the entity's bookkeeping start date.

{% hint style="info" %}
**Note:** When you connect a bank, all accounts from that institution are imported. Each account can be assigned to a different entity.
{% endhint %}

If your client's institution isn't available through Plaid or can't connect successfully, you can upload statements directly via the [Universal Importer](/accountants/setting-up/universal-importer) instead. You can check Plaid's [supported institutions](https://plaid.com/docs/institutions/) to verify coverage, and check back periodically — Plaid regularly adds support for new institutions.

#### Transaction history

Kick pulls in as much history as your bank provides through Plaid — typically 6 to 24 months, depending on the institution. Some banks (e.g., Capital One) may only provide 3 to 6 months.

If you need older data, upload historical bank statements via the [Universal Importer](/accountants/setting-up/universal-importer).

***

### Statement sync

For Plaid-connected accounts at supported institutions, Kick can automatically fetch monthly bank statement PDFs. Once fetched, statements appear in [Documents](/accountants/bookkeeping-workflows/documents) and are automatically queued for [Reconciliation](/accountants/close-workflows/reconciliation) — no manual downloading or uploading required.

{% hint style="info" %}
Statement sync is a premium feature. The connected institution must support Plaid's Statements product.
{% endhint %}

If a connected account supports statement sync but hasn't been authorized yet, a task appears in your task list prompting you to update the Plaid connection.

To enable:

1. Click **Refresh connection** on the task, or open the account's settings and click **Enable in Plaid**
2. Complete the Plaid re-authorization flow

{% hint style="warning" %}
**Important:** Only the connection owner can refresh the connection.
{% endhint %}

Once authorized, statement sync runs automatically. Every time Kick syncs transactions, it also checks for new statements.

#### Where statements appear

[**Documents**](/accountants/bookkeeping-workflows/documents) — Each fetched statement is saved as a PDF in the workspace's Documents, named with the account and statement period (e.g., "Chase Checking Statement 2025-03.pdf").

[**Reconciliation**](/accountants/close-workflows/reconciliation) — Statements covering periods that haven't been reconciled yet are automatically added to the Reconciliation importer. When you open Reconciliation, they're ready to use.

To check the sync status, go to [**Account Settings**](/accountants/setting-up/integrations/manage-integrations). There, you'll find details about your statement sync: whether it's supported, currently syncing, or needs reconnection. Under the **Statement sync** section, you can see the current status and the date of the last statement retrieval.


# Google Sheets

Pull your clients' Kick reports straight into Google Sheets to build branded, always-current report packages.

**Kick to Google Sheets™** pulls financial reports from Kick into any spreadsheet in seconds. Add reports for as many clients and entities as you need, turn on auto refresh, and build branded deliverables on top of live data.

Install it from the [Google Workspace Marketplace](https://workspace.google.com/marketplace/app/kick/83078251972).

{% hint style="success" %}
**Kick reports land as live spreadsheet data, so Gemini, Claude, ChatGPT, or other AI tools can summarize trends, build forecast tabs, and run month-end review on your client's numbers - all in the same workbook**

→ [**Read how to use AI with Kick to Google Sheets**](/accountants/setting-up/integrations/google-sheets/google-sheets-use-with-ai)
{% endhint %}

***

## Common use cases

* **Branded client deliverables:** Build a management report package in your own firm's template, with your logo and layout, on top of live Kick data. No more re-exporting and re-formatting every month.
* **Multi-entity packages:** Pull several entities into one spreadsheet, each on its own tab, then roll them up however the client needs.
* **Custom reporting Kick doesn't produce natively:** KPI dashboards, rolling forecasts, sensitivity tables, covenant calculations, and class- or property-level analysis.
* **Deliver instead of export:** Share one Google Sheet with the client and let auto refresh keep it current, rather than emailing a new PDF each month.
* **Working papers:** Pull a General Ledger or Trial Balance for a period and tie out on adjacent tabs.

***

## One-time Set up

### Install the add-on

1. Open the [Kick listing on the Google Workspace Marketplace](https://workspace.google.com/marketplace/app/kick/83078251972)
2. Click **Install** and grant the requested permissions

{% hint style="info" %}
If your firm is on Google Workspace and add-on installs are restricted, your Workspace admin may need to allowlist the Kick add-on before you can install it.
{% endhint %}

### Open the add-on

1. Open a Google Sheet file from your Google Drive (recommended to save in a Client folder). You can create a new spreadsheet or open an existing one
2. Open the Kick add-on under **Extensions → Kick**, or via the **side bar menu** (look for the Kick icon)

{% embed url="<https://files.gitbook.com/v0/b/gitbook-x-prod.appspot.com/o/spaces%2FiOfJtU5BnOhuPqTiOHth%2Fuploads%2FxaACbyTa4HTBv4k7JKyB%2FOpen%20Kick%20add-on%20in%20Google%20Sheets.mp4?alt=media&token=d70a4783-5cbf-4e0d-91ff-fa0bf1a9e46b>" %}

3. If you're not signed in yet, click **Sign in to Kick**
4. Complete the login flow that opens in a new browser tab and approve access to Kick
5. When you see the confirmation message, close the tab and return to your spreadsheet
6. The sidebar updates to show your Kick profile when sign-in is complete

The add-on inherits your own Kick permissions, so you'll see every client workspace you have access to. To disconnect, open the settings icon (gear) at the top of the sidebar and click **Sign out**.

{% hint style="info" %}
**Pop-up blockers:** Kick sign-in opens in a new tab. If nothing happens when you click **Sign in to Kick**, allow pop-ups for Google Sheets (`docs.google.com`) and Kick (`kick.co`). See [Troubleshooting](#troubleshooting) below.
{% endhint %}

***

## Add a report

The sidebar has two tabs: **Reports** for adding new reports, and **Refresh** for keeping existing ones up to date.

1. On the **Reports** tab, select the client **Workspace**
2. Select the **Entity**. This is a multi-select: check individual entities, or choose **All** to include every entity in the workspace.
3. Choose a **Report type**, such as Profit & Loss, Balance Sheet, or General Ledger
4. Set your **Date range**
5. Adjust the **Advanced filters** if you need them
6. Click **Add report to sheet**

{% embed url="<https://files.gitbook.com/v0/b/gitbook-x-prod.appspot.com/o/spaces%2FiOfJtU5BnOhuPqTiOHth%2Fuploads%2FDxAGdncZzcHyYkohZMnT%2FHow%20to%20add%20a%20Kick%20Report%20to%20Google%20Sheet.mp4?alt=media&token=e29a44e4-c549-43ac-966c-c1f042efa77b>" %}

The report loads in a few seconds, and the sidebar confirms **Report imported.** Add as many reports as you'd like to the same spreadsheet.

### Advanced filters

The filters available are similar to those each report has in Kick:

* **Columns:** how the report is broken out, for example **Total only** or **By month**
* **Class:** limit the report to specific classes
* **Counterparty:** limit the report to specific customers or vendors
* **Compare:** add comparison columns, such as the prior year and the percentage change

<figure><img src="/files/9gc8RSrBDk5qbZxGC02d" alt="Advanced filters in the Kick to Google Sheets sidebar: Columns, Counterparty, and Compare"><figcaption></figcaption></figure>

Each report goes into its own tab named after the entity and report type.

{% hint style="warning" %}
Build your dashboards, schedules, and client-facing tabs on **separate tabs** that reference the report tabs with formulas. Do not add columns or formulas directly to a report tab, because refresh rewrites report tabs in full.
{% endhint %}

***

## Refresh reports

Open the **Refresh** tab in the sidebar to see every report you've added to the **current spreadsheet**, grouped by entity. Each report shows when it was last updated, and the top of the tab shows when the spreadsheet last synced.

<figure><img src="/files/l1Td43Ezj7TwN1tUBfIF" alt="The Refresh tab showing one report and the auto refresh toggle" width="375"><figcaption></figcaption></figure>

There are 2 available options to sync live data from Kick:

**1. One time refresh**

* **Refresh a single, selected report:** Click the refresh icon on the report row to pull the latest data from Kick.
* **Refresh all reports in the worksheet:** Click **Refresh all reports** at the bottom of the tab to update every report in the spreadsheet at once. This is the fastest way to roll a whole client package forward after close.

**2. Auto refresh**

Turn on the **Auto refresh** toggle to have Kick keep the reports in this spreadsheet updated for you, so a client opening the file always sees current numbers.

**What refresh changes**

Kick rewrites the full report. Any extra columns, formulas, or formatting you added to a report tab will be **overwritten**. Tabs you created yourself, such as a dashboard or schedule, are **not** touched by refresh.

{% hint style="info" %}
If you deliver locked or finalized periods, leave auto refresh **off** on those spreadsheets so a signed-off package doesn't change after you send it. Use auto refresh for live dashboards instead.
{% endhint %}

***

## Share a spreadsheet with a client

Sharing is handled entirely by **Google**, not Kick.

**How to share**

1. Open the spreadsheet in Google Sheets
2. Click **Share** in the top-right corner (or go to **File → Share → Share with others**)
3. Add people by email, or click **Copy link** to generate a shareable URL
4. Set each person's role:
   * **Viewer:** can see the data but not edit or refresh
   * **Commenter:** can view and leave comments
   * **Editor:** can change the spreadsheet contents
5. Click **Send** or **Copy link**, depending on how you are sharing

For client deliverables, **Viewer** is usually the right role. It lets the client read current numbers without changing your formulas or template.

**Who can refresh Kick data**

Only the Kick user with permissions to the client data can add or refresh reports. Clients you share the sheet with can view (or edit) it in Google, but they cannot pull new data from Kick unless they sign in with their own Kick account that has access to that workspace.

**Keep client data separated**

Kick is **not responsible for who can access a spreadsheet once you share it through Google**. Kick cannot see, manage, or revoke Google sharing permissions. You control access from the **Share** button in Google Sheets at all times.

{% hint style="warning" %}
Never put two clients' data in one shared spreadsheet. Before sharing externally, review who has access under **Share** and remove anyone who no longer needs it. Treat shared links like credentials. Anyone with the link may be able to open the file, depending on your Google sharing settings.
{% endhint %}

***

## Where the data is saved

Kick does **not** store the spreadsheet on Kick's servers. Everything is saved in **your Google account**:

* **Which file:** The report is written into whichever Google Sheet you have open when you click **Add report to sheet**. Open or create that spreadsheet first. Kick does not create a separate file for you.
* **Which tab:** Kick adds the report to a **tab** inside that spreadsheet, named after the entity and report type.
* **Where it lives:** The spreadsheet is stored in **Google Drive**, like any other Google Sheet. Most firms keep client packages in a shared drive folder per client.

For multi-entity clients, you can use a single spreadsheet with separate tabs per entity, or keep each entity in its own spreadsheet.

Tip: Keep separate clients in separate spreadsheets so sharing one deliverable never exposes another client's data.

***

## Troubleshooting

<details>

<summary>Can't sign in to Kick / nothing happens when I click Sign in</summary>

Kick sign-in opens a **new browser tab**. If no tab opens, a pop-up blocker is usually the cause.

1. **Allow pop-ups** for `docs.google.com` and `kick.co` (check the blocked-pop-up icon in your browser's address bar, and disable pop-up blocking in ad blockers or privacy extensions)
2. Click **Sign in to Kick** again and complete login in the new tab
3. Click **Authorize** or **Approve** on the Kick connection screen. Do not close the tab before this step.
4. Return to your spreadsheet; the sidebar should update within a few seconds

If it still fails: open the settings icon (gear) → **Sign out**, try again in a private/incognito window, or confirm you are signing into the correct Kick account.

</details>

<details>

<summary>Sign-in completed but the sidebar still shows "Not signed in"</summary>

1. Close the authorization tab and return to your spreadsheet
2. Reopen the sidebar: **Extensions → Kick → Open**
3. Wait up to 2 minutes. The sidebar checks for sign-in automatically.
4. If it still shows **Not signed in**, sign out and sign in again

</details>

<details>

<summary>"Sign-in not completed. Try again."</summary>

The sidebar did not detect a finished sign-in within about 2 minutes. Usually the Kick tab was blocked, closed early, or authorization was skipped. Allow pop-ups, complete the full flow (sign in → approve → see the success message), and try again.

</details>

<details>

<summary>A client workspace or entity is missing from the dropdown</summary>

The add-on only shows workspaces and entities your Kick account can access. Confirm your access in Kick, then sign out and back in to refresh the list. If you're switching between your own organization and a client workspace, make sure you're signed in with the account that has the access you need.

</details>

<details>

<summary>Report does not appear after clicking Add report to sheet</summary>

Make sure you have a Google Sheet open, the date range is valid, and your connection is active. Try adding the report into a blank tab. If the issue persists, sign out and sign back in.

</details>

<details>

<summary>Connection failure or a similar login error</summary>

Your session with Kick has likely expired. Open the settings icon (gear) → **Sign out**, sign back in, and add the report again.

</details>

<details>

<summary>Balance Sheet or Trial Balance is empty or fails</summary>

These reports require opening balances in the client's workspace. Complete [opening balance setup](/accountants/setting-up/chart-of-accounts/import-opening-balances) in Kick, then try again.

</details>

<details>

<summary>Refresh does not update the data</summary>

Use the refresh icon on the report row in the **Refresh** tab, or **Refresh all reports** to update everything at once. For hands-off updates, turn on the **Auto refresh** toggle. Only the signed-in Kick user can refresh. Clients with view access cannot.

</details>

<details>

<summary>Data formatting looks wrong</summary>

Existing formatting on a tab can interfere. Try adding the report into a blank tab, or clear formatting on the target tab first.

</details>

<details>

<summary>I see the wrong workspace or entity data</summary>

The add-on uses whichever Kick account is signed in. Sign out, sign in with the correct account, and re-select the right **Workspace** and **Entity**.

</details>

***

## FAQs

<details>

<summary>What happens to my dashboard tabs and formulas when I refresh?</summary>

Refresh rewrites the **report tab** with the latest data from Kick. Any columns, formulas, or formatting you added to that tab will be overwritten.

**Other tabs are preserved.** Dashboards, charts, and schedules on separate tabs that reference the report data are not changed by refresh, as long as your formulas point to cells that still exist after the refresh.

</details>

<details>

<summary>Can I put multiple clients in one spreadsheet?</summary>

Technically yes, but don't. Sharing that file with one client would expose the others. Use one spreadsheet per client, and separate tabs for that client's entities.

</details>

<details>

<summary>Can I add reports for multiple entities?</summary>

Yes. The **Entity** selector is a multi-select, so you can check several entities or choose **All**. Each report is added to its own tab, and the **Refresh** tab groups them by entity.

</details>

<details>

<summary>Can I reuse one template across clients?</summary>

Yes, and it's the main reason to build packages this way. Set up your firm's template once with dashboard tabs that reference the report tabs, then make a copy for each client and add that client's reports. Keep report tab names consistent so your formulas carry over.

</details>

<details>

<summary>Is there an extra cost?</summary>

No. Kick to Google Sheets is included at no extra cost.

</details>

***

Need help? [Contact Kick support](https://kick.co/support).

***

*Google Sheets™, Google Drive™ and Google Account™ are trademarks of Google LLC. Kick is not endorsed by or affiliated with Google LLC.*


# Use with AI

Use Gemini, Claude, or ChatGPT on live Kick report data in Google Sheets: build forecasts, run month-end review, and extend client deliverables with AI.

Kick reports land as live spreadsheet data in your workbook, so Gemini, Claude, or ChatGPT can read and reason over them. Summarize trends, build forecast tabs, and run month-end review without exporting from Kick.

{% hint style="info" %}
Want a quick start? use our [/advisory Agents](https://www.kick.co/agent-builder)
{% endhint %}

Build new analysis on **separate tabs** that reference your Kick report tabs. Do not add columns or formulas directly to a report tab, because refresh rewrites report tabs in full. See [Google Sheets](/accountants/setting-up/integrations/google-sheets#add-a-report) for setup.

***

## Prompts vs skills

|              | Prompts                                   | Skills                                                           |
| ------------ | ----------------------------------------- | ---------------------------------------------------------------- |
| **What**     | One-off copy-paste asks                   | Guided workflows — get started, monthly review, budget vs actual |
| **Best for** | Exploration and ad-hoc questions          | Repeat use every month                                           |
| **Where**    | [Example prompts](#example-prompts) below | Free in [Agent Builder](https://www.kick.co/agent-builder)       |

***

## Connect your AI tool

### Gemini in Google Sheets

Gemini is already built into Google Sheets, so there's nothing to install. Open the Gemini side panel from the top-right of your spreadsheet and ask it to summarize trends, flag anomalies, or draft commentary on the client's numbers.

**Best for:** quick questions and first-draft commentary without any setup.

### Claude for Chrome

The [Claude for Chrome extension](https://chromewebstore.google.com/detail/claude/fcoeoabgfenejglbffodgkkbkcdhcgfn) puts Claude in a side panel that can read the spreadsheet you have open, reason across all of its tabs, and build new tabs for you. It requires a paid Claude plan.

{% embed url="<https://files.gitbook.com/v0/b/gitbook-x-prod.appspot.com/o/spaces%2FiOfJtU5BnOhuPqTiOHth%2Fuploads%2FhJoPbrLAnhngEZqLO6Ci%2FHow%20to%20use%20Claude%20with%20Kick%20to%20Google%20Sheets.mp4?alt=media&token=e4aa3564-b00d-4049-9af0-a635a3481199>" %}

From there you can interrogate a whole report package the way a client would: which property or product line is carrying the business, what happens to revenue if the weakest one goes away, where the tenant concentration risk sits, or whether a strong month is real or inflated by a one-time item.

Claude can also write back to the spreadsheet when you ask it to, which is useful for the analysis clients ask for but Kick doesn't produce natively — for example, a new sensitivity tab modelling forecast net income at several revenue growth rates.

**Best for:** advisory work — deep analysis across a full package, and having AI build new schedules and scenario tabs for you.

{% hint style="info" %}
Claude for Chrome asks for permission before it acts. Keep it in **Ask before acting** mode so you approve any change before it touches a client deliverable, and point it at your own working tabs rather than the Kick report tabs, since report tabs are overwritten on refresh.
{% endhint %}

### ChatGPT in Google Sheets

OpenAI's [ChatGPT add-on for Google Sheets](https://workspace.google.com/marketplace/app/chatgpt/870214997678) runs in a sidebar inside your spreadsheet. Install it from the Marketplace, then open it under **Extensions → ChatGPT → Open** and sign in with your OpenAI account. It can read your cells and formulas, and build or edit tabs in place.

**Best for:** building the structure of a template — formulas, schedules, and layout — with natural language.

***

## Example prompts

Copy-paste into Gemini, Claude, or ChatGPT after your Kick reports are in the spreadsheet. Send **Ground rules** first when using Claude for Chrome.

| Use case                  | Prompt                                                                                                                                                                          |
| ------------------------- | ------------------------------------------------------------------------------------------------------------------------------------------------------------------------------- |
| **Ground rules** (Claude) | `I'm going to ask you questions about this spreadsheet data. Act as a professional financial analyst and return all answers in this chat. Don't edit tabs unless I ask you to.` |
| **Learn the business**    | `Summarize what this P&L tells you about the business: revenue drivers, margin, and anything unusual in the last 3 months.`                                                     |
| **Budget vs actual**      | `Add a budget vs actual tab by month. Flag variances over 10%.`                                                                                                                 |
| **Rolling forecast**      | `Add a 12-month rolling forecast tab.`                                                                                                                                          |
| **OpEx changes**          | `What changed most in operating expenses vs last month, and what should I flag for the client?`                                                                                 |
| **Month-end variances**   | `Summarize the top three variances for our client month-end review.`                                                                                                            |

***

## Prefer to work outside of Sheets?

Kick also supports access to client financial data via MCP, which lets AI tools query Kick directly without exporting anything. [Learn more about Kick AI & Automation →](https://docs.kick.co/ai)

Any AI tool you connect to a spreadsheet containing Kick data can read that client's financial data, and third-party tools are governed by their own privacy and data-training policies, not Kick's. Confirm this is consistent with your firm's data policy and your client engagement terms before pointing an AI tool at client financials.

***

← [Google Sheets](/accountants/setting-up/integrations/google-sheets)


# Payment Processors

Connect Stripe and PayPal to sync transaction-level detail into Kick, including customer information, product data, and automatic revenue and fee splits.

### How payment processors work in Kick

Payment processor accounts function like any other financial integration in Kick. Payments received from customers are categorized as income in the payment processor account. When funds transfer to your bank, both sides of the transfer should be categorized as Transfer to avoid double-counting revenue.

Kick's direct integrations with Stripe and PayPal automatically split transactions into gross revenue and fees, so you don't need to manually separate merchant processing costs. Customer and product details sync into the bank description field, giving you granular visibility into revenue sources without manual tracking.

***

### Stripe

#### What syncs

Stripe syncs the following data types once connected:

* Payments from customers with automatic revenue and fee splits
* Refunds
* Payouts to your bank account(s)
* Invoice line item splits
* Customer and product details
* Stripe Capital loan payments (split into principal, fees, and other expenses)

#### Connect Stripe

1. Go to the Accounts tab
2. Click **Add account** and select **Stripe**
3. Authorize the connection through Stripe's login flow
4. Select the entity your Stripe integration relates to
5. Click **Continue**

Repeat the flow to connect multiple Stripe accounts, if needed.

{% hint style="info" %}
**Tip:** With customer and product details syncing into Kick, you can create [rules](/accountants/bookkeeping-workflows/rules) to automatically map transactions by Stripe product to specific income sub-accounts.
{% endhint %}

***

### PayPal

#### What syncs

PayPal syncs the following data types once connected:

* Payments from customers with automatic revenue and fee splits
* Refunds
* Payouts to your bank account(s)
* Customer and product details
* PayPal loan payments
* Expense transactions and vendor names

{% hint style="warning" %}
Only USD transactions are synced from PayPal. If you have foreign currency transactions, they'll need to be converted to USD and added manually.
{% endhint %}

#### Connect PayPal

1. Go to the Accounts tab
2. Click **Add account** and select **PayPal**
3. Authorize the connection through PayPal's login flow
4. Select the entity your PayPal integration relates to
5. Click **Continue**

***

### Cash App, Venmo, and other processors

Cash App and Venmo connect through Plaid like other bank accounts. See [Connect Accounts](/accountants/setting-up/integrations/connect-accounts).

If a payment processor doesn't connect through Plaid, you can import transactions manually via CSV or PDF statement using the [Universal Importer](/accountants/setting-up/universal-importer).

***

### Categorizing income and transfers

Treat your payment processor like a checking account:

* **Payments received** from customers → categorize as income
* [Transfers](/accountants/bookkeeping-workflows/transfers) out to your bank → categorize as Transfer on **both sides**

If the deposit into checking is categorized as income instead of a transfer, revenue will be double-counted between the payment processor and the bank account.

For recurring transfers (like daily Stripe payouts), create a [Transfer Rule](/accountants/bookkeeping-workflows/rules) to automatically match both sides.


# Ramp

Sync your Ramp credit card transactions, reimbursements, and bills directly into Kick.

{% hint style="info" %}
**Before you connect**

You must be an **admin** of your Ramp account to connect the integration.
{% endhint %}

### How to connect

You can connect Ramp from either of two places:

<div data-with-frame="true"><figure><img src="/files/KNuggZOm4qyLVa5ftejQ" alt=""><figcaption></figcaption></figure></div>

**From the** [**Accounts**](https://use.kick.co/accounts) **tab**

1. Navigate to the **Accounts** tab.
2. Click **Add account** in the top right.
3. Select **Ramp** from the dropdown, or search for it.
4. Follow the prompts to authenticate with your Ramp admin credentials.

<div data-with-frame="true"><figure><img src="/files/G7YmoxB4SNLeZOzNFNbD" alt=""><figcaption></figcaption></figure></div>

**From the** [**Bill Pay**](https://use.kick.co/billing) **tab**

1. Navigate to the **Bill pay** tab.
2. Click **Connect Ramp**.
3. Follow the prompts to authenticate with your Ramp admin credentials.

Regardless of where you connect, all data types (credit card transactions, reimbursements, and bills) will sync.

***

### What syncs from Ramp

**Credit card transactions**

All Ramp virtual cards will appear as a **single credit card account** on your Balance Sheet. Credit card transactions sync on the Transactions tab and can be categorized and edited similar to transactions from any other integrated account.

**Reimbursements**

Reimbursements sync as a **separate account** under Other Current Liabilities on your Balance Sheet. When reimbursements are paid, they map to this liability account — so your Balance Sheet always reflects a live running balance of what is owed. Reimbursement-related transactions appear on the Transactions tab.

**Bills**

Bills from Ramp sync on the Bill Pay tab. For details on how Kick handles accounts payable reconciliation and bill pay insights, see [Bill Pay](/accountants/bookkeeping-workflows/bill-pay).

**Receipts**

All receipts from Ramp sync automatically and are matched to their corresponding expense transactions in Kick — no need to manage receipts in two places.

**Departments**

If you use departments in Ramp, they will automatically sync as Classes in Kick.


# Mercury

Connect Mercury to sync transactions, bank statements, and treasury activity directly.

### Connecting Mercury

1. Go to the **Accounts** tab.
2. Click **Add account** and select **Mercury**.
3. Authorize the connection through Mercury's login flow.
4. Select the entity your Mercury integration relates to
5. Click **Continue**.

Kick connects to all Mercury accounts associated with the login used during authorization. This includes checking, savings, credit card, and treasury accounts.

If you authorize with a personal Mercury login, the connection is assigned to the workspace's Personal entity.

***

### What syncs

| Account type | Transactions | Bank statements | Invoices |
| ------------ | ------------ | --------------- | -------- |
| Checking     | ✅            | ✅               | ✅        |
| Savings      | ✅            | ✅               | ✅        |
| Credit card  | ✅            | ❌               | ❌        |
| Treasury     | ✅            | ❌               | ❌        |

Transactions sync automatically once the connection is authorized. Bank statements for checking and savings accounts sync into the Documents tab and are available for reconciliation. Invoices sync from business checking and savings accounts only (not from personal Mercury logins).

***

### Treasury accounts

Mercury treasury accounts include investment activity beyond standard banking. Kick syncs the following treasury transaction types:

* Deposits and withdrawals
* Dividends
* Interest
* Fees

{% hint style="info" %}
Bank statements are not yet available via the API for treasury and credit card accounts. Upload these manually from Mercury if needed for reconciliation.
{% endhint %}

***

### Direct integration vs. Plaid

Mercury accounts can be connected via Plaid, but the direct integration offers richer data and broader account coverage. For the best experience, we recommend using the direct integration.


# Gusto

Connect Gusto to automatically sync payroll runs, domestic contractor payments, and reimbursements into Kick.

<div data-with-frame="true"><figure><img src="/files/OMpBC61Lid9EZaPJ7EgM" alt=""><figcaption></figcaption></figure></div>

### Connecting Gusto

1. Go to the **Accounts** tab and click **Add account** in the top right — or press **⌘K** and select **Add account**
2. Select **Gusto** from the integration list
3. Follow the prompts to authenticate and complete the connection

Once connected, Kick begins syncing payroll data automatically.

{% hint style="info" %}
Gusto sync requires a **Basic** plan or above. Workspaces on the Free plan will see an upgrade prompt when connecting Gusto.
{% endhint %}

{% hint style="info" %}
You must be an admin on your client's Gusto account to complete the connection.
{% endhint %}

***

### What syncs

**Payroll runs**

Each payroll run syncs as a split transaction, with each payroll expense line item broken out individually — wages, payroll taxes, employee benefits, and other payroll-related expenses.

**Domestic contractor payments**

Domestic contractor payments sync automatically alongside payroll runs.

{% hint style="warning" %}
International contractor payments are not synced via the Gusto integration. Categorize those transactions directly from the connected checking account(s).
{% endhint %}

**Reimbursements**

Employee reimbursements sync automatically.

**Departments**

If your client uses departments in Gusto, they sync as [classes](/accountants/bookkeeping-workflows/classes) in Kick. No additional setup needed.

***

### Gusto on the Balance Sheet

When Gusto is connected, it appears on the Balance Sheet of the entity it's connected under **Payroll Liabilities**. Each expense transaction from payroll runs, contractor payments, and reimbursements increase this liability account.

To reconcile the Gusto payroll liability account at close, see → [Payroll](/accountants/close-workflows/payroll).


# BILL

Sync your BILL bills, invoices, vendors, customers, and payment directly into Kick.

{% hint style="info" %}
**Before you connect**

You must be an **admin** of your BILL account to connect the integration.
{% endhint %}

### **Connecting BILL**

You can connect BILL from either of two places:

**From the** [**Accounts**](https://use.kick.co/accounts) **tab**

1. Go to the **Accounts** tab
2. Click **Connect account**
3. Select **BILL**

**From the** [**Bill Pay**](https://use.kick.co/billing) **tab**

1. Navigate to the **Bill pay** tab
2. Click **Connect BILL**
3. Complete the token setup steps below

Regardless of where you connect, all data types (bills, invoices, vendors, customers, and payments) will sync.

#### **Step 1: Initiate connection in Kick**

If you started from the **Bill Pay** tab, Kick opens the connection flow automatically. Otherwise:

1. Go to the **Accounts** tab
2. Click **Connect account**
3. Select **BILL**

<figure><img src="/files/OIQg6leIrETU5wir5gQ5" alt=""><figcaption></figcaption></figure>

#### **Step 2: Create an API token in BILL**

You'll need to create a sync token in your BILL account:

1. Sign in to your [bill.com](https://login.us.bill.com/neo/login) account
2. In the left navigation, open **Settings**
3. Go to **Sync & Integrations → Tokens**
4. Click **Create token**
5. Enter a token name (for example, `kick-bill-integration`) and save
6. Copy the **token value** (the secret string BILL shows once, like a password) to your clipboard before you leave the screen

{% hint style="warning" %}
Copy the token value to your clipboard before closing the screen - BILL only shows it once.
{% endhint %}

{% embed url="<https://player.mux.com/h2LpCNirnB7uBXrs01EgJQ6IOUfQmtL4hC37nIu6X5N8>" %}

#### **Step 3: Complete connection in Kick**

1. Return to Kick
2. Enter the **token name** (you can use the same name you chose in BILL) and paste the **token value**
3. Click **Connect**

{% embed url="<https://www.loom.com/share/fd750c5a46d249b88b7d405056dbd770>" %}

***

### **Chart of Accounts mapping**

To categorize bills and invoices to the correct GL account without further work, upload your Kick Chart of Accounts to BILL.

#### **Export from Kick**

1. In Kick, go to **Accounting > Chart of Accounts**
2. Click the download icon in the top right
3. Select **Chart of Accounts (.csv)**
4. Save the file

<figure><img src="/files/c1mOzRsc9E2bZMTD2t6Q" alt=""><figcaption></figcaption></figure>

#### **Import to BILL** <a href="#import-to-bill.com" id="import-to-bill.com"></a>

1. In BILL, open **Settings** in the left navigation, then go to **Import & export**
2. Click **Custom File Integration** in the left sidebar
3. Scroll to **Accounts** and click **Import**
4. Upload the CSV file from Kick
5. Map fields if prompted and complete the import

Your Kick GL accounts are now available when categorizing bills and invoices in BILL.

{% embed url="<https://www.loom.com/share/0a41b7db852044b9bf4abcb1e19d4c83>" %}

***

### **What syncs from BILL**

Once connected, the following data syncs automatically:

* **Bills** — All bills created in BILL
* **Invoices** — All invoices created in BILL
* **Vendors** — Vendor information and contact details
* **Customers** — Customer information and contact details
* **Payments** — Payment transactions and status updates
* **GL account assignments** — Account categorizations for bills and invoices

***

### **Viewing BILL data in Kick**

* **Bills** sync on the [Bill Pay](/accountants/bookkeeping-workflows/bill-pay) tab
* **Invoices** sync on the [Invoicing](/accountants/bookkeeping-workflows/invoicing) tab

For details on how Kick handles accounts payable and receivable reconciliation, see [Bill Pay](/accountants/bookkeeping-workflows/bill-pay) and [Invoicing](/accountants/bookkeeping-workflows/invoicing).

***

## **FAQ**

<details>

<summary><strong>What to do if my connection failed?</strong></summary>

* Verify you created a sync token under **Settings → Sync & Integrations → Tokens** in BILL
* Ensure you copied the **token value** to your clipboard and entered the **token name** in Kick
* Check for extra spaces when pasting

</details>

<details>

<summary><strong>Why my bills are not syncing in Kick?</strong></summary>

* Confirm bills are saved in BILL
* Check last sync time in Kick **Accounts** tab
* Refresh the **Bill Pay** tab

</details>

<details>

<summary><strong>Why some GL accounts are missing in BILL?</strong></summary>

* Confirm you imported Chart of Accounts (see Chart of Accounts mapping above)
* If you updated your Chart of Accounts in Kick, you will have to manually [update your accounts in BILL](#import-to-bill.com)
* Check import status: **Settings → Import & export → History** in BILL

</details>


# Manage Integrations

Update connected account settings, fix disconnections, merge accounts, and pause or remove connections from the Accounts tab.

### Reassign an account to a different entity

You can change the entity associated with a connected account without disconnecting:

1. Go to the **Accounts** tab
2. Click the options menu (⋯) on the account row
3. Click **Settings**
4. Change the entity in the **Details** section

***

### Change the start or end date

The connection start date controls when transaction data begins syncing. It defaults to the entity's bookkeeping start date. The end date controls when syncing stops — transactions after the end date will not appear in Kick.

To change either date:

1. Go to the **Accounts** tab
2. Click the options menu (⋯) on the account row
3. Click **Settings**
4. Click **Edit** next to the **Start date** or **End date**
5. Pick a new date and click **Set Date**

To remove a date override and revert to the entity default, click **Clear date** in the date picker.<br>

{% hint style="warning" %}
**Important:** Changing the start date can pull in additional historical transactions or remove transactions outside the new range. Adjust with care if categorization or reconciliation work has already been done.
{% endhint %}

***

### Fix a disconnected account

Bank and financial account connections can occasionally disconnect due to credential changes, multi-factor authentication updates, or connectivity issues with the institution. When this happens, the affected account will display a connection error on the Accounts tab.

#### Reconnect an account

1. Go to the **Accounts** tab
2. Click **Fix connection** on the affected account
3. Re-authenticate with your bank or financial institution

Once reconnected, Kick automatically syncs any missed transactions.

#### Credential changes (new account number or login)

If your bank issued new credentials or a new account number (e.g., due to fraud, a card replacement, or an account migration), the **Fix connection** flow may not resolve the issue — the bank treats it as a new account through Plaid.

To maintain continuity:

1. On the **Accounts** tab, click **Add Account** and authenticate with the new credentials.
2. Once the new account is connected, merge it with the original account to consolidate transaction history and avoid duplicates.

#### Re-enable a disabled account

If an account was disabled rather than fully removed, it will appear grayed out on the Accounts tab. Toggle the **Connected to Plaid** switch back on — no need to go through Plaid again.

#### Re-add a deleted account

If you previously deleted a bank account and want to add it back:

1. On the **Accounts** tab, click **Add Account**
2. Search for your bank and authenticate through Plaid
3. Select the specific account(s) you want to reconnect

***

### Merge accounts

When an account is reconnected with new credentials — or when you need to consolidate two accounts that represent the same underlying bank account — use Merge Accounts to combine them without losing transaction history or creating duplicates.

#### Where to find it

Go to **Settings → Accounts**, then open the **Account details** panel for the account you want to merge. If the account is eligible, you'll see a **Merge account** button.

{% hint style="info" %}
**Note:** The merge option is not available if the account has locked transactions.
{% endhint %}

#### Select accounts to merge

1. Click **Merge account** to open the merge modal.
2. The **Merge** field is pre-filled with the account you started from — this is the account that will be absorbed and removed.
3. In the **into** field, search for and select the destination account. Only accounts on the same entity are available.
4. Use the **Flip accounts** button to swap the source and destination if needed.

The modal will confirm: "This will move all transactions from \[source account] into \[destination account] and remove \[source account]."

Click **Preview merge** to continue. This does not modify any data.

#### Preview the merge

The preview runs a dry-run analysis comparing both accounts and shows what will happen:

**Transactions to be moved** — Transactions that only exist on the source account will be relocated to the destination.

**Deduplicated transactions** — If both accounts contain transactions with the same amount on the same date, they will be flagged as duplicates. Expand this section to review them. The system keeps one copy and removes the other.

**Conflicts** — Two types of conflicts may require your input:

* **Both modified** — A duplicate transaction was found in both accounts, but each copy has been manually edited (e.g., different categories or memos). Select which version to keep.
* **Multiple matching** — A transaction in the destination matches more than one transaction in the source (e.g., two identical charges on the same date). Select the correct pairing.

The **Merge** button is disabled until all conflicts are resolved.

#### Execute the merge

Once all conflicts are resolved, click **Merge**. The system will:

* Move all non-duplicate transactions from the source to the destination
* Deduplicate overlapping transactions
* Regenerate journal entries for moved transactions
* Reassign bank and integration connections (Plaid, Stripe, etc.) from the source to the destination
* Remove the source account

If an additional conflict is detected during the merge, a prompt will appear asking you to resolve it before continuing. You can choose **Continue** or **Abort merge**.

#### After the merge

If the destination account now has multiple bank or integration connections, a **Merged accounts** section will appear in the account details. Each connection is listed with an **Extract** button, which lets you split that connection back out into a standalone account if needed.

#### Key details

* Accounts must belong to the same entity to be merged.
* Accounts with locked transactions cannot be merged.
* If the source account has manual journal entries on its ledger, you may need to address those before merging.
* There are no restrictions on mixing account types — you can merge based on entity ownership regardless of whether the accounts are bank accounts, credit cards, or other types.

***

### Pause a connection

To temporarily stop a connected account from syncing without removing it:

1. Go to the **Accounts** tab
2. Find the account and click the options menu (⋯)
3. Toggle off the connection using the switch next to the sync status

This stops future syncing but keeps all existing data intact. Toggle it back on at any time to resume.

***

### Remove a connected account

If you need to permanently remove an account from Kick:

1. Go to the **Accounts** tab
2. Find the account and click the options menu (⋯)
3. Click **Settings**
4. Scroll down and select **Remove account**
5. Choose one of the following:
   * **Remove all historical data and account** — permanently deletes the account and all associated transaction history
   * **Keep historical data and disable the account** — stops future syncing while preserving all existing transactions

{% hint style="info" %}
**Tip:** We recommend pausing the connection rather than removing it unless you're sure the data is no longer needed.
{% endhint %}


# Universal Importer

Upload bank statements and CSVs to bring in transaction data for institutions not supported by Plaid, or to backfill history beyond Plaid's lookback window.

### When to use the Universal Importer

* Your client's bank is not supported by Plaid (e.g., local credit unions)
* You need historical data beyond what Plaid provides for an existing connected account
* You're doing catch-up bookkeeping with statements from closed accounts
* You only have paper statements that have been scanned

{% hint style="info" %}
**Important:** The Universal Importer is available on all paid plans. If you are on the free plan, upgrade to access this feature.
{% endhint %}

***

### Supported file types

* **PDF**, including scanned PDFs
* **CSV** transaction exports
* **JPG / JPEG / PNG** (image scans of statements)
* Maximum file size: **20 MB per file**

Excel (.xlsx) and Word files are not supported.

***

### Import transactions

1. Go to the **Accounts** tab
2. Click **Add account** and select **Import transactions**
3. Drag and drop your files, browse from your computer, or select from the **Documents** tab. You can upload PDFs and CSVs for multiple accounts at once.
4. Kick extracts account information, balances, and transactions automatically. Review the extracted data before importing.
5. Select the entity and either create a new account or map to an existing one. If you're backfilling history for a connected account, select that account here.
6. Click **Import** to create the transactions.

{% hint style="info" %}
When you upload files for multiple accounts in a single batch, Kick automatically detects which account each file belongs to and sorts them accordingly.
{% endhint %}

{% hint style="info" icon="lightbulb" %}
Extraction and import may take a few minutes depending on the number of files and transactions. You can navigate away and come back — the import will continue processing.
{% endhint %}

***

### Review extracted data

<div data-with-frame="true"><figure><img src="/files/wKxr0xUL0qmOZksSD3Gh" alt=""><figcaption></figcaption></figure></div>

After uploading, Kick presents the extraction in a side-by-side view — a preview of the source document on the left and the extracted transactions in an editable table on the right. You can modify:

* **Dates** — Adjust transaction dates if the extraction parsed them incorrectly
* **Descriptions** — Edit or clean up transaction descriptions
* **Cash in / Cash out** — Correct amounts in either column
* **Opening and closing balances** — Edit the extracted balance figures for the statement period

The table includes built-in arithmetic validation: opening balance + cash in − cash out = closing balance. If the totals don't align, Kick flags the discrepancy so you can correct it before importing.


# Multi-Account Statements

Handle bank statements that combine multiple accounts into a single PDF.

## When a Statement Covers Multiple Accounts

Kick's statement extraction expects one account per document. Some banks — particularly smaller credit unions and certain card issuers — issue a single PDF that combines multiple accounts. When a PDF contains multiple accounts, the extractor may pull transactions or balances from the wrong account, combine figures, or fail to identify a clear opening and closing balance. This causes mismatches that can't be resolved by adjusting individual transactions.

{% hint style="info" %}
Each uploaded PDF is associated with a single account. If you upload a combined statement for one account, that same document can't be reused for the second account — upload it again as a new document and select the new copy.
{% endhint %}

***

### Identifying a Multi-Account Statement

You likely have a multi-account statement if:

* The PDF shows separate transaction sections for different account numbers or card numbers
* The statement lists more than one opening balance or closing balance
* The extracted opening or closing balance doesn't match what you expected for that account
* The extracted transaction count is higher than expected — it may include transactions from the other account

***

### Splitting the PDF Before Uploading

This is the recommended approach. Create a separate PDF for each account before uploading to Kick.

1. Open the combined statement and identify which pages belong to which account. Look for the account number or last four digits printed on each page.
2. Print the relevant pages to a new PDF — on Mac, use File → Print → Save as PDF; on Windows, choose Microsoft Print to PDF as the printer. Select only the pages for the account you need.
3. Make sure each resulting PDF includes the page with the statement summary (opening balance, closing balance) for that specific account.
4. Repeat for each account on the statement.
5. Upload each individual PDF to Kick under the correct account.

If you have Adobe Acrobat, you can also use Extract Pages or Split Document to separate the file.

{% hint style="warning" %}
Each split PDF must include the statement summary page for the correct account. Without a clear opening and closing balance on the document, Kick's extraction won't be able to match balances, and you'll need to enter them manually.
{% endhint %}

***

### Correcting the Extraction Manually

If splitting isn't practical — for example, when both accounts share the same summary page — upload the combined PDF and fix the extraction results in Kick.

1. Upload the combined statement for one of the accounts.
2. After extraction, review the results. Kick shows the extracted opening balance, closing balance, and transaction list.
3. Edit the opening and closing balances to reflect the correct account's figures from the statement summary.
4. Remove any transactions that belong to the other account.
5. Add any transactions the extractor missed for this account.
6. Complete the process once the figures match.

{% hint style="info" %}
You can click and drag to highlight multiple rows in the extraction table, or hold Shift and use the arrow keys to select in bulk — similar to a spreadsheet.
{% endhint %}

To handle the second account, upload the same PDF again as a new document in the [Documents tab](/accountants/bookkeeping-workflows/documents), then start a new [import](/accountants/setting-up/universal-importer) or [reconciliation](/accountants/close-workflows/reconciliation) for that account using the new copy. Repeat the same correction process — this time keeping only the other account's balances and transactions.

{% hint style="info" %}
This approach is more error-prone than splitting, especially for accounts with high transaction volumes. Where possible, split the PDF first.
{% endhint %}


# Invite your Clients

Give your clients access to their workspace for a smooth collaboration

{% hint style="warning" %}
**Before you invite:** Review the available permission levels to choose the right access. See [Roles & Permissions](/accountants/managing-clients/roles-and-permissions) for details.
{% endhint %}

***

### Invite a Client

1. Open the client's workspace.
2. Click the **profile icon** or go to **Settings** → **Members**.
3. Click **Add team**.
4. Enter the client's email address.
5. Select the appropriate role.
6. Choose which entities they should access.
7. Click **Send invite**.

The client will receive an email with a link to access their workspace.

{% embed url="<https://player.mux.com/7x6g7BsOg02029GCXh01tMbXAJKpdylJMV86jAG61FqgHY>" %}

***

### Update Permissions or Remove Access

To change what a client can see or remove their access:

1. Open the client's workspace.
2. Go to **Settings** → **Members**.
3. Click the **⋯** menu next to the client's name.
4. Select:
   * **Configure permissions** — Change their role or entity access
   * **Remove from workspace** — Revoke their access entirely

{% embed url="<https://player.mux.com/u8vC9h3pzPFTydpK29wTyf02KsQSlsM2701QCSrxZxz00s>" %}

***

### FAQs

<details>

<summary><strong>Can clients see other clients' data?</strong></summary>

No. Clients only see the workspace or entities they've been granted access to.

</details>

<details>

<summary><strong>Can I invite multiple people from the same company?</strong></summary>

Yes. You can add multiple team members to a client workspace — for example, the business owner and their office manager, at no additional cost.

</details>

<details>

<summary><strong>What if my client is already on Kick?</strong></summary>

You can still invite them using the steps above. They'll sign in with their existing account and see the workspace you've shared.

</details>

<details>

<summary><strong>How do I resend an invite?</strong></summary>

Go to **Settings** → **Members**, find the person with a pending invite, and click on the three dots (**⋯**) → **Resend invite**.

</details>

<details>

<summary><strong>How is this different from adding team to my organization?</strong></summary>

Clients are invited to their own *workspace* to view their books. Team members are added to your *organization* and can access multiple client workspaces. Learn more in [Invite your Team](/accountants/start-here/set-up-your-firm/invite-your-team).

</details>


# Categorization

Kick uses two layers to categorize transactions automatically — an AI layer that handles the first pass, and a rules layer that gives you full control.

### AI layer

When transactions sync into Kick, the categorization model automatically categorizes \~97% of them on first pass. The model is optimized to get you to a materially correct Profit & Loss as fast as possible, minimizing manual work across all your clients.

Kick also learns from the changes you make. When you update a category, counterparty, class, or other transaction attribute on the Transactions tab, Kick prompts you to apply the same change to similar transactions — both historical and going forward. If confirmed, Kick applies that feedback automatically in the future.

Uncategorized transactions appear when the model's confidence is low and need to be reviewed manually.

***

### Rules layer

Rules give you hard, deterministic control over categorization. You can create multi-condition, multi-action rules to set categories, GL accounts, counterparties, classes, entities, and more. Rules always take priority over AI-based categorization.

Rules are especially useful for complex clients or industries that require highly detailed and consistent financial reporting — or any situation where you need to guarantee a specific outcome regardless of what the AI suggests.

→ [Rules](/accountants/bookkeeping-workflows/rules)

***

### How the two layers work together

For most clients, the AI layer handles the bulk of categorization automatically. Rules layer on top to enforce any exceptions, custom mappings, or client-specific logic. Transactions post to the General Ledger in **real time** once categorized.


# Custom Categories

Create custom categories to tailor Kick's categorization to your client's specific reporting needs.

### Custom Categories

Kick comes with a standard set of categories designed to cover most business types. When transactions sync, Kick's categorization model automatically assigns a category to \~97% of them out of the box. Custom categories let you extend that standard set for clients with specific reporting needs — industries with specialized expense types, detailed revenue breakdowns, or any case where the standard categories don't map cleanly to how your client thinks about their finances.

Each category in Kick maps automatically to a GL account to keep your Profit & Loss and Balance Sheet accurate. See [Categories vs General Ledger](/accountants/bookkeeping-workflows/categorization/categories-vs-general-ledger) to learn more.

→ [Categorization](/accountants/bookkeeping-workflows/categorization)

***

### Accessing categories

Go to **Transactions →** [**Categories**](https://use.kick.co/categories) in the left nav to view all categories across your client's workspace.

***

### Creating a custom category

There are two ways to create a custom category.

**From the Transactions tab:** Click the **Category** field on any transaction to open the category dropdown, then click **Create new category** at the bottom of the list. The new category is created and automatically assigned to that transaction.

**From the Categories tab:** Go to **Transactions → Categories** and click the **+** icon next to any existing category to add a custom subcategory beneath it.

{% hint style="info" %}
Kick's AI categorization model does not automatically assign custom categories. Create a rule to ensure custom categories are applied consistently going forward.
{% endhint %}

→ [Rules](/accountants/bookkeeping-workflows/rules)

***

### Editing a custom category

Go to **Transactions → Categories**, find the category, click the options menu (⋯), and select **Update**.

***

### Deleting a custom category

Go to **Transactions → Categories**, find the category, click the options menu (⋯), and select **Delete**.

When a custom subcategory is deleted, all transactions assigned to it revert to the parent category.

{% hint style="warning" %}
Any rules that reference a deleted custom category will no longer fire correctly. Review your rules before deleting a category.
{% endhint %}

***

### Assigning a custom category to a transaction

Navigate to Transactions, click the **Category** field, and search for or select your custom category.

Categories can also be assigned in bulk by selecting multiple transactions at once.

To apply a custom category automatically going forward, create a rule.

→ [Rules](/accountants/bookkeeping-workflows/rules)


# Categories vs General Ledger

Kick uses two parallel systems to label transactions — categories for business owners, and general ledger accounts for accountants.

### Categories vs. General Ledger

Categories were created with the business owner in mind.

<div data-with-frame="true"><figure><img src="/files/m75R6MmRqDUgR08f6vur" alt=""><figcaption></figcaption></figure></div>

Categories give business owners a simple, non-technical way to label transactions. Behind the scenes, every category maps automatically to the correct general ledger account.

Categories and general ledger accounts can be viewed side-by-side by switching to the **Cash ledger review** [view](/accountants/collaboration/views) on the [Transactions](https://use.kick.co/transactions) tab.

Categories create a strong first draft of your client's books. Accountants always have full control over the general ledger, and are never bound by the default category-to-general ledger account mapping.

***

### How category-to-general ledger account mapping works

Every category in Kick maps to a general ledger account. When a transaction is categorized, it posts to the corresponding general ledger account in **real time.**

This mapping handles cases that would trip up most business owners. A few examples:

**Federal Taxes → Distributions**

A single-member LLC that categorizes a transaction as Federal Taxes will have it automatically mapped to Distributions on the Balance Sheet — the correct equity account treatment — rather than incorrectly landing as an expense on the Profit & Loss.

**Income (negative amount) → Refunds & Returns**

If a business owner categorizes a negative transaction as Income, Kick automatically maps it to Refunds & Returns on the Profit & Loss rather than posting it as negative revenue.

**Credit Card Payment → Credit Card Clearing**

When a transaction is categorized as Credit Card Payment, Kick posts it to the Credit Card Clearing account on the Balance Sheet. Both sides of the payment flow through clearing and net to zero when matched — no need to identify the correct credit card liability account manually.

**Transfer → Bank Transfer Clearing**

When a transaction is categorized as Transfer, Kick posts it to the Bank Transfer Clearing account. All movements of funds between accounts flow through clearing accounts, ensuring transfers don't inflate income or expenses.

→ [Transfers](/accountants/bookkeeping-workflows/transfers)

To see how all categories map to general ledger accounts, go to [**Rules**](https://use.kick.co/rules) in the left nav, open the **Accounting** subtab, and scroll down to **Kick Rules**.

***

### General ledger account control

Categories get your books materially correct out of the box — but you have full control over the general ledger and can override any category-to-general ledger account mapping at any time.

There are several ways to work directly with general ledger accounts:

**On individual transactions:**

1. Reveal the general ledger column on the Transactions tab using custom [views](/accountants/collaboration/views)
2. Select the appropriate general ledger account from the dropdown in this column
3. Once manually changed, the automated category-to-general ledger account mapping will never override it again. The category label remains on the transaction for the business owner's view, but the general ledger account is locked to your selection.

**In bulk:** Select multiple transactions on the Transactions tab and update the general ledger account across all of them at once.

**Via rules:** Create rules that post directly to a general ledger account without using category as a condition. For example, you can map transactions to a specific general ledger account based on bank description, account, amount, or any other condition — giving you precise, automated control over general ledger posting regardless of how the transaction is categorized.

→ [Rules](/accountants/bookkeeping-workflows/rules)

**Via journal entries:** Use manual journal entries for accrual adjustments and other entries that don't originate from transactions.

→ [Journal Entries](/accountants/close-workflows/journal-entries)


# Transactions

View, categorize, and manage all synced transactions across your client's entities from a single tab.

### The Transactions tab

The Transactions tab is the central workspace for reviewing and categorizing your client's financial data. All transactions from connected accounts, direct integrations, and imported files flow into this tab automatically.

When transactions sync, Kick's categorization model categorizes approximately 97% on first pass. Uncategorized transactions appear when the model's confidence is low. Once categorized, transactions post to the General Ledger in real time.

→ [Categories vs General Ledger](/accountants/bookkeeping-workflows/categorization/categories-vs-general-ledger)

***

### Columns

Customize which columns are visible using the **Views icon** (⚙) in the top right. The following columns are available:

* **Date** — The transaction date as reported by the bank or integration
* **Description** — The transaction description displayed in Kick
* **Account** — The connected financial account the transaction came from
* **Subaccount** — The subaccount within the connected account, when applicable
* **Amount** — The transaction amount
* **Entity** — The entity the transaction is assigned to
* **Bank description** — The raw, unmodified description from the bank feed
* **Cash ledger** — The account the transaction posts to on the Cash ledger
* **Accrual ledger** — The account the transaction posts to on the Accrual ledger
* **Counterparty** — The vendor or customer associated with the transaction
* **Memo** — Free-text field for adding context to a transaction
* **Receipt** — Whether a receipt has been uploaded or matched
* **Reconciliation status** — Whether the transaction has been reconciled against a bank statement. → [Reconciliation](/accountants/close-workflows/reconciliation)
* **Class** — Class and subclass assignments for departmental or location-based tracking. → [Classes](/accountants/bookkeeping-workflows/classes)
* **Matched transfer** — Whether the transaction has been matched to a corresponding transaction on another account. When money moves between two accounts (e.g., a withdrawal from checking and a deposit into savings), both sides should be matched so the movement is recorded as a transfer rather than counted as separate income and expense. → [Transfers](/accountants/bookkeeping-workflows/transfers)

Drag column borders to resize columns.

***

### Filters

Click **Filter** in the top left to narrow the transaction list. You can filter by Date, Category, Account, Class, Amount, Rules, Similar to, Counterparty, Memo, Receipts, Split, Reconciliation, Match, General ledger, Accrual ledger (when accrual is enabled), Ledger type, Locked, Status, and 1099 (Included or Excluded).

**General ledger** filters on the same account shown in the **Cash ledger** column, so the filter chip and the column use different names for it. **Ledger type** filters by account class: Assets, Liabilities, Equity, Income, or Expenses.

You can save specific column and filter combinations as custom views for quick access.

→ [Views](/accountants/collaboration/views)

***

### Edit a transaction

Select a transaction to open the details panel. From here you can update:

* **Category** — The client-facing label used for cash flow reporting
* **Cash ledger** — The account the transaction posts to on the Cash ledger
  * Manually changing the ledger account overrides the default category-to-account mapping
* **Accrual ledger** — The account the transaction posts to on the Accrual ledger
* **Counterparty** — The [vendor or customer](/accountants/bookkeeping-workflows/counterparties) associated with the transaction
* **Entity** — Move the transaction to a different [entity](/accountants/setting-up/multi-entity)
* **Memo** — Add [context](/accountants/collaboration/memos) to the transaction
* **Receipt** — Upload or match a [receipt](/accountants/bookkeeping-workflows/documents) to the transaction
* **Match** — Match the transaction to a [corresponding transfer](/accountants/bookkeeping-workflows/transfers) on another account

Other fields that cannot be edited in details can be edited in-line by exposing the relevant column on the Transactions tab via [Views](/accountants/collaboration/views).

The details panel **⋯** menu also includes **Copy transaction link** and, on business transactions, **View journal entry**. Personal transactions do not post to the general ledger, so the option is hidden on them.

When no rows are selected, keyboard shortcuts act on the focused row: **c** (category), **m** (memo), **e** (entity), **g** (cash ledger).

→ [Categorization](/accountants/bookkeeping-workflows/categorization)\
→ [Categories vs General Ledger](/accountants/bookkeeping-workflows/categorization/categories-vs-general-ledger)\
→ [Accrual tasks](/accountants/close-workflows/tasks/accrual-tasks)

***

### Bulk actions

Select multiple transactions to act on them at once. You can select transactions by clicking with **Shift** held.

When rows are selected, a footer shows **N selected** and **Select all**. Click **Actions** (⌘K) to open a command menu with bulk updates, including:

* Set category, counterparty, class, memo, or entity
* Set cash ledger or accrual ledger
* Remove counterparty, classes, or memo
* Unmatch all or Unsplit all
* Create task or Reconcile Gusto
* Copy URL

**Create task** attaches the selected transactions to a task you can assign to a team member or client, and the task inherits the column layout from your current Transactions view. **Copy URL** generates a direct link to the selected transactions for sharing outside of Kick.

Many actions have single-key shortcuts in the menu (C, V, L, G, E, M, T, and others).

→ [Tasks](/accountants/close-workflows/tasks)

***

### Create a one-off transaction

If you need to record a transaction that didn't come through a connected account or import — such as a cash payment or an off-platform exchange — you can create one manually.

1. Click the (+) icon in the top right, or press cmd + k on your keyboard
2. Click **Add transaction**
3. Enter the transaction details: date, description, amount, and entity
4. Click **Save**

The transaction appears on the Transactions tab, where it can be edited or deleted, and posts to the Cash on Hand account on the Balance Sheet.


# Deleting Transactions

Manage transactions that should not be included in business financials.

Transactions you created manually or imported from files can be deleted. Transactions from connected bank accounts and integrations cannot be deleted directly, but can be removed if needed during [Reconciliation](/accountants/close-workflows/reconciliation).

***

### When you can delete a transaction

Delete is available for:

* **Manual transactions** — Transactions you entered directly in Kick
* **Imported transactions** — Transactions created from CSV or PDF statement imports
* **Gusto reconciliation lines** — Only the specific lines with "Reconciliation transaction" in the bank description (e.g., "Reconciliation transaction for Net Pay"). These are adjustment entries Gusto creates to true up payroll clearing accounts, not actual bank activity.
* **Stale pending transactions** — Pending transactions with a date more than one week in the past. These are typically transactions the bank never finalized or that were replaced by a cleared version.

To delete a transaction:

1. Select the transaction to open the details panel
2. Click the options menu (⋯)
3. Select **Delete**
4. Confirm the deletion

<div data-with-frame="true"><figure><img src="/files/bd9LwtPctrTcYiVvrdVb" alt=""><figcaption></figcaption></figure></div>

A brief **Undo** option appears after deletion. Once dismissed, the transaction is permanently removed.

***

### When delete is blocked

Delete is not available when:

| Condition                     | Why                                                                                                                       |
| ----------------------------- | ------------------------------------------------------------------------------------------------------------------------- |
| Connected account transaction | Transactions from Plaid, Stripe, Mercury, Ramp, and other live syncs mirror the bank — they can't be deleted individually |
| Locked period                 | The transaction falls within a locked bookkeeping period                                                                  |
| Reconciled transaction        | The transaction is part of a completed reconciliation                                                                     |

{% hint style="info" %}
If a transaction is locked or reconciled, you'll need to unlock the period or undo the reconciliation before deletion becomes available.
{% endhint %}

***

### Handling bank-synced transactions

Transactions from connected accounts can't be deleted because they reflect actual bank activity. If you need to adjust how a synced transaction appears in your books, use one of these approaches instead:

* **Recategorize** — Update the category or GL account to change how the transaction posts
* **Split** — Break the transaction into multiple line items with different categories, classes, or entities
* **Match as transfer** — Pair it with a corresponding transaction on another account so the movement is recorded as a transfer rather than income or expense
* **Categorize as Personal** — Categorize transactions that shouldn't affect the business books (e.g., personal expenses on a business card) as Personal. This category maps to Owner Draws or Distributions on the Balance Sheet.

***

### Removing imported transactions in bulk

To undo an entire import rather than deleting transactions one by one, remove the source document. This deletes the file and all transactions created from it.

From **Account settings**:

1. Go to the account's settings and find the imported files section
2. Click the trash icon on the file you want to remove
3. Confirm — this removes the document and its transactions in one step

{% hint style="warning" %}
Removing imported transactions cannot be undone.
{% endhint %}


# Personal to Business

Have your clients connect their personal accounts to Kick to capture all deductions.

## The Personal Entity

### Overview

Every Kick account comes with a **Personal Entity** by default. This is a feature unique to Kick. Unlike traditional bookkeeping and accounting software, Kick recognizes that most small and mid-sized business owners regularly mix personal and business finances. The Personal Entity gives your client a dedicated place to connect all of their personal financial accounts, so personal transactions are always visible and easy to act on without ever polluting the business books.

As an accountant managing clients on Kick, understanding how the Personal Entity works will help you catch deductible expenses that might otherwise be missed, keep your client's GL clean, and streamline your monthly review process.

***

### What Is the Personal Entity?

The Personal Entity is a separate entity within your client's Kick workspace that houses all of their personal financial accounts, including personal bank accounts, personal credit cards, and more.

Transactions pulled in from personal accounts **do not automatically flow into the General Ledger (GL)**. Instead, they are surfaced on the **Transactions tab**, where you or your client can review each one and decide whether it belongs in the business books.

This separation ensures that personal spending never accidentally appears on financial statements, while still giving you full visibility into transactions that may have a business purpose.

***

### Connecting Personal Accounts

Your client can connect any number of personal financial accounts to the Personal Entity, including:

* **Personal bank accounts**
* **Personal credit cards**
* **Any other personal financial accounts** connected via Plaid or a supported direct integration

All connected accounts will feed transactions into the Transactions tab for review. There is no limit to how many personal accounts can be connected.

***

### Reviewing Personal Transactions

To review personal transactions for a client:

1. Navigate to the **Transactions tab**
2. Filter by entity = **Personal** to isolate transactions from the client's personal accounts
3. Review each transaction to determine whether it has a business purpose
4. For transactions that belong in the business books, move them from Personal to Business directly from this view

***

<div data-with-frame="true"><figure><img src="/files/F4OndQKhlGOfNfD5CCjP" alt=""><figcaption></figcaption></figure></div>

### Moving Transactions from Personal to Business

When you move a transaction from the Personal Entity to a business entity, you can:

* **Assign the correct category** for the expense
* **Select the destination entity** if your client has multiple businesses
* **Move transactions in bulk** by selecting multiple transactions and moving them together, making the review process faster for clients with high transaction volumes

Once moved, the transaction is posted to the selected business entity's GL just like any other transaction and will appear on the relevant financial statements. The other side of each expense moved from Personal to Business is treated as a Contribution into the business.

***

### What Stays in the Personal Entity

Any transaction you do not move to a business entity remains in the Personal Entity. Transactions left in the Personal Entity:

* **Do not appear on any financial statements**, including the P\&L, Balance Sheet, or any tax-ready reports
* **Do not affect the GL** in any way
* **Remain visible** on the Transactions tab for future review at any time

***

### Best Practices for Accountants

* **Set expectations during onboarding.** Let clients know that personal accounts live in the Personal Entity and that transactions won't hit the books until reviewed.
* **Build a regular review cadence.** Review Personal transactions periodically to catch business expenses paid personally before close.
* **Use it to surface deductions.** The Personal Entity is one of the best tools for finding overlooked write-offs, especially for owners who frequently use personal cards for travel, meals, or other expenses.
* **When in doubt, leave it.** If you're unsure whether a transaction is business-related, leave it in Personal and confirm with your client before moving it over.

***

### Summary

The Personal Entity is one of Kick's most distinctive features and one of the most valuable for accountants managing clients with blended finances. By keeping personal transactions visible but separate from the GL, Kick gives you a clean, controlled way to capture every potential business expense without the risk of personal spending finding its way into your client's books.


# Transfers

Match transfers between accounts so money movement is recorded accurately and doesn't inflate your client's income or expenses.

### How transfers work in Kick

When money moves between two accounts — checking to savings, Stripe to checking, checking to a credit card — both sides of that movement need to be linked. Otherwise, the outflow can look like an expense or uncleared transaction on one account and the inflow can look like income or an uncleared transaction on the other.

Kick uses clearing accounts to track transfers. When a transaction is categorized as a transfer, it posts to a clearing account rather than hitting the P\&L. When the other side of the transfer is matched, the clearing account nets to zero. If it doesn't net to zero, one side of the transfer is either missing or miscategorized.

This approach gives you real-time visibility into money in transit — funds that have left one account but haven't settled in another yet. The tradeoff is that unmatched transfers will carry a balance in the clearing account until both sides are present and matched.

{% hint style="info" %}
**Note:** A single real-world transfer appears as two separate transactions in Kick — one on each account. Both need to be categorized as Transfer (or Credit Card Payment) and matched to each other for the clearing account to net to zero.
{% endhint %}

***

### Transfer types

What happens on the GL depends on the relationship between the two accounts involved.

**Bank to bank (same entity)** — Both sides post to Bank Transfer Clearing. When matched, the clearing account nets to zero.

**Payment processor to bank** — When a processor like Stripe or PayPal pays out to a connected bank account, both the payout and the deposit post to Payment Transfer Clearing. When matched, the clearing account nets to zero. If the bank deposit is categorized as income instead of Transfer, revenue will be double-counted between the processor and the bank account.

→ [Payment Processors](/accountants/setting-up/integrations/payment-processors)

**Credit card payment** — When a bank account pays a credit card, both sides post to Credit Card Clearing. The bank side records the outflow; the credit card side records the payment received. When matched, the clearing account nets to zero.

**Intercompany (cross-entity)** — When money moves [between two different entities](/accountants/setting-up/multi-entity), the sending entity records an Intercompany Receivables and the receiving entity records an Intercompany Payables. Kick creates these entries automatically when a cross-entity transfer is matched.

**Owner transactions** — Transfers between a [personal account](/accountants/bookkeeping-workflows/personal-to-business) and a business account don't use a clearing account. They post directly to equity — Distributions when money moves from business to personal, Contributions when money moves from personal to business.

***

### Matching transfers

Kick automatically matches transfers when both sides are present. The matching algorithm looks for transactions with opposite amounts on different accounts within a few days of each other.

Matching runs when new transactions sync, new accounts are connected, or a transaction is manually categorized as Transfer or Credit Card Payment.

**Suggested matches** — If Kick finds a likely match but isn't fully confident, it surfaces a suggested match in the match drawer's **Suggested** list. Open the transaction and click **Find a transaction match** to review suggestions. Select a suggestion, then confirm it with **Match** on a cash-basis entity or **Confirm match** on an accrual-basis entity. To reverse a match, click **Unmatch** on the matched row.

**Manual matching** — If none of the suggestions fit, switch the drawer from **Suggested** to **All** and search for the transaction yourself. Selecting and confirming works the same way.

{% hint style="info" %}
**Tip:** If a transaction is categorized as Transfer or Credit Card Payment but no match is found, either the other account involved needs to be connected to Kick, or the transaction's category needs to be updated.
{% endhint %}

***

### Automation

Transfer Rules let you define custom conditions to automatically match transfers between specific accounts. This is useful for recurring transfers that follow a predictable pattern — like Stripe payouts landing in a specific bank account.

→ [Rules](/accountants/bookkeeping-workflows/rules)


# Rules

Automate your bookkeeping by creating Rules.

The best way for Kick to learn from any transaction changes you make is to create a Rule.

Rules ensure that Kick will accurately update future transactions for you, further personalizing your bookkeeping experience and saving you time.

***

## Rule Types

Kick has four rule types: **Transactions**, **Accounting**, **Transfer**, and **Split**. Transactions, Transfer, and Split rules run when transactions are first synced or a new rule is created. Accounting rules run every time a transaction is updated or recategorized.

***

### Transactions Rules

Transactions Rules run when new transactions sync into Kick or when a new Transactions Rule is created. They’re ideal for setting simple, proactive Rules to categorize transactions or move them to a different entity - including your Personal entity.

Transactions Rules currently support the following actions:

* **Change Category** – Automatically apply a specific category when certain conditions are met
* **Move to a different Entity** – Reassign transactions to a different Business entity or move between Business and Personal
* **Assign Classes** – After creating custom Classes (available on Plus), assign them to transactions
* **Assign Vendors or Customers** – Assign a Vendor or Customer to each transaction based on the conditions you set, automating Revenue and Expense insights
* **Add Memos** – Add additional context to transactions for your own records or for your CPA come tax time

Examples:

* Recategorize all **Amazon** transactions from *Supplies & Equipment* to *Goods & Materials*

<div data-with-frame="true"><figure><img src="https://prod-uk-services-workspac-workspacefilespublicbuck-vs4gjqpqjkh6.s3.amazonaws.com/w_01JKXKPYB5Q0PBMZBNY0T9CKGA/wFile_01JXYECB6V2VG4NP7P3CDZTEZF" alt=""><figcaption></figcaption></figure></div>

* Move all **Apple** transactions from one Business entity to another and categorize as *Computers*

<div data-with-frame="true"><figure><img src="https://prod-uk-services-workspac-workspacefilespublicbuck-vs4gjqpqjkh6.s3.amazonaws.com/w_01JKXKPYB5Q0PBMZBNY0T9CKGA/wFile_01JXYEDEZ3KVQXCT7F65RGRWMJ" alt=""><figcaption></figcaption></figure></div>

Rules are especially helpful if you’re using **Custom Categories**, since these categories are not automatically assigned by Kick’s categorization model.

Creating a Rule ensures that your Custom Categories are automatically applied to the right transactions going forward.

***

### Accounting Rules

Accounting Rules run every time a transaction is updated or recategorized.

These Rules are ideal for ensuring your transactions are consistently mapped to the correct account in your **Chart of Accounts (CoA)**.

Accounting rules are designed to specifically target both the Cash and Accrual [ledgers](/accountants/setting-up/ledgers).

Examples:

1. Map *Amazon* transactions to COGS on my Cash ledger and Inventory on my Accrual ledger, and auto-confirm (post without my review) to the Accrual ledger.

<div data-with-frame="true"><figure><img src="/files/qOhAqxZHVT5gnDc7IZrU" alt=""><figcaption></figcaption></figure></div>

2. Map *Sponsorship Income* over $5,000 to Revenue on my Cash ledger and Deferred Revenue on my Accrual ledger. Do not auto-confirm.

<div data-with-frame="true"><figure><img src="/files/9egm41WkOAlxc2uAoDxO" alt=""><figcaption></figcaption></figure></div>

Selecting **auto-confirm** for Accrual ledger rules will automatically post transactions that meet the rule conditions to your Accrual ledger. Accrual rules without auto-confirm enabled will be surfaced in an accrual task for your review.

Review your Accounting rule application by viewing both the Cash and Accrual ledger columns on the Transactions tab using Views.

<div data-with-frame="true"><figure><img src="/files/YtaOyzYGgAwcohcf7F78" alt=""><figcaption></figcaption></figure></div>

Only the Cash ledger is available in Accounting rules for clients or entities without an Accrual ledger enabled.

→ [Accrual tasks](/accountants/close-workflows/tasks/accrual-tasks)\
→ [Views](/accountants/collaboration/views)

***

#### Kick Rules <a href="#kick-rules" id="kick-rules"></a>

Kick Rules apply to transactions that aren’t affected by any custom Accounting Rules. They serve as the [default mapping](/accountants/bookkeeping-workflows/categorization/categories-vs-general-ledger) between your transaction categories and the Chart of Accounts. If no Accounting Rule is triggered, Kick will use these built-in Rules to assign transactions to the appropriate accounts.

These Rules cannot be edited or deleted, but they’re easy to override by creating a custom Accounting Rule. Accounting Rules always take priority - Kick Rules will never override them.

***

### Transfer Rules

Transfer Rules run automatically when new transactions sync into Kick or when you create a new rule. They let you set custom conditions to match transfers between accounts, ensuring both sides of the transaction are properly linked.

Transfers—such as bank-to-bank, payment processor-to-bank, or bank-to-credit card—should always be matched in Kick to keep your books accurate. If a transaction is categorized as **Transfer** or **Credit Card Payment** but no match is found, either:

* The other account involved in the transfer may need to be connected to Kick, or
* The transaction category may need to be updated.

Example:

* Match *Stripe Payouts* from Stripe to *Stripe Deposits* into Mercury 8523

<div data-with-frame="true"><figure><img src="https://prod-uk-services-workspac-workspacefilespublicbuck-vs4gjqpqjkh6.s3.amazonaws.com/w_01JKXKPYB5Q0PBMZBNY0T9CKGA/wFile_01K5QH22VQC363X7C5F5953ZBD" alt=""><figcaption></figcaption></figure></div>

***

### Split Rules

Split Rules run automatically when new transactions sync into Kick or when you create a new rule. They let you set custom conditions to split transactions across categories or entities based on percentage or amount.

Examples:

* Split *Anthem Blue Cross* transactions between *Health Insurance* and *Fees* by Amount

<div data-with-frame="true"><figure><img src="https://prod-uk-services-workspac-workspacefilespublicbuck-vs4gjqpqjkh6.s3.amazonaws.com/w_01JKXKPYB5Q0PBMZBNY0T9CKGA/wFile_01K5QHD3V2GEJ41FM0ZBY66Y9C" alt=""><figcaption></figcaption></figure></div>

* Split my *Kick Bookkeeping* transactions evenly across my 3 business entities by percentage

<div data-with-frame="true"><figure><img src="https://prod-uk-services-workspac-workspacefilespublicbuck-vs4gjqpqjkh6.s3.amazonaws.com/w_01JKXKPYB5Q0PBMZBNY0T9CKGA/wFile_01K5QHHQ9VS708PX5W5M6QD32G" alt=""><figcaption></figcaption></figure></div>

* Move 50% of my *Travel* expenses to *Personal*

<div data-with-frame="true"><figure><img src="https://prod-uk-services-workspac-workspacefilespublicbuck-vs4gjqpqjkh6.s3.amazonaws.com/w_01JKXKPYB5Q0PBMZBNY0T9CKGA/wFile_01K5QHMVXXF83T307Z8DV3ZPYJ" alt=""><figcaption></figcaption></figure></div>

***

## Rule Groups

Most accounting rule engines rely on a long, disorganized list of Rules that are hard to manage at scale. Kick breaks this pattern with **Rule Groups**—a system that makes it simple to organize and prioritize your Rules with full transparency.

To create a Rule Group, click **Add rule group** in the top right corner of the Rules tab. To rename an existing group, including the default **General Rule Group**, click the three dots next to the group name and select **Edit**.

To change priority, just drag and drop your Rule Groups into the order you want—so you always know exactly how Rules will be applied.

***

## Editing Rules

#### Editing a Rule <a href="#editing-a-rule" id="editing-a-rule"></a>

To edit a Rule, hover over it and click the three dots (`⋯`) at the far right of the row. From the dropdown menu, select **Edit**. This opens the Rule details so you can update the Conditions or Actions.

#### Archiving a Rule <a href="#archiving-a-rule" id="archiving-a-rule"></a>

To temporarily stop a Rule from running, click the three dots (`⋯`) and select **Archive**. Archived rules remain in your list but won't apply to future transactions until you select **Enable**. Use the **Rules status** filter to show **Enabled** or **Archived** rules.

#### Deleting a Rule <a href="#deleting-a-rule" id="deleting-a-rule"></a>

To permanently remove a Rule, use the same `⋯` menu and choose **Delete**. This action cannot be undone, so make sure you no longer need the Rule before deleting it.

#### Rule Prioritization <a href="#rule-prioritization" id="rule-prioritization"></a>

Rules are applied in order from top to bottom. You can drag and drop Rules to change their priority.

#### Conflicting Rules <a href="#conflicting-rules" id="conflicting-rules"></a>

If two or more Rules could apply to the same transaction, only the first matching Rule (based on priority) will run. Reorder or edit your Rules if one is unintentionally blocking another from applying.

***

### AI-created rules

When you confirm applying a change to similar transactions, Kick creates an AI rule that appears in your rules list. These rules can only be **Overridden**, not edited or archived. Select **Override** to create your own editable rule with the same conditions and actions.


# Splits

Split transactions across categories, classes, entities, and more.

Splits let you break a single transaction into multiple line items, each with its own category, entity, or class assignment. This is useful when a single charge covers multiple expense types, needs to be allocated across entities, or includes components that belong on different parts of your financials (e.g., a loan payment with principal and interest).

***

### Splitting a Transaction Manually

1. Select the transaction from the [**Transactions**](https://use.kick.co/transactions) tab.
2. Click the **Split transaction** icon in the transaction footer.
3. Add line items and allocate each portion by amount or percentage.
4. Assign a category (and optionally a counterparty, class, or entity) to each line.

The split amounts must add up to the original transaction total.

To undo a split, select the transaction and click **Unsplit**. The transaction will revert to a single line item.

***

### Split by Amount vs. Percentage

You can split by fixed dollar amounts or by percentage — whichever fits the use case:

* **By amount** — Best when you have exact figures (e.g., a loan payment where the amortization schedule gives you a specific principal and interest breakdown).
* **By percentage** — Best for recurring allocations (e.g., splitting shared expenses across entities based on ownership or usage).

***

### Splitting Across Entities

Splits can allocate portions of a transaction to different entities within the same workspace. For example, if a shared expense like rent or a software subscription covers multiple businesses, you can split the transaction and assign each portion to the relevant entity.

When you split transactions across multiple entities, Kick automates the intercompany payable and receivable journal entry creation for you so everything is tracked correctly on your Balance Sheets.

***

### Automating Splits with Rules

For recurring transactions that always need the same split, create a [**Split Rule**](/accountants/bookkeeping-workflows/rules) to handle it automatically.

Split Rules run when new transactions sync into Kick or when a new rule is created. You can set conditions based on description, amount, vendor, or other transaction attributes, then define the split allocation.

Examples:

* Split Anthem Blue Cross transactions between Health Insurance and Fees by amount
* Split a bookkeeping fee evenly across 3 business entities by percentage
* Move 50% of Travel expenses to Personal

***

### Integration Splits

Some integrations automatically split transactions when connected:

* **Stripe** — Splits payouts into gross revenue, fees, and net. Also splits invoice line items and Stripe Capital loan payments.
* **PayPal** — Splits payments into revenue and fees.
* **Gusto** — Each payroll run splits as a single split transaction, breaking out wages, payroll taxes, employee benefits, and other payroll-related expenses.

These splits happen automatically once the integration is fully synced. If you've connected an integration but don't see splits, verify it's connected as a direct integration (not just reflected through a bank feed) and allow up to 24 hours for processing.

***

### Things to Keep in Mind

* Splits on locked transactions cannot be modified or undone.
* Split activity is logged in the **Activity** tab for audit purposes.
* Each line of a split can have its own class assignment, which is useful for department or project-level tracking.


# Classes

Classes let you organize transactions beyond standard categorization by grouping them under any custom system that fits your business.

Track income and expenses by location, department, property, project, product, funds, or any other dimension using classes and subclasses.

Classes are available on the Plus plan and above. You can create an unlimited number of classes and subclasses.

### Creating classes and subclasses

A **class** is the grouping type (e.g., Location, Department, Property). **Subclasses** are the labels you assign underneath it (e.g., Los Angeles and San Diego under a Location class).

Subclasses can be nested up to five levels deep, so you can build hierarchies like **Region → Country → City** when you need more detail.

To create a class:

1. Go to **Accounting → Classes**
2. Click **Add class**
3. Enter the class name and click **Create**

To add a subclass:

1. Find the class you want to add a subclass to
2. Click the **+** icon on that row
3. Enter the subclass name and click **Create**

You can also choose a **Parent class** directly in the create form to place a class anywhere in the hierarchy.

{% embed url="<https://player.mux.com/lRGxqcCYQYK2FBevXlbkNso7wvPspSiYGRzSc02tMsfs>" %}

#### Managing your classes <a href="#managing-your-classes" id="managing-your-classes"></a>

* **Rename** – Open the row's menu and choose **Rename**.
* **Delete** – Open the row's menu and choose **Delete**. Deleting a class also deletes its subclasses and unassigns them from any transactions, so you'll be asked to confirm first.
* **Reorder** – Drag classes and subclasses using the drag handle to change their order within the same parent.

{% embed url="<https://player.mux.com/ekOjoRT02jizpF3HvgVnEyK7G3aP3R5hbNsai3NONPEc>" %}

Class names must be unique among siblings (classes under the same parent). You can reuse the same name in different branches — for example, a **Sales** subclass can exist under both a **North America** class and an **EMEA** class.

#### Class and subclass examples <a href="#common-classes-and-subclasses" id="common-classes-and-subclasses"></a>

* **Location:** Los Angeles, San Diego
* **Department:** Marketing, Sales
* **Property:** Oak Street, Cove Way
* **Project:** Design, Development, Launch
* **Product:** Product 1, Product 2

***

### Assigning classes to transactions

You can assign classes to a transaction from the **Transactions** tab:

1. Reveal the **Class** column using [**Views**](/accountants/collaboration/views)
2. Click the dropdown in this column for any transaction
3. Select the classes that apply

You can also set a class from the transaction details drawer using the **Class** field.

To assign classes in bulk:

1. Select multiple transactions
2. Click **Actions** (⌘K) and choose **Set class**
3. Select the relevant class or subclass
4. Click **Apply**

To clear class assignments in bulk, select the transactions and choose **Remove classes** from the same **Actions** menu.

{% embed url="<https://player.mux.com/n6YpPR1SwWijBSUhcOhrlE68wr74iIa2enmAYB29yrI>" %}

#### Assigning classes to splits <a href="#assigning-classes-to-splits" id="assigning-classes-to-splits"></a>

When you split a transaction, each split line can have its own class assignments. Set the class on each split line so different portions of a transaction can be tracked under different classes.

***

### Classes on other records <a href="#classes-on-other-records" id="classes-on-other-records"></a>

Classes aren't just for bank transactions. You can also assign them per line item on:

* **Journal entries** – Use the **Class** column when adding journal entry lines.
* **Invoices** – Set a **Class** on each invoice line item.
* **Bills** – Set a **Class** on each bill line item.
* **Products & services (catalog items)** – Assign a default class to an item so it's applied automatically to invoice lines that use it.

***

### Automating class assignment

Create a rule to automatically assign classes based on conditions like bank description, account, counterparty, or amount.

1. Go to **Rules**
2. Click **Add rule**
3. Set your conditions
4. Under actions, select **Set class**
5. Choose the class and subclass to assign

{% embed url="<https://player.mux.com/tdi2v2npwAv19hHKU3ZcyRGk8761HI7iZ9bPvLIj7bo>" %}

Rules run automatically when new transactions sync, so once configured, matching transactions are classified without manual intervention.

This is especially useful when you need consistent class assignment across high-volume transaction types — like tagging all transactions from a specific account to a particular location or department.

You can also use **Class** as a rule *condition* — for example, to apply additional actions to transactions already assigned to a given class. Selecting a parent class in a condition automatically includes all of its subclasses.

See [**Rules**](/accountants/bookkeeping-workflows/rules) for more on setting up automation.

***

### Classes from integrations <a href="#classes-from-integrations" id="classes-from-integrations"></a>

You don't always have to create classes by hand. Kick can bring them in from connected tools:

* **Gusto and Ramp** – Departments from Gusto and Ramp automatically sync as subclasses under an auto-created **Department** class. No extra setup needed.
* **QuickBooks Online** – When migrating from QuickBooks Online, you can choose to import your existing classes. In the migration step titled **What would you like to migrate?**, enable the **Classes** option to bring over your class and location tags from QuickBooks, preserving their nesting.

***

### Reporting by class <a href="#reporting-by-class" id="reporting-by-class"></a>

Classes make it easy to see performance broken out by any dimension you track.

**Filter by class.** In Accounting reports — including Profit & Loss, Balance Sheet, General Ledger, Trial Balance, and Expenses by vendor — use the **Class** filter to narrow results. Filter modes include:

* **Any selected class** – show records matching any of the selected classes
* **Every selected class** – show records matching all selected classes
* **Exclude selected class** – hide records with the selected classes
* **No classes** – show only records with no class assigned

<div data-with-frame="true"><figure><img src="/files/SAFhQ02DWNJwSnO614K3" alt=""><figcaption></figcaption></figure></div>

**Break reports into columns by class.** On Profit & Loss, Balance Sheet, and Cash Flow Statement, use the columns option to view **By class**, which splits the report into a column for each class (and its nested subclasses). This lets you compare locations, departments, or projects side by side.

***

### **FAQs**

<details>

<summary><strong>How many classes and subclasses can I create?</strong></summary>

You can create an unlimited number of classes and subclasses. Subclasses can be nested up to five levels deep.

</details>

<details>

<summary><strong>Can one transaction have more than one class?</strong></summary>

Yes, but only one class per dimension. A transaction can have both a Location and a Department, for example, but not two different Locations.

</details>

<details>

<summary><strong>Which plans include classes?</strong></summary>

Classes are available on the Plus plan and above.

</details>

<details>

<summary><strong>Can I import my classes from QuickBooks?</strong></summary>

Yes. When you migrate from QuickBooks Online, enable the **Classes** option in the migration step to bring over your existing classes and location tags.

</details>

<details>

<summary><strong>Can I assign classes to invoices, bills, and journal entries?</strong></summary>

Yes. Classes can be assigned per line item on invoices, bills, and journal entries, and you can set a default class on catalog items (products & services).

</details>


# Counterparties

Manage your customers and vendors across entities in a consolidated view.

Counterparties are a consolidated list of your client's vendors and customers. Each counterparty can act as a vendor, a customer, or both.

***

### The Counterparties tab

Go to **Accounting →** [**Counterparties**](https://use.kick.co/counterparties) to see a grouped directory of vendors and customers. The table shows:

* **Name** — Counterparty name, with per-account child rows underneath
* **Accounts** — GL accounts used by that counterparty
* **Created by** — Where the counterparty came from (manual entry, integration, and so on)
* **Journal entries** — Count of journal entry lines
* **Debit** and **Credit** — Totals for the selected period
* **1099 eligible** — Whether the counterparty is flagged for 1099 reporting

A **No counterparty** row captures activity without an assigned counterparty. Click any counterparty row to open a details panel on the right.

Set a date range and use the **entity** selector at the top to scope the view. Click **Filter** to narrow by **Account**, **General ledger**, **Amount**, **1099** (Eligible or Not eligible), **Entry source**, **Ledger type**, or **Created by**.

Built-in views include **1099 review** lists for the current and prior tax years. Selecting one scopes the page to a single entity and replaces the date range with a **year** selector.

The row **⋯** menu offers **Edit**, **View transactions**, **View GL**, **Merge**, and **Delete**. Download the list as CSV from the download button in the header.

{% hint style="info" icon="lightbulb" %}
Counterparties are not entity-specific. A counterparty created in one entity is available across all entities.
{% endhint %}

***

### How counterparties are created

Kick automatically generates and assigns counterparties when transactions sync from connected integrations or are imported. Kick also syncs counterparties directly from certain integrations:

* **Ramp** — vendors created in Ramp are synced if you're using their bill pay product
* **BILL** — vendors and customers created in BILL are synced
* **Stripe and PayPal** — customers are synced if you're using either platform to collect payments

You can also create counterparties manually. Click **Add new** in the top right corner of the Counterparties tab. The only required field is the name. You can also add an email address, phone number, website, and address.

***

### Updating counterparties

To change the counterparty on a transaction, go to **Transactions** and use the dropdown in the **Counterparty** column.

To assign a counterparty in bulk, select multiple transactions (shift + click), click **Actions** (⌘K), and choose **Set counterparty**.

Select counterparties in the directory to bulk **Mark 1099 eligible** or **Unmark 1099 eligible** from the Actions menu.

***

### Automating counterparty assignment

You can create [Rules](/accountants/bookkeeping-workflows/rules) to automate counterparty assignment based on any combination of: entity, category, amount, bank description, account, date, or class.

***

### Reviewing counterparties at close

The **Insights** tab lets you drill into each category to see all the counterparties included in it — a useful way to spot miscategorized transactions before closing a period.

For a detailed view of vendor spend over time, use the [**Expenses by Vendor**](/accountants/reports/expenses-by-vendor) report on the **Accounting** tab.


---

[Next Page](/llms-full.txt/1)